 How important is your data? Most of us realize that a good backup is worth it’s weight in gold. Many of us have backup methods are we back up our computer data and even sometimes take that data offsite. But more and more we are finding our most important computing device these days to be our smart phone or tablet. These devices are with us all the time. We store information in them that’s extremely personal to us but critical for us to have available. Having a good method to backup your handheld device is extremely important. If you have an iOS device, there are typically two methods to choose for backup.
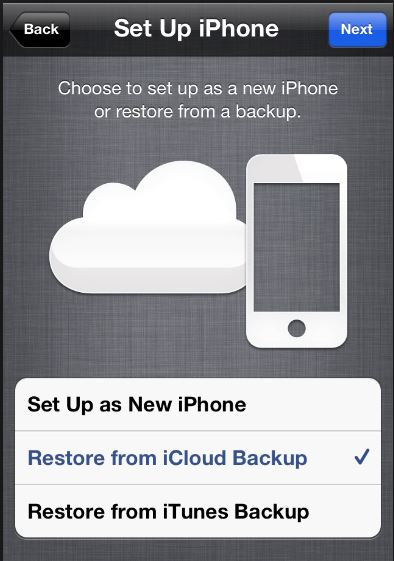
Backing up to iCloud
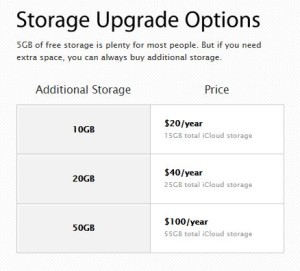
A wireless backup in the cloud. How perfect could that be. Seems like a no-brainer to use this method for backing up our device. There are problems associated with a cloud-based backup strategy. The biggest problem is the limited amount of storage space Apple provides us on iCloud. Sure iCloud is a free service and you can add additional storage space for a cost. Unfortunately these costs are not trivial. Many of us have iPhones or iPads with a relatively large storage capacity.
 When you sign up for iCloud, you automatically get 5GB of free storage. That may be plenty of room, particularly if you only have one device, because of the way iCloud stores your content. Your purchased music, movies, apps, books, and TV shows — as well as your Photo Stream — don’t count against your free storage. That 5GB goes a long way for your mail, documents, account information, settings, and other app data. And if you need more storage you can easily purchase an upgrade right from your device. But many people have a single issue that causes them to run out of space very quickly.
Photos you take on your device go into the Camera Roll. All these photos get backed up to iCloud and DO use part of the storage that iCloud provides you. People who routinely keep hundreds of photos in the camera roll will quickly exhaust the 5GB of space Apple provides and not realize why they have done so. If you sync your photos to your computer, or be sure you have saved them there from your Photo Stream, you should be able to remove these photos from the Camera Roll.
Many people believe they need to leave them there to keep them on the phone. But, you have to keep in mind that if you have Photo Stream turned on, they will be copied to the stream and available from that selection on your device.
Another way to deal with this is to sync your photos to your computer. This is in my opinion a preferred method for ensuring those photos are backed up. In general, I recommend people keep no more than 100 photos in the Camera Roll. With that many photos, a standard iCloud account should provide enough storage for two iOS devices.
Backing up to your computer
In the early days of iOS backing up your computer was the only option. Your computer typically has larger amounts of storage has the ability to keep copies of the backup. But even this can cause a space problem in the attic. If you have a new machine with an SSD drive, you may have limited storage space available. Backing up your device to your computer will make a copy of everything on it so it’s much larger than the storage space that iCloud uses for it’s backups. Since iCloud storage eliminates the need to copy anything you’ve purchased from Apple, it is able to store more information in a smaller space. When backing up to your computer though all information gets copied and takes much more space.
If you have storage space on your computer, backing up to get may be a good solution for you. By plugging your device into your computer, you not only can back it up, but you can download those photos out of the camera roll too.
But just like backing up to iCloud, there are things you need to be aware of when backing up to your computer. When you back up your computer it keeps a full copy of the device. If you change devices often, you may have full copies of older devices you no longer own still stored on your computer.
 If you want to delete a backup created by iTunes, follow these steps:
- Open iTunes Preferences:
- Windows: Choose Edit > Preferences
- Mac: Choose iTunes > Preferences
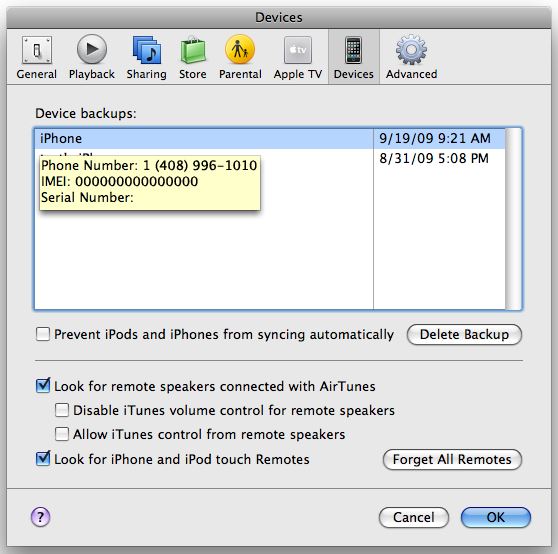
- Click Devices (the iOS device does not need to be connected).
- iTunes will show the phone number, IMEI, and serial number of the backed up iPhone when you position your mouse pointer over a backup (iTunes shows only the serial number for iPad and iPod touch). Use this to locate the backup for the iOS device you want to delete. Select the backup you want to remove and click Delete Backup.
- Confirm you wish to remove the selected backup by clicking Delete Backup.
- Click OK to close the iTunes Preferences Window.
Deleting extra copies of old devices can save significant storage on your computer.
George’s Recommendation
Because backing up is something that needs to be seamless, I recommend using iCloud is your main backup process. In doing this, you must keep in mind that you need to sync your photos once in a while to your computer to reduce the number of images that are stored in your camera roll. As long as you do that, iCloud storage is usually sufficient to be able to backup both your iPhone and your iPad if you have one.
[stextbox id=”info” caption=”Turning on iCloud for Backup”]
iCloud automatically backs up the most important data on your device using iOS 5 or later. After you have enabled Backup on your iPhone, iPad, or iPod touch in Settings > iCloud > Backup & Storage, it will run on a daily basis as long as your device is:
- Connected to the Internet over Wi-Fi
- Connected to a power source
- Screen locked
You can also back up manually whenever your device is connected to the Internet over Wi-Fi by choosing Back Up Now from Settings > iCloud > Storage & Backup
[/stextbox]
