
Spaces has changed a bit in El Capitan. Apple has a great help article that covers how it works in the new operating system version. Here is what Apple has to say:
If your desktop becomes cluttered with open app windows, you can create additional desktops, called spaces, to organize the windows. When you work in a space, you see only the windows that are in that space.
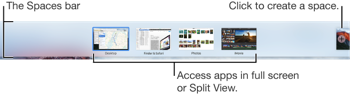
You use Mission Control to show the Spaces bar, where thumbnails represent your spaces and apps you’re using in full screen or Split View.
Create a space
-
Enter Mission Control, then click the Add button
 in the Spaces bar.
You can create up to 16 spaces.
-
When you’re done, click a space in the Spaces bar or a window in Mission Control.
Move between spaces
Do any of the following:
Swipe left or right with three fingers.
Press the Control key and the Right or Left arrow key.
Enter Mission Control, move the pointer to the top edge of the screen to show the Spaces bar, then click a space.
Move an app window from one space to another
Do any of the following:
Drag the window to the edge of the screen. After a moment, the window moves to the next space.
Place the pointer over the window’s title bar. Hold down the trackpad or mouse button, then press the Control key and the Right or Left arrow key.
From the space that has the window you want to move, enter Mission Control. Then drag the window up to the space you want to use.
If you drag the window onto an app in full screen, you can use the apps in Split View.
Assign apps to spaces
If you assign an app (or System Preferences) to a specific space, the app will always open in that space.
-
Press and hold an app’s icon in the Dock.
You may have to first open the app from Launchpad to see its icon in the Dock.
-
From the shortcut menu that appears, choose Options, then one of the following:
-
All Desktops: The app opens in every space.
-
This Desktop: The app opens only in the current space. If you use the app full screen, it appears in its own space.
-
Desktop on Display [number]: The app opens in the current space on a specific display (if more than one display is available).
-
None: The app opens in whichever space you’re using at the time.
-
By default, when you switch to an app, the desktop automatically switches to a space that has open windows for the app. For example, if you create a new TextEdit document in Desktop 3, but TextEdit windows are already open in Desktop 2, your new document opens in Desktop 2. To change this setting, choose Apple menu > System Preferences, then click Mission Control.
Delete a space
-
Enter Mission Control, then move the pointer to the top edge of the screen to show the Spaces bar.
-
Place the pointer over the space you want to delete, then click the delete button that appears.
If the space contains open windows, they are moved to another space.
You can quickly stop using an app in full screen or Split View by moving the pointer over the thumbnail in the Space bar, then clicking the exit button that appears.