Mac Users: You’ve probably been seeing alerts like this one


Apple has announced that macOS 10.14 will be the last version capable of running 32-bit applications.

As Apple finalizes its transition to all-64-bit code, Mojave and High Sierra present an alert like this when you launch a 32-bit application. While it’s not a crisis at present, you’ll need to update or upgrade those applications before you update to macOS 10.15 later this year.

Finding out which of the applications you use each day is a good idea before you upgrade to MacOS Catalina.  St Clair Software has a great little application that can scan your hard disk and list the applications that will have problems.  The application is called Go64 and best of all, its a free download.  Check it out and make sure a critical application to your workflow will not be dying in the next Mac update.

Inexpensive Security cameras for the Home

Wyze Cam V2

In the last year or so, the security camera market for your home has exploded.  Where once there were only a couple of options for cameras to choose from, today there are dozens out there and all have their pluses and minuses.  There is a lot to be said for selecting cameras that work inside the infrastructure that you’re already using in your home.  If you have nest products in your homes perhaps the nest cameras are best for you. If you have Ring products in your home maybe ring deserves a second look. The one thing you will find is that selecting one of these big-name infrastructure‘s will definitely cost you. Not only will the cameras be more expensive, but she’ll be forced to live with limitations with each and every set up.

I have tried a number of these different cameras and until recently I have been using a

mixture of D-link and blink cameras.  My DLink cameras have been around for quite a while and I felt like it was probably time to be in looking at other options.  My Blink cameras are only about a-year-old, and are there outdoor cameras. I really love the way they’ve set these up with being battery powered and waterproof. They definitely have a place in my smart home as my outdoor camera variety.

Recently a friend pointed me to some cameras from a company that’s trying to do things a little differently. They are in the process of building their own security infrastructure around their camera models but their big difference is in price. Rather than paying upwards of $200 for a camera, their cameras start at about 25 bucks shipped.  Obviously at that price you’re expecting quite a few limitations, and I would be remiss if I didn’t say there are a few but when it comes to price performance these little cameras are a great option for you to look at. The company I’m referring to is Wyze https://www.wyze.com/ and their Wyzecam products.  

Right now, these cameras come into varieties. The Wyze cam V2 and the Wyze cam Pan.

Wyze Cam Pan

The Wyze cam V2 is their most affordable model coming in at about $26 shipped.  This camera is well featured including night vision and motion detection and comes on an innovative little base that allows you to be able to turn and left the camera to position it exactly the way you want it. Neither of these cameras require a hub because they connect to your wireless network using Wi-Fi. They’re quite easy to activate using the app for your iPhone or android phone. Once activated, you can set them up to send you alerts based upon motion or sound. The cameras have the ability to automatically go into night mode and use the night vision to be able to see in the dark. They can record video to the cloud automatically through the app and also record to an SD card that you can place in the camera. All in all, these cameras have all the features of the $200 models at only $26.

The second model is called the Wyze cam Pan.  This camera is basically the same camera as described above but has the ability to pan left and right and up and down within the app by moving the camera on a rotating basis. Cameras like this from name brands are always very expensive. But this camera comes in at only $36.  It includes all the features of their less expensive model plus the pan feature. 

Wyze App for iOS

Wyze Is also working on adding external motion detection and door sensors to their product. While announced, these have not been released yet but to be quite inexpensive also. At CES this year, they also described a product that will value to have a external hard drive in your house they records all of your video and allows you to use the hard drive as a personal cloud.  If you have an Alexa display, these cameras also work directly with that. You can say “Alexa, show me The living room camera”, and the display shows you live you with that camera.   

Wyze Is quite an innovative company that has made the decision from the beginning to release products at low-cost. If you’re looking for indoor cameras, these definitely deserve a look. At the price they’re charging you can afford to buy one and try it and even if you don’t like it, you don’t have a lot invested.

Multi Camera Event View in Wyze app

360° Photography

One of the new photo types available with some cameras is 360° photography. The photograph below is a 360° photo taken with a Insta360 One X camera. Photos like this give you the ability to have a perspective of the scene from any direction regardless of the way you were pointing. The camera itself has two lenses each with a 180° field of view. Each lens takes a photo and the two photos are stitched together. As part of the stitching process the software removes the camera from the photo. It’s actually quite interesting to see the results.

Click on the image below and move your mouse around to see the full scene.

Brinno Camera Sunset and Sunrise

This is a full night time lapse including sunset, darkness with stars, moon rise, and sunrise captured with the Brinno Construction camera. The settings for this capture were to take a photo every 20 seconds and create a movie at 15 frames per second. This equates to 5 hours of time lapes per minute of this video.

Brinno Timelapse Camera

Screen Shot 2016-03-21 at 11.27.30 AMFor the last few days I have been working with a new time-lapse camera called Brinno. The Brinno camera is a self contained camera with the main purpose to create time-lapse video.The particular model of brine I am working with is intended to be a construction camera.

Brinno has been a recognized leader in Time-Lapse Cameras. With the industrial-Grade professional construction camera, BCC200, a wire-free, weatherproof camera bundle, offers quick and easy installation, without cumbersome wiring or power requirements. It illustrates the entire project, no matter how many days, months, or years taken, in few minutes instant HDR time-lapse video which presents the project with a high publicity factor on project and marketing management.

The camera is quite easy to setup and configure for the particular need that you want to capture.  You set the camera to take a photo at a particular time intraval and you set the frame rate of the final video the camera creates from the photos.

Screen Shot 2016-03-21 at 11.27.19 AMThe example below was taken with a 20 sec image intraval and the final video was created at 15 frames per second.  SO the video takes 3 photos per minute and uses 15 photos, or 5 minutes of time to create 1 second of video.  The video is created automatically in the camera.  Unfortunately, it creates a windows AVI video but iMovie can import and convert it to video you can then edit.

Overall, I was quite pleased with the result considering the limitations of the capture such as a cloudy cold night and the capture being done in the city with quite a bit of ambient “city” light.  I also used a UltraWarmer warming pad around the camera to prevent the condensation but unfortunately it did little good.

I will be continuing to work with this in the hopes of being able to get more comfortable with the settings.

DJI Osmo steps up the Handheld Gimbal Market

IMG_0480

Almost a year ago, I wrote an article about a product called DSLRPros Mantis, a handheld 360° gimbal for a go pro camera. This handheld camera holder provided a motion sensitive gimbal that stabilized video taken with the go Pro camera. Recently, DJI released a similar device called the Osmo. I was fortunate enough to get an opportunity to play with one of these gimbals.

If you’re into sports photography, and you’re looking for a way to stabilize video that you’re taking, the DJI Osmo may be exactly what you’re looking for. Unlike previous products, DJI’s has released this device with their own camera that had been used previously in the Inspire helicopter drone. This camera, can shoot 4K video at 24 or 30 frames per second or 1080p video at up to 120 frames per second.  Since DJI ships this with their own camera, they have the ability to be able to make their software work very well to control the camera. To utilize the device, you need to have either an iPhone or an android phone. Utilizing the DJI GO app,  a free download from the respective App stores, you have full control over all the video or still shot parameters and even the movement of the gimble.

The Camera utilizes a microSD card, that’s included, to record video and still images taken with the device. Easily accessible controls on the handle allow you to move the gimbal up down and around. They also allow you to start and stop video or take still images. The handle is extremely easy to use and fairly lightweight. This makes the Osmo a very good addition to tools used for motion photography.

IMG_0479

The handle also includes a well-designed phone holder that securely holds your phone to give you the ability to preview video as you’re shooting it and make changes to settings. This is truly one of the best phone holders I’ve seen in that it grabs your phone on one side and onto corners on the other side for a very secure hold. The holder is fully adjustable for the smallest or the largest phones.

At this point, the Osmo is not without its minor problems. The camera seems very good in outdoor photography, which is likely what it was designed for, but actually doesn’t read light very well when you’re inside in nonoptimum light conditions.   You do have the ability to be able to tap the screen and focus on a particular point reading the light reading at that point also. This works pretty well but is actually another step you have to make to ensure good indoor photography.  The audio quality captured from the built in mic is not very good either but you do have the ability to plug in an external mic and overcome that problem.  The other issue is that at this point the Osmo is not compatible with either DJI’s X3 camera, that comes installed on the inspire aircraft, or their X5 and X5R cameras that are higher quality add-ons to the inspire.  DJI promises an add on control board that will allow these to work and firmware updates to fix the incompatibilities.

Below is some sample video that you can hear the pronounced hum.

Overall, the Osmo is a great camera for motion photography. It certainly isn’t the best video quality at times, and in fact the owner that allowed me to use this device for my review states that his iPhone 6s Plus takes much better video and photography. But the stabilize gimbal included in the Osmo allows you to take photography while in motion that the iPhone would provide little stability for.  I was very impressed with the Osmo’s ability and feel confident that DJI will take care of the minor problems and enhance the device was software in the near-term.

Newer Technology Mini Stack Drive – A Nice addition to a Mac Mini

Screen Shot 2015-07-02 at 2.24.11 PMWhen I purchased my Mac Mini, I was excited about the fact that I was going to have much more space on my desk. And for a time, I was able to do that. But, over time when I needed additional disk space, I needed to add external hard drives to give me that space. I’ve always been one to purchase external hard drives based upon price.

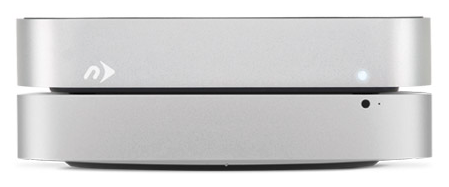
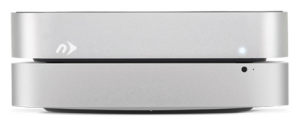
I typically buy whatever is on sale locally. Unfortunately, that has allowed me to have a number of dissimilar drives that all take up space on my desk. I was excited to see NewerTech’s miniStack drive because the form factor of this drive was the exact size of the current Mac Mini. This allows me to place the drive under my Mac Mini and an additional space without using up more disk space.

I was fortunate enough to be able to tryout one of these units with a 1 TB hard drive built-in to see how it performs and how looked when set up with my system.

NewerTech’s miniStack has a number of ports on the back that allow you to be able toScreen Shot 2015-07-02 at 2.24.19 PM connected with either FireWire 800, eSATA (which doesn’t make a lot of sense in the Mac world), or by the common USB3 port that comes on the current model Mac Mini. Since USB3 is faster than Firewire 800, I chose to make the connection with the included USB3 cable.

If you were using Firewire 800, NewerTechnologies was thoughtful enough to include an additional passthrough port for other Firewire devices. Unfortunately, to get additional USB3 ports you need to move up to NewerTechnology’s miniStack Max unit that provides additional USB3 ports and an SD card reader. This unit also allows for a DVD or Blue-ray drive to be included inside.

After placing the drive unit under my Mac Mini, I plugged in the power adapter and the included USB3 cable. Unfortunately, the power adapter included was a large brick type of adapter that required a wide plug to be plugged in. It would’ve been slightly better had a power adapter been built-in internally so the plug-in would only require a standard spaced plug.

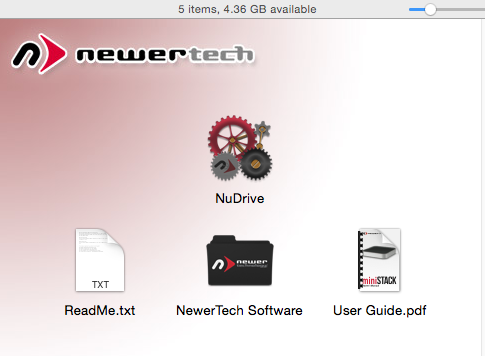
After the initial setup, I was presented with an icon for the new drive software to be installed. I ran the installer and selected the recommended easy-setup option. Having to run software to install a drive was somewhat foreign to me, but running the utility, I accepted the defaults and was presented with an icon for the drive on my desktop. For users who do not install a drive very often, this method of setup is quick and easy. Other options in the process would allow for multiple partitions to be setup if the user wants them.

On the drive was a bundled package of Speedtools OEM version and Prosofts Data Screen Shot 2015-07-02 at 3.06.05 PMBackup 3. In general, these utilities are a little dated. but still functional if you’re using the correct operating system. Windows utilities were also included. For my use, I chose to use Carbon Copy Cloner to do my backup since I already owned it and was familiar with it.

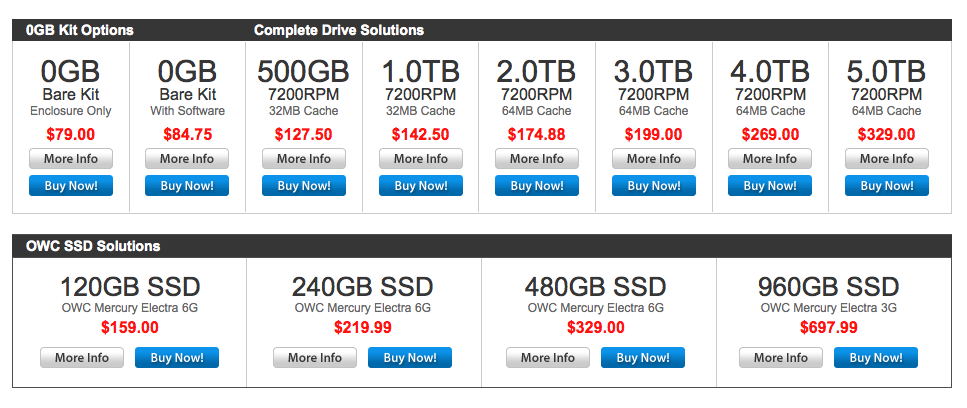
The miniStack drive is available in drive sizes up to 5TB or as a bare unit without a drive. If you really want fast storage, you can also get it with a Solid State Drive SSD in 120GB to 960GB sizes.

Screen Shot 2015-07-02 at 2.25.16 PMOnce the drive was setup and formatted, it was easiest to use just as any other drive on a Macintosh. I set up a Carbon Copy Clone task and copied my main drive due this new drive as a backup. That all without a hitch. Speed was as good as any USB3 drive that I’ve used before. The fan in the drive proved to be very quiet. It did not add much noise to my working environment. While there is a switch on the back of the drive, I doubt that I will use it as I will allow the Mac to continue to run almost all the time.

If you’re looking for a small footprint drive for your Mac Mini, NewerTechnologies many stack is a great solution. The footprint is exactly the same as the Mac Mini and by having a USB3 port it complements the drive internal to the Mac Mini. If you have an older Mac with a FireWire 800 port, and you’re looking for a drive to be able to use it with, the miniStack is also a good choice.

Price varies from $79 to $693 depending on Drive size and type.
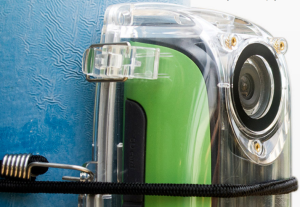
For more information check out the Other World Computing website.

Apple “Photos ” iPhoto replacement is right around the corner

Screen Shot 2015-02-06 at 8.07.07 AMEarly last year, Apple announced it was working on a New photo application for the Mac called Photos. Later in the fall, Apple confirmed rumors that iPhoto and Aperture we’re going to go away and be replaced with this new application. They also said the application will be delivered in the first part of 2015. Well here we are in the first part of 2015 and early reports and reviews of this new Photos application are starting to hit the web.

While II have not actually seen the new application, I have read a number of reviews and descriptions of how it works. Many of these descriptions discuss the abilities of the app and some of them also describe the things the application will be missing when it’s first released. Overall, it looks like the new Photos application is going to be pretty nice and make some interface improvements from what we’re used to and iPhoto.

First off, there has been a lot of conjecture as to what the look and feel of the new application would be like. Just as I suspected, we’ve all been using Photos for a while now. At least those of us using iOS8. If you’re interested in the overall look and feel of the new photos app, take a look at Photos on iOS. The basic make up of the application is going to be very similar to what we’re seeing on the iOS version. Just as we’ve seen before, Apple continues to try to merge the interface of the iPad and iPhone with that of the Mac. This time though, it’s not the Mac features that are moving to the iOS, it’s the iOS app it’s moving to the Mac.

If you become comfortable with the moments, collections, shares, and cloud features in iOS8 photos, the new Mac application is going to be very familiar to you. Looking at screenshots that have been posted on the web, much of what you’re going to see on the Mac is similar to what you’re seeing on iOS today. Now don’t get me wrong, editing features on the Mac will be worlds ahead of iOS but still not quite up to the level of iPhoto. Apple will continue to add new features overtime as they generally do when they rewrite an application. We’ve seen this with their applications like iMovie.

Basically out of the box Photos is going to be very functional, provide nearly all of the things you normally do with photos in iPhoto, and provide one nice benefit. Photos, will directly read your iPhoto or Aperture library. There will be no conversion, no duplication of space, and no possibility of having things mixed up when you move to the new app.

Apple announced that it’s going to make a pre-release version available very soon for us to begin to learn and play with, and make the initial app release with Mac OS 10.10.3 this spring. I’m looking forward to getting an opportunity to work with it and also being able to write more about it. I can also pretty well guarantee that when the application is released, if your local to Jefferson City, we’re going to dedicate an appleJAC Macintosh user group meeting to this new application.

Neither iPhoto or Aperture will be going away immediately. Even the next release of the MacOS will continue to work with these applications. But like many things in life, change is inevitable, if you stick to iPhoto too long and don’t try the new application you’re going to get left behind and end up not being able to update your computer to the latest operating system, or forcing a move to the new application when you’re not ready. So my recommendation to you is as soon as the new release comes out in MacOS 10.10.3, start taking a look at the new photos app. We’ll have to see how well it works before we can make a final determination of whether that will be the time to move, but I’m absolutely sure the new application will be functionally complete enough for you to deal with most of your photo needs right out-of-the-box.

Here are a few good early reviews from people that have been able to work with the new Photos application.

The Verge
Yahoo
Cnet