Bose SoundLink Mini: Great Sound in a Small Package

more_featuresSometimes you just need to rock to your tunes. You may be at a picnic, a hotel room, or even in the car. The easiest way to be able to do this is to connect your phone to a Bluetooth speaker. But there are so many on the market, which should I try?

If your in the market for a bluetooth speaker with great sound, I recommend looking to the Bose Soundlink Mini.

The SoundLink Mini speaker is small and light enough to tuck into your bag. It weighs in at just 1.5 pounds. Its low profile lets you place it almost anywhere and provides a low center of gravity that makes it nearly impossible to tip over.

The rechargeable lithium-ion battery delivers up to seven hours of playtime. And at home, you can listen even longer—the charging cradle lets you listen while it charges. An empty battery usually fully recharges in three hours.

The speaker has a range of about 30 feet, so you can enjoy the sound you want without wires. It pairs easily with your smartphone, iPad® or other Bluetooth device. And it remembers the most recent six devices you’ve used, so reconnecting is even simpler.

There are even more features:

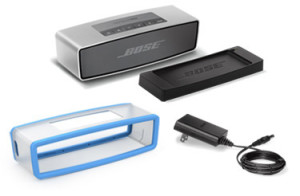
  • Charging cradle recharges the battery and serves as a convenient home base for your speaker, and it lets you play while it charges
  • Wall charger can be plugged into the cradle or directly into the speaker
  • Auxiliary port lets you connect other audio sources, like an MP3 player
  • USB port allows for software update to ensure ongoing Bluetooth device compatibility
  • Soft covers are available separately in red, blue, green or orange. Pick a color to match your style

There are many of these on the market these days but I really like the sound technology Bose uses. Take a look at this one if you are looking and judge for yourself.


Automatic: Your Smart Driving Assistant

Screen Shot 2013-12-11 at 11.46.20 AMThe world is exploding with technology. It’s amazing to see technology entering into so many different areas. One of those areas that has long been ripe for this expansion is Automotive.   Automotive technology has been around for quite a while but unfortunately the technology you get your car is a result of what you get when you purchase the vehicle. In some cases manufactures don’t have very good technology available for their cars. But more often, good technology today Tuesday age poorly in a vehicle.  What may be the most advanced system in the world the day you buy your vehicle tends to be old and dated even before your vehicle is paid for. I have long believed that being able to add tech to a vehicle you all is a natural process.   But unfortunately adding text after-the-fact is to be expensive and also poorly integrated. That’s one reason why I was excited to read about Automatic.

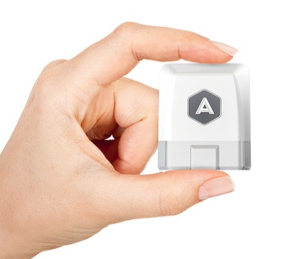
Automatic is a small attachment device that plugs into your vehicles OBD port and provides information that your vehicle computer already has through Bluetooth to an application running on your phone. Automatic supports both iPhone and android devices. Nearly all vehicles 1996 and newer have this port.

IMG_0750The attachment dongle easily plugs in to the same port your mechanic uses when you take your car in for service. It’s easily accessible near the steering wheel. It then uses Bluetooth Low Energy Wireless using Bluetooth 4.0 and sophisticated energy-saving algorithms to allow the link to minimizes your phone’s battery consumption. The application is freely downloadable from respective app stores and can be installed on multiple devices if you choose.

So what kind of information does Automatic supply?

For the most part, you can get Driving Feedback.  Automatic is your auto assistant. It learns about your driving style and gives you subtle audio cues when you do things that waste gas, like:

Rough Braking – Braking abruptly decreases fuel efficiency and dramatically increases wear-and-tear on your car’s brake pads.

Speeding – Highway speeding may not save you much time, but driving 10 MPH over the speed limit reduces fuel efficiency by 12-15%.

IMG_0748

Rapid Acceleration – Stepping hard on the gas pedal decreases fuel efficiency and wastes money.  Automatic shows how you’re doing on every trip.

Drive Score – Automatic scores your driving every week to help you improve. A high score could save you hundreds on gas every year.

Trip Timeline – The Automatic app displays detailed info about your week, like how much you drive and where. See the actual MPGs for all your trips, even for older cars that don’t display fuel efficiency on the dashboard. Automatic also detects* fill-ups and even tracks local gas prices to show you how much you’re spending.

Crash Alert – Automatic can detect many types of serious crashes using the Link’s built-in accelerometer. Agents from Automatic report the situation to local authorities to get you help in an emergency. An agent will also call your loved ones to let them know the details of the crash and that emergency responders are on the way.

Unfortunately, there are a few things that automatic needs to improve. Right now the system provides no ability to do anything outside of looking at your phone with the data it collects. There needs to be A companion website that allows me to download my information or print reports of what I’ve done. I really want to be able to use automatic too log mileage for my trip and provide me a detailed report of starting and ending locations along with mileage and cost. I hope the company realizes that they only just begun.

There is a short YouTube video about Automatic.

Automotive technology supplied by automatic is a great start. The ability to add a relatively inexpensive device to your vehicle and connect to your phone to act as the brain has been a long time coming. Automatic provide you a great start at this. Let’s hope they continue to improve the system and application.

Protect your home with Nest Protect

IMG_0009By now, most everyone must of heard of Nest. Nest is a company famous for their Nest thermostat. This thermostat connect to the Wi-Fi in your home and give you the ability to modify thermostat settings from any place that you have Internet access. It also provides a great deal of intelligence related to setting schedules for thermostat.

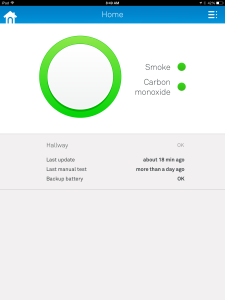
Nest’s latest product is called the Nest Protect. Protect is a connected smoke alarm and carbon monoxide detector. Similar to the nest thermostat, the nest protect connects to your Wi-Fi network and provides the ability to monitor smoke and carbon monoxide detection within your home.
Protect is easy to install. Actually it’s quite a bit easier than the thermostat.  Prior to installation you must decide which model of the unit you want to purchase. Nest provides both a wired connected device and a battery only device. That’s not to say that the wire device doesn’t also have batteries, it does, but the battery only unit does not connect to electricity. You also have to determine whether you want the light color or the dark color version of the device.
IMG_0007Once your protect arrives, it’s extremely easy to install. I installed the wired version in my home.  You begin by removing the existing smoke alarm in the house. My particular alarm was a three wire connected unit a positive, negative, and interconnect wire.  Since nest connects with Wi-Fi, the interconnect wire is no longer necessary.  The installation process wires the two wires in to the unit and mounted to the wall.
Next you run the test on the unit to make sure it’s functioning properly. The test provides audible information from the speaker in the unit in addition to tones that identify both smoke and carbon monoxide. Running the test allows you to understand what the different tones sound like. An LED light ring on the box also provides information about what type of an alarm is being sounded.
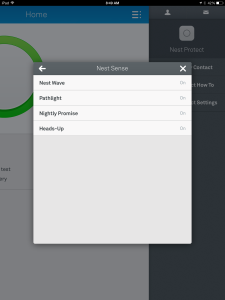
After running the test, you connected to your nest account. After updating the software onIMG_0007 my iPad, I simply press the add device button and walked through the process as it found the protect and connected it to my nest account.  Now that it’s connected, the unit works in conjunction with my wireless network to provide me information in case an alarm sounded.
One intriguing feature of the alarm is that in case of an alarm sounding, it has the ability to both text or email me letting me know if I’m away from home that the alarm is going off. The unit also has the ability to like the way if the alarm is sounded by using white LED light through the light ring in the front of the device.
If this entire process sounds simple, it was. Installing the protect took only a few minutes and provides that additional peace of mind.  Is bad as it is to say, I did not have a carbon monoxide detector in my home and all. The nest protect gives me that in addition to much more fruits connected technologies.
IMG_0008From the first time I installed a nest thermostat, I love the technology the company uses. They make things extremely easy to understand, and provide great features in a connected method through both iPhone iPad or any android device, and through the Internet in a web browser.
I’m happy with my installation of the protect. I also look forward to other devices for the home that nest may come out with in the future. I believe this company really understands home connection information and I look forward to them providing other additional devices that can connect my home to me whether I’m there or not.

Perfect Photo Suite Offers Low Cost Focused Tools for Photographers

PPS BoxesPhotoshop: the gold standard for photo work is a terrific piece of software.  People who know the ins and outs of Photoshop can do literally anything they want to enhance or fix a photo.  But that’s the problem for us mere mortals.  Photoshop is not simple to learn.  It requires years of experience to get good at.  That is part of the learning process for someone in the photography industry but many people like myself need something to give us some of those dramatic effects possible in Photoshop without the large time investment.  Even Adobe sees this in its Photoshop Elements program that adds recipes for a number of these photographic effects.

There are many people who end up in the middle.  They have mastered organization programs like iPhoto or Picasa and want to take that next step.  One good place to start  is with Lightroom, as I have written about before.  But even Lightroom has its limitations particularly if you want to make changes to a portion of an image rather than the entire image.  There are a lot of good tools to assist you in these next steps including a few plugins for Photoshop and Lightroom but OnOne Software has a tool set that not only gives you some needed enhancements, it integrates with the tool you may already use.

Perfect Photo Suite 7 includes modules that allow photographers to focus on specific needs with tools that are created specifically for that workflow.  These include, Perfect B&W to develop black and white images, Perfect Portrait for easy portrait retouching, Perfect Effects and FocalPoint for creative effects, Perfect Mask for replacing backgrounds and Perfect Resize for image enlargement. This toolset also allows for a layered workflow without Adobe® Photoshop®, so you can combine the best parts of multiple photos, create composites, and quickly retouch portraits and landscapes. All of the products in Perfect Photo Suite 7 work together seamlessly as integrated modules to assist you in creating the images you envision.

With Perfect B&W you can achieve classic black & white looks instantly with a library of expertly crafted effects or customize your own unique look using powerful, darkroom-inspired controls that replicate old processing techniques. Enhance tone and contrast by boosting shadow and highlight details or bring back a touch of selective color. and control the exact appearance of your image using a set of adjustment brushes.  With Perfect B&W, you’ll infuse the artistry of black and white photography and create your own masterpiece.

Perfect Portrait lets you improve skin texture and color, remove blemishes, and enhance eye, lips and teeth. You’ll find that it’s never been so easy to create terrific  portraits

Perfect Layers lets you enjoy all of the benefits and creative power of a layered workflow, allowing you to combine, composite, and blend images—all without Photoshop.

Perfect Effects provides an easy, fast and powerful way to create images with impact with Perfect Effects 4. Choose from a robust library of photographic effects to add professional looks to your photos instantly, including the popular HDR and retro looks. You can also recreate the look of film and darkroom techniques, add glows, vignettes, borders, and correct common photography problems. With the ability to stack, combine and blend effects, and paint in effects to specific areas, your creative options are endless.

Perfect Resize, formerly known as Genuine Fractals, increases image size faster and without the loss of sharpness or detail that you might normally expect. The same patented, fractal-based interpolation algorithms that were in Genuine Fractals are at the heart of Perfect Resize with several improvements. Faster processing speeds, new presets that optimize clarity and detail of different image types, built-in output presets, and the redesigned user interface add to the power of Perfect Resize.

With Perfect Mash you can create high quality masks quickly and easily with new automated functionality and powerful tools. Automatic Background Removal, Drop and Refine Brushes, and clean-up tools make selecting subjects and isolating backgrounds for removal extraordinarily accurate.  You can create some amazing effects using this tool that really make you subject pop.

FocalPoint can create realistic selective focus and depth-of-field effects you would think could only be done in camera. Choose from a selection of lens presets to produce a specific effect or adjust controls to adjust the amount and kind of blur you want. You can even paint in sharpness or blur exactly where you want. It has never been easier or faster to focus your viewer’s eye and minimize distractions. This is like choosing you lens for the shot from an infinite lens bag and doing it after you take the shot.  It is really very cool.

Many folks will say, I can do all that in Photoshop.  Sure you can if you know how and want to spend the cost of using (not owning) this tool on a monthly basis.  You can even do some of these effects in Photoshop Elements or Lightroom but I will say you can’t do them as easy as you can with this toolset.

PPS PlatformsPerfect Photo Suite 7 is designed to meet specific workflow and budget needs with three different editions. It may be used as a plug-in for Adobe Photoshop, Photoshop Elements, Lightroom, or Apple Aperture, and also works as a standalone. You simply choose the method that works best for the tools you already use.

Now for the best part.  These tools are truly inexpensive.  The complete professional suite for every workflow. Works with Photoshop, Lightroom, Aperture, and as a standalone is just $199.  The same toolset for your Lightroom or Aperture workflow and as a standalone is only $129.  If you don’t have Photoshop, Photoshop Elements, Lightroom, or Apple Aperture, a stand-alone only version runs just $79.  Perfect Photo Suite is available for Windows or MacOS and offers a 30 day free trial from the company’s website.

Pro Photographers will scoff at the need for tools like this but those of us with ambitions for some of those Pro looking effects  in our photos but without the time to dedicate to learning advanced Photoshop techniques will grow to love this toolset.  When you can produce the look you want from an image, photography takes on a new light for you.  These tools are a great bulb to help turn on that light.
Want to access your home web camera but your IP address continues to change?

Screen Shot 2013-07-05 at 9.49.26 AMIn todays connected world, many people would like to be able to access their computer, DVR, webcam or camera system remotely without having to remember a confusing (and ever changing) IP address? DynDNS is a great option for those who need Dynamic DNS and Remote Access capabilities without any bells, whistles or fireworks.

What Does It Do?

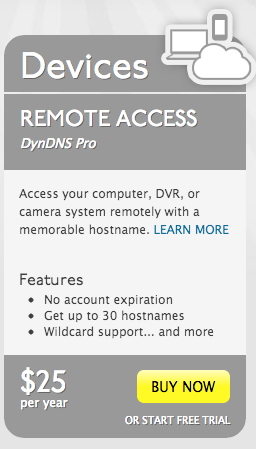
DynDNS Pro allows you to assign an easy to remember hostname (such as yourname.dyndns.org) to your location’s IP address. By installing an update client on a device at that location, your hostname is automatically updated whenever the IP address changes, ensuring you can access your device remotely at any time.

Most internet service providers charge you extra to provide a fixed IP address that does not change. Others don’t make that an option at all. DynDNS allows you to get around those restrictions and still get access to devices in your home or business. This service works in conjunction with a good router or firewall in your location. THink of the router as the locking system for your internet. And DynDNS as map of how to get to your front door.
After signing up and paying a low one year subscription rate of $25, you download a small client piece of software that you run on your Mac or Windows machine. The software needs to run on a machine that will be left on all the time. This software senses your external IP address provided by your internet service provider and sends it to the DynDNS service. On the service you setup a permanent url with DynDNS as the access point for your network. An example might be http://myhouse.dyndns.org. The software you have installed on your computer checks for the actual IP address you are using from your service provider every 5 minutes. Lets say for example it is 100.120.130.140. It then tells the DynDNS service that the url ttp://myhouse.dyndns.org is at the ip address 100.120.130.140.

To access the devices in your location, you simply configure them for http://myhouse.dyndns.org rather than the ip address numbers. DynDNS does the network address translation to rout any requested traffic to your location front door. Once at the door, port forwarding on your router needs to be configured to provide the necessary secure access. This process may sound difficult but a networking professional could assist you in setting it up.

With a service like DynDNS you can get access to those security cameras, network storage devices, or DVRs easily from anywhere in the worls. When you service provider will not give you a fixed IP address for a reasonable cost, DynDNS can come to your rescue and make your connections work.

Logitech Harmony Smart Control: The one to Purchase.

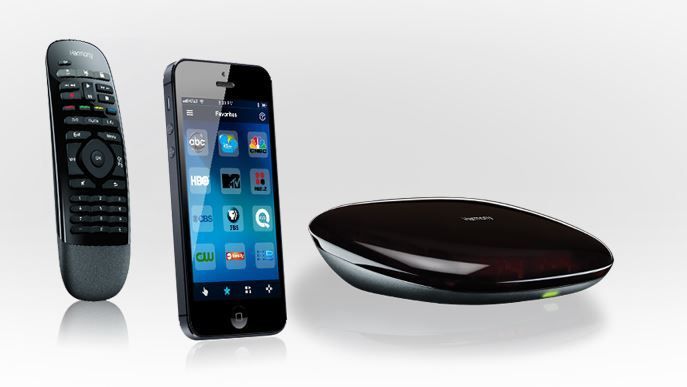
Harmony 1Universal Remotes.  I can personally remember 4 different ones I purchased over the years.  Some as simple as a universal Sony remote about the size of a hard backed book that did a good job with simple on off and channel commands.  Others as complex as a Harmony remote with a screen on it that was programmed by a USB cable.  All sort of worked.  None really worked well.  That all changed with my purchase of the Logitech Harmony Smart Control.  Finally. I have found a smart remote that I feel can put all my other remotes in a drawer.

What makes this one so special?

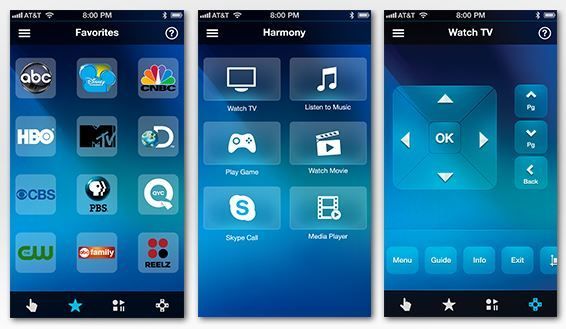
How many people sit on the couch to watch TV these days and have their iPhone or iPad right at their side.  Logitech takes advantage of this with this new remote product.  ALl programming of the remote is done through your iOS device.  And yes, Android is also supported.  Using the Harmony app (free from the Apple app store)you connect to the device and program it from the web.  You simply follow the prompts, make selections of the brand and model of devices you have, tell it what port the device connects to the TV on and it all gets programmed for you.  It even creates shortcuts to common activities like Watch a Movie that can turn on the TV, turn on the Blu-ray player, and set the correct connection port.  All of this happens from the push of a button.  This integration with iOS makes getting the remote to control all your devices very easy.

Not only will it control all your devises that use an infrared remote, but the unit has Bluetooth built in so it seamlessly addresses devices like the PS3 game console that uses Bluetooth.  Unfortunately for my aging Bose system, it does not do Radio Frequency (RF) devices.  In addition, this device handles the AppleTV very well.  Other units make it hard to access the menu button but this one maps it automatically for you.  Everything is seamless.

Harmony 2With this unit, you can easily control your home theater devices.   Anyone in the house can download the Harmony iPhone or Android app turn their mobile phone into a personal universal remote control, including 50 favorite channel icons and gesture control.  When your mobile phone is not available, you can use the included simple remote control. It lets anyone in the family change the channel and adjust the volume.   Simply press one button to switch to favorite activities, like watch TV or play a game.

It controls what you already own.

Logitech says you can consolidate 8 remote controls into one simple mobile app. Harmony is compatible with over 225,000 home theater devices. And unique to Harmony is their patented Smart State technology, which remembers your devices’ power and input settings and automatically adjusts them based on what you want to do.  If you are unsure if your device is supported, Logitech provides a great presale site to check.

Here is the best part of this product.  It’s reasonably priced for a smart remote.  Priced at just $129, it is a universal remote that I can finally recommend to people.

Why an iPhoto user should consider Adobe Lightroom

LR LogoiPhoto is a terrific image catalog.  It stores your photos automatically and you don’t even need to think about where they are going or what format they are in.  Apple does a terrific job of making iPhoto easy to use for the novice.  But once you are past the novice stage, iPhoto trails off in its features to other image software.  Some may say that Aperture from Apple is your next option but Apple has not revised it in years and it is getting quite long in the tooth these days.

Many people who have come to this place in their electronic photo life ask me if they need to get Photoshop to be able to move forward with making changes and manipulations to their images.  Photoshop is a terrific professional image editor that certainly could be in their future.  Unfortunately the high cost of Photoshop and the subscription use plan they have put in place makes going this direction too expensive for the hobbyist photographer.

Ok, so those people should get Photoshop Elements, right?  Elements is the consumer version of Photoshop that will do 99% of what a non-professional photographer need to do.  In fact, I expect many pros to revisit the elements tent now that it costs nearly $360 per year just to use Photoshop.  That may be a reasonable direction to go.  But I believe there is another option, Adobe Lightroom.

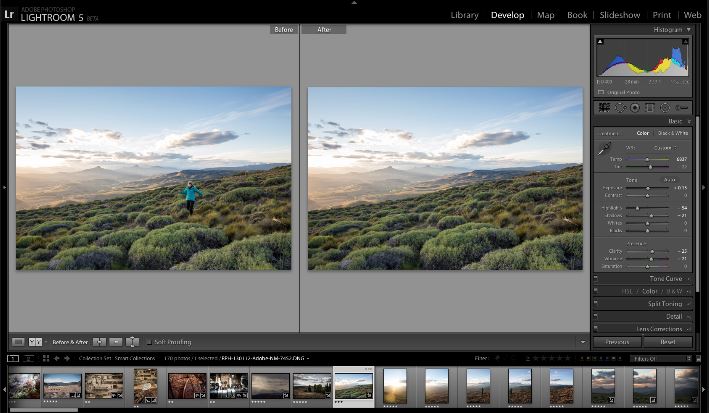
LR ScreenshotLightroom is a image catalog program similar to iPhoto.  It allows you to import images and store them, and then make manipulations to them in a non-destructive way.  Lightroom can also do much more to take you to the next step in your photo editing experience.

First off, Lightroom lets you store your images anywhere on disk you want.  You create the storage structure and you control what happens to those images.  The storage location does not need to be on your main harddisk like it does in iPhoto and it can even be on multiple drives on your computer or network.  Not only that, you can import your photos to Lightroom and then remove the drive the photos are on.  Lightroom 5, the latest revision, lets you still do edits to those images that get applied to the master the next time you plug in that drive.  How cool is that for a user with a smaller SSD harddisk!

Here are a few of my favorite features in Lightroom that make it superior to iPhoto for advanced image editing work:

Advanced Healing Brush

Do you have photos with dust spots, splotches, or other distractions and flaws that get in the way of a great image?  We all do.  With the Advanced Healing Brush in Lightroom 5, you can not only change the brush size but also move it in precise paths. Unwanted scene elements — even those with irregular shapes such as threads — just disappear.

Upright Tool

I thought the camera was straight!  Straighten tilted images with a single click. The new Upright tool analyzes images and detects skewed horizontal and vertical lines, even straightening shots where the horizon is hidden.

Smart Previews

As I mentioned above you can even work with images without bringing your entire library with you. Just generate smaller stand-in files of your full-size images. Any adjustments or metadata additions you make to these files will automatically be applied to the originals.

Location-based organization

You can find, group, and tag images by location, or plot a photo journey. It even automatically displays location data from GPS-enabled cameras and camera phones.

Highlight and shadow recovery

If you shoot in camera raw format, or even if you don’t, you can bring out all the detail that your camera captures in dark shadows and bright highlights.

Fast cross-platform performance

Perhaps you edit photos on a PC at work.  You can speed up day-to-day imaging tasks and process images faster with cross-platform 64-bit support for the latest Mac OS and Windows operating systems.

Selective adjustment brushes

Expand your creative control with flexible brushes that let you adjust targeted areas of your photo for just the look you want. That detail in editing is tough in iPhoto.  Then you can selectively adjust brightness, contrast, white balance, sharpness, noise reduction, and moiré removal.  That’s nearly impossible with the limited edit tools in iPhoto.

These are just a few of the newer tools in Lightroom that make it a great addition to your photo edit tools.  The next thing is getting your images out of iPhoto.  Apple makes that possible, but not too easy.  The best method is to export your images, with adjustments you made in iPhoto to your disk.  I recommend setting up a structure for this.  Many people like their images in folders by date.  This is the common standard if you are coming from a PC and have photos.  I usually create a folder called Images and then have dated folders under it.  Lightroom can do the organizing for you if you just export the photos.  There are other ways of opening the iPhoto Library package and bringing out the images that way but this is a little detailed for this forum.  Here is a great New York Times article describing some of the issues.

There is also a great site with videos about Lightroom from Scott Kelby’s group that might want to take a look at to get a better feel for Lightroom before making a move.

Once your photos are out of iPhoto, you need to also be sure they are being backed up since this is the location that changes also get stored.

iPhoto is a great tool for people to manage their personal photos and for novice photo editors.  Adobe Lightroom is the logical next step for those that want to do more with photos.  Lightroom is available from Adobe as a part of its Creative Cloud subscription or as a standalone $149 product for Mac or PC.  Adobe offers a 30 day free trial and I highly recommend trying before you buy to see if the workflow matches your needs.

Chromebooks: Not for everyone but possibly for you


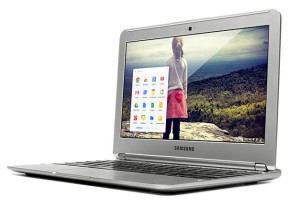
ChromebookA recent help call from a friend of mine caused me to rethink my thoughts related to Google’s Chromebook notebooks.  I had an opportunity to look at a chrome book when they first came out, and really wasn’t too impressed. The hardware was a little funky, and the functionality of Google’s chrome operating system was certainly lacking.  But as with many things time chores all and Google’s chrome operating system is beginning to mature.

Today there are basically four chrome book models available. Three very low-cost ones, and one relatively expensive one. Samsung, HP, and Acer have a chrome book notebook. The Acer runs about $200, the HP about $330, and the Samsung runs about $250. For that cost you get a relatively small screen, 11 inch on the Acer and Samsung and 14” on the HP, notebook with some interesting features.  The Acer features a spinning hard drive while the Samsung and HP feature 16 GB solid-state drive.  Interestingly enough, the Samsung looks very much like a MacBook air!   The forth model of chrome book, it’s actually done by Google itself. The chrome book pixel is a very nice laptop featuring a touchscreen hiring processor more storage space and a very elegant case and feature set. It also costs as much as a MacBook Air!  Google also has a Chromebox for those that want desktop capability rather than a laptop for $330.

Many people may ask how you can offer a computer at that price?  Basically, it has to do with the chrome operating system. Chrome is a web-based operating system. You have a Chrome kernel on your machine that is basically nothing more than the chrome web browser. With this browser, you connected all the Google services that are available along with any other service that’s available on the web.  If your computer needs our web centric, basically consisting of web browsing, email, and the occasional note or document, the chrome operating system could be perfect for you.

Early versions of chrome required a network connection at all times to be functional. But Google has made changes to the operating system allowing more and more functionality to be useful even when you do not have an Internet connection. Yeah,  don’t get me wrong, if you don’t have Wi-Fi, these notebooks won’t be very satisfying, but with a fast Wi-Fi connection, and those are available and more and more places, this notebook can do pretty much anything you’ll need to do on a daily basis.

ChromeUsing chrome could require you to make changes to the way to work. If you store documents in the cloud, particularly using Google Drive, it should be no problem for you. These notebooks also have the ability to store documents locally, but some have relatively limited space.  With more and more of the Google services being put together to allow you to do more work in the cloud, a Chromebook becomes more of an interesting possibility.  My limited experience with these tells me that the performance of these devices is very good. They typically have a lower end  processor, but if you keep in mind that all they really do is provide a browser view to the web where everything runs in that browser view, you can see how that would take less processing power.

So someone then may ask who would be a good candidate for one of these Chromebook laptops?  In my consulting service, I run into a lot of people that do nothing more than browse the web get email and deal with an occasional photograph.  Many of these people have high-end Windows or Mac machines to do this small level of task.  They also tend to have difficulties in working with the operating system, because they don’t really get into the operating system often enough to become proficient.  For these users, a Chromebook could be the perfect solution.    Other people are looking for a small device to use when traveling or at the coffee shop and have considered a iPad or tablet but really feel they need a keyboard.  These needs fit right into the Chromebook demographic.

I would certainly not say these devices are for everyone, but if your needs are limited, are normally web-based, and you’re interested to try something a little different, a Chromebook could be a easy and low-cost solution for you. Consider it the next time you making a purchasing decision.

The Google TV Experience: Not bad at a Good Price

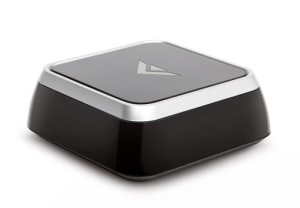
VizioI have long been, and still consider myself an advocate for the Apple TV.  It is a terrific little box that does many things for a reasonable price.  But sometimes I find myself wishing the Apple TV did things that it does not do today.  Wouldn’t it be great to have access to apps or custom channels of content from the web.  How about the integration of real TV programming into the same interface as the web content. Well, that is doable today.  It is not a solution for everyone but it is definitely something that works well and is well thought out.

Enter the Google TV.  Sony has been producing televisions with Google TV inside them for the last few years.  But purchasing a new screen to get this experience is a long way to go.  Sony also has a $249 Google TV add-on box complete with a Blu-ray drive available but I have a Blu-ray player. But now, Vizio has introduced the CoStar , a new Google TV add on box that competes very well with the Apple TV.  In fact it is the exact same $99 price as an Apple TV but the feature set is completely different.

Most of you are aware that Android Phones are very popular in the marketplace.  The phones have an application catalog comparable to that of iOS.  Google TV uses the base Android operating system to start with so application developers have an easier time creating apps for the device than having to start from scratch.  Apple could take a lesson from this.  By having a development platform similar to phone development, Google TV has made it easy to have an application catalog for these devices. Now don’t get me wrong.  Not all Android apps can run on the Google TV but there is at least a starting point to entice development that has resulted in hundreds of titles.

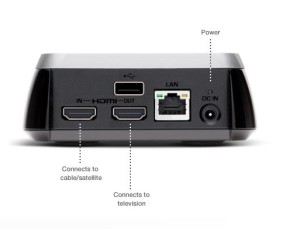
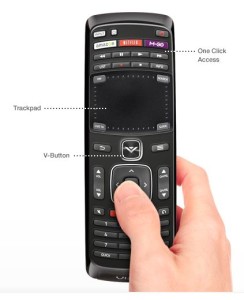
But let be digress and describe the unit itself.  This little box is about the size of an Apple TV except it is a little taller.  It has two HDMI ports on the back.  One port is the input from your cable or satellite box and one is the output to your TV.  This incorporation of the TV stream allows the device to control the entire experience without having to switch HDMI ports.  It is all controlled with the included remote.  The box also contains an Ethernet port and Wi-Fi so that it can connect to the internet for content.  Also included is a fat but powerful remote with a trackpad and standard remote functions on the front and a small QWERTY keyboard on the back.  The remote is Bluetooth so there are no line of sight issues with using it as there are with Apple TV.  It really should have had a backlight to illuminate the keys but that is a truly minor complaint at this price.

Vizio BackAfter connecting the unit the software leads you through an extensive series of settings to dial in you cable or satellite system, control the TV itself with the Vizio remote, and get connected to the Internet.  The unit then updates its software to the current release.  All this prep takes about an hour.  Once it is complete, you have the ability to watch TV just like you did before in addition to using the features of the box.  When you press the button to go into the interface of the box, a menu slides in from the side allowing you to pick an application.  Virtually all of the features of an Apple TV are included with the exception of AirPlay for putting iOS or MacOS device content on the big screen.  But there is an app for that in the Google Play store.  The interface also allows you to use picture in a picture where the TV content shows in a small box in the corner of the screen and the app content fills the rest of the screen.  Very nice control.

remoteThe interface, by virtue of its higher functionality, is more difficult to use than that of an Apple TV so this solution may not be for everyone but it sure works nice and really adds a lot of function to your TV.  Some of the applications that it ships with include a music player, Netflix, Vudu, Amazon Prime Video, and even the Chrome browser.  The keyboard on the back of the remote allows easy use of the browser.  Other apps such as Pandora are available on the Google lay store as free downloads.

The extendibility of this unit is what is really great. Apps can be downloaded that give web content right on the TV screen.  I particularly like the included YouTube app and one from Motor Trend TV that I downloaded from the store.

Is this add-on box better than Apple TV?  For people not firmly entrenched in the Apple ecosystem, I would say it is.  Interestingly enough, even if you use all Apple devices, it still may be something you want to try.  The ability to do so much more from the TV is really a nice feature.  It is not without it’s little quirks but in general, for a $99 device, it is a good value and something I would recommend you consider for a fuller media entertainment experience that integrates TV with Web content.

Need more Solid State Storage on your Macbook Air? OWC can Fix You Up

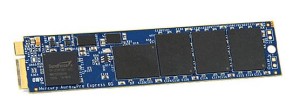
Aura Pro DriveOne of the problems I saw when Apple introduced the Macbook Air was the lack of expandability.  Not only can you not upgrade the RAM in these machines, but you also cannot upgrade the solid state hard disk space.  Or so Apple claims…..

I use my Macbook Air when I travel.  It is a terrific companion that is light weight and powerful.  I have a 2011 model with a 120gb solid state drive.  For most of the time since I purchased it, I have been fighting the space issues on the solid state drive and wishing I had purchased one size bigger.  A couple of months ago, I had the need to run PC software on it so I installed VMWare Fusion and Windows 7 on it.  To do this I had put my disk on a serious diet.  I deleted enough to put the virtual machine disk onit but rather than having a machine that was close on harddisk space, I ended up with a machine completely out of space.  One of my thoughts was to replace it with a newer model with a larger SSD but that is expensive and the machine was still plenty fast for the work I do while on the road.

I ran across an ad for Other World Computing that claimed to have an upgrade for my 2011 MacBook Air’s SSD  to a larger size with greater 6G speeds so I had to check it out.  OWC has upgrades to 240gb and 480gb that are plug in compatible with the MacBook Air.  In addition they have a case where I can reuse the original SSD as a sleek new external drive.  With pricing for the 240gb version at $319 it was much cheaper than a new computer so I decided I needed to give it a try.

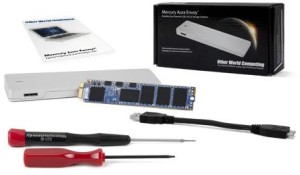
KitThe installation kit includes the upgraded drive, a tapered aluminum Envoy storage solution case, Torx T-5 screwdriver, and a Pentalobe compatible driver.  This was everything I needed to install this in my Macbook Air.  OWC even has detailed videos on their website describing the process.  With all the parts and my Macbook Air laying on a soft cloth, I setup my iPad and began the video.  Fifteen minutes and a dozen or so screws and I had the upgrade complete.  I then installed my old drive in the external case and began the data migration process.

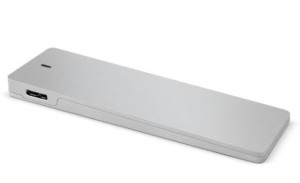
EnclosureThe external case is USB3 but my 2011 Air is just USB 2 so it took about an hour and a half to migrate my data from my old drive in the external case to the new drive in my machine.  I did the migration using the restore utility inside Disk Utility.  It all went without a hitch.

It really feels good to have 110gb of breathing room on my hard drive.  It gave me the opportunity to put some of the applications back on that I was forced to delete to get VMWare fusion enough space back on the machine.  It also allowed me to move more of my data files I want for travel onto the machine and still have plenty of free space.

In the end, I spent about the same had I purchased the larger SSD in the beginning but I also now have a very fast, small and lightweight 120gb SSD drive in an external case.  Taking that into account, this was a much less expensive solution.

The question of it being faster with this new drive still remains. My Air was very fast to begin with so it is a little hard to tell if the drive is much faster.  The documentation leads me to believe it could be as much as twice as fast for disk reads.  Let me just say it is fast enough for the work I need it to do.

I would definitely recommend this solution for anyone with a Macbook Air and not enough free space.  OWC also has upgraded SSD drives for other macs that I believe are just as easy to install.  Overall, I am very happy with this upgrade.  Check out all the possibilities at the Other World Computing website.