Which Hard Drive do I choose for backing up my Macintosh or my PC?

Q: With all the choices, which Hard Drive do I choose for backing up my Macintosh with Time Machine or my PC?

A: I wish there was a simple answer, but unfortunately there isn’t one.  Choosing a backup drive involves a number of factors that need to be take into account.  Many of these factors depend on the type of machine you have and the size of your original harddisk.  In this article, I am going to look at a number of decision points and attempt to provide some assistance in making that selection.

Internal vs External
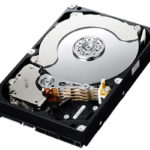
Raw drives are drive mechanisms that are sold without a case,   These drives are intended to be installed inside the computer box.  For Mac users, this decision point is simple.  None of the current or recent Macintosh machines can support adding an internal drive.  If you use a PC, and have a tower yo use an internal drive but then you have to open the case and install it.  While usually not too difficult to do, it just adds one more possibility to get things configured wrong.  There was a time where raw drives were much less expensive but that time has passed. So, in my opinion, external is the answer.

Brand

These day, there are many brands of drive available at your local Staples or Best Buy.  The brand of the drive actually has little to do with the quality of the unit.  The actual harddisk mechanism inside the box is likely made by 1 of 3 manufacturers and telling the difference between them is not really important.  It really all boils down to case design, interfaces and price.

Don’t be fooled by vendors that want you to spend more money for either a “Mac” version of a drive or for a “premium” model.  The drive mechanism is likely the same part.  Mac formatted drives are just that, pre formatted for a mac.  That is no big deal because you can easily reformat a PC formatted drive on the Mac.  In fact, time machine recognizes a new drive plugged in and asks to reformat it if it is a PC model.  Don’t pay extra for this formatting alone.

Also don’t pay extra for backup software.  Time Machine, which is a builtin feature of MacOS 10.5 Leopard or newer, is better than any of these backup solutions that ship with new drives.  Only consider backup software if you are using 10.4 or older on a Mac and in my opininon, your money is better spent upgrading a current MacOS release to do your backups if your machine will handle it.

For PC users, it depends on the operating system.  In Windows 7 or 8, backup is a control panel that you can configure.  In Windows 10, it is called File History.  Select the Start​ button, select Settings > Update & security > Backup > Add a drive, and then choose an external drive or network location for your backups.

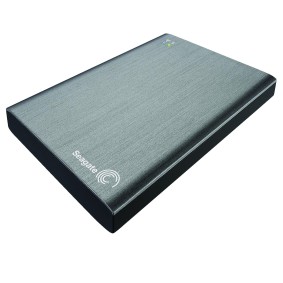
All that said, I do have a couple of favorite brands.  Both Seagate and Western Digital make fair priced external drives that work very well.  There are a number of models available and best of all, you can get them locally at the Best Buy of Staples store.  When I recommend a drive, I choose one of these two.  One of them is usually in the weekly ad from Best Buy or Staples and on sale.

Desktop vs Portable drive

Either a desktop or portable drive will work fine.  Portable drives are usually smaller, have less capacity, and cost more.  If you are using a desktop Mac, purchase a desktop drive.  There is little reason to spend the extra for the portable one.  If however you are using a laptop, you may want to still purchase a desktop drive.

Desktop drives are usually made from a more available, more reliable and larger mechanism.  These drives usually use a 3 ½” drive mechanism.  These drives are available in larger sizes and at less cost.  Portable drives use a 2 ½” mechanism just like those used in laptops.  These are smaller, have less capacity, use less power, but cost more.

One important consideration is that a Desktop drive will need to be plugged into electricity while a portable drive usually is self powered from the USB or the Firewire bus.  This is nice for travel since you don’t have to plug it in to power, just the computer.

If you own a laptop, but use it quite a bit in one place, a desktop drive is likely a better solution.  If you want a backup drive that can travel with you, choose a portable drive for that application.

Size

My recommendation is to think of the future and purchase a drive as large as you can afford.  You will be amazed at how data accumulates and how fast you fill the drive you have.  Raw drive mechanisms are available as large as 6Tb today.  External desktop drives are available that large also but the real sweet spot here today is the 2Tb or 3Tb drive.  Portable drives are available as large as 4Tb with their sweet spot being at the 1TB to 2TB level.

On a Mac Time machine is very smart.  It will use all the space you give it and continue to keep copies of data from the past.  The general thing to remember is always select a drive twice the size of the internal drive you want to backup if you can.  This way you have plenty of space for multiple backups in time machine.  This gives you the most flexibility.

On a PC, you may need to ‘prune’ you backup when it fills the drive,  You can manage the backup space in the same location that you setup the backup in Windows.

Interface (ports)

Drive makers, including Western Digital and Seagate make many models.  One of the many considerations for drive pricing is the type of interface ports the drive has.  Some of the common interfaces you’ll see are:
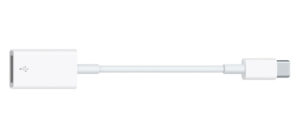
USB – all drives these days include USB 3.0.  USB 3 drives are backward compatible with USB 2 so no matter if your machine supports only USB 2, get a USB 3 or 3.1 drive.  Newer machines may have a USB-C style connecter so be sure to check that out before bringing a drive home.  If your machine supports USB-C, use that connection because it will provide the fastest throughput.  If the drive you chose still uses a USB 3 port, a cheep USB-C to female USB 3 adapter can be had for less than $10.

Firewire – In past years, I would have always recommended that you use Firewire.  But these days, Firewire is a dead technology.  If you have a Firewire port on your computer and you want to use it, be sure to select a drive that has both a Firewire and a USB interface to future proof your purchase.  Firewire drives may be hard to find since the technology is being phased out..  Some Macs like the new Macbooks and Macbook Air do not have Firewire at all.

eSATA – External SATA.  SATA is the native interface od all of todays drives.  The External version of this is called eSATA.  This connection is only available on some tower PC’s and is problematic so I recommend considering it.

Ethernet – This port allows a drive to work connected directly to an Ethernet network.  It is technically called Network Accessible Storage or NAS.  This is what Apple did in the time capsule (a great but more expensive backup unit).  Having this port allows a drive to hang on a network rather than be connected to a machine.  But, it is important to note, these drives are not compatible with Time Machine unless you use the Apple Time Capsule.  If you need some extra traditional storage that you may want to share, this is a good option but for Time Machine, it is is only a consideration if the drive is advertised to support it.  One such drive is the Western Digital My Cloud.  It supports time machine and a lot more. I use one as a secondary backup and while not as fast as directly attached storage, it works great.

So what do you get?  My recommendation here is to get a drive uses USB 3.  Some newer drives may have USB-C connections, and I suspect we will see this a lot more in the future but for now, converting to USB-C if that is the only port your machine has (2015, 2016 MacBook or 2016 MacBook Pro) is simple and inexpensive.

Price

Drive prices have dropped a lot lately.  Price should be one of the last things to think about.  My recommendation is to purchase drives near the sweet pricing spots I described above.  These are the ones in the Sunday circulars. Again, I recommend you purchase a drive as large as you can afford.  Larger drives above the sweet spot size will cost a little more and are usually fine choices if you have a great deal to backup.  These larger drives will become tomorrow’s sweet spot and cost will go down.

What will it cost?  Today, in February 2017, an 1 Tb USB external drive costs between $59 and $79 depending on features and sales.  A desktop 5Tb drive runs about $129 to $149.  With prices this low, more is always better.

Conclusions

All this is probably much more than you want to know about backup drives.  These conclusions will be my opinions of what you should get in a nutshell:

•    Consider as a first choice a Western Digital or Seagate drive
•    Get a desktop Model unless you need to backup your laptop on the road
•    Size the drive a minimum of twice the size of your internal drive
•    Get a drive with a USB 3 port even if you don’t have a computer with USB 3. Someday you will and USB 3 is much faster than USB 2.
•    Watch the weekly circulars.  Drives are always on sale

Computer Scams can really Ruin your day…

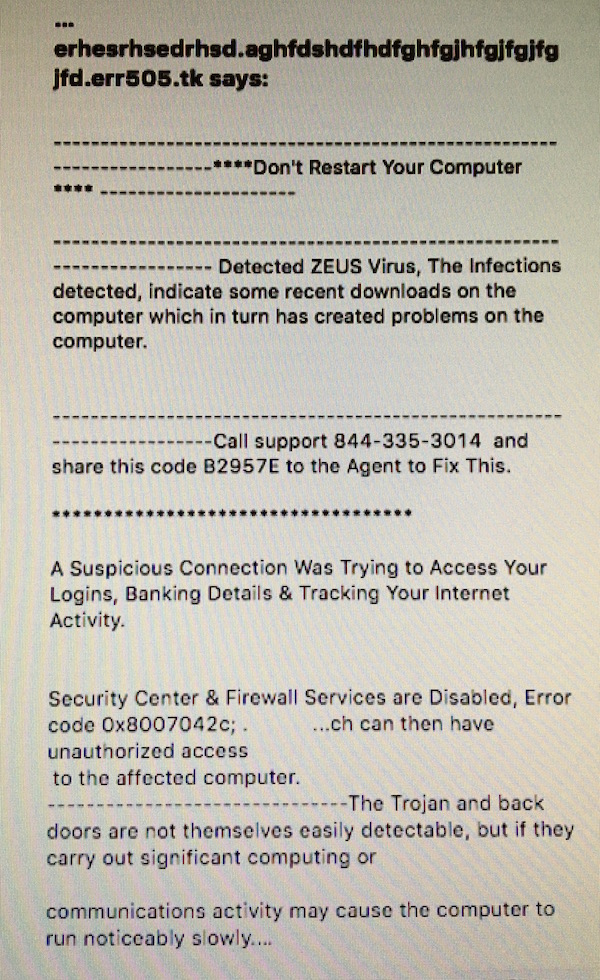
Having a bad day today?  Well it could be a lot worse.  What it you were surfing the web on Facebook and suddenly saw this?

IMG_1137 (1)

Many people have seen messages such as this, particularly by clicking a link on Facebook.  Don’t fall for this scam.  The real infection here is to get you to call the phone number, let them connect to your computer to “Fix” it, and then have them install real spyware.  Then they show you how the machine is “infected” and tell you they can fix it for $190 only to steel your credit card info and make charges to your card.

Don’t make an errant click into a terrible mistake.  Force quit your browser to get rid of the message and ignore it. NEVER call a phone number for a computer problem that pops up on your screen and NEVER let someone you do not know make a connection remotely to your PC or Mac.

This can happen anywhere on the web but lately, many people see this from clicking a link from Facebook.

Google Makes NIK Photo enhancement tools FREE

Screen Shot 2016-03-25 at 4.57.23 PMIf you are a user of Photoshop, Photoshop Elements, Lightroom, or Aperture you owe it to yourself to download these plug-in tools from Google.  These are true high end enhancements for all these products and now, Google has made them free.

the Nik collection It includes Analog Efex Pro, Color Efex Pro, Silver Efex Pro, Viveza, HDR Efex Pro, Sharpener Pro, and Dfine.  Each of these are fine additions to the adobe products but together and for free they add a major enhancement to the ability of these products, particularly for Lightroom users.

  • Analog Efex Pro – Explore the look and feel of classic cameras, films, and lenses.
  • Color Efex Pro – A comprehensive set of filters for color correction, retouching, and creative effects.
  • Silver Efex Pro – Master the art of black-and-white photography with darkroom-inspired controls.
  • Viveca – Selectively adjust the color and tonality of your images without complicated masks or selections.
  • HDR Efex Pro – From natural to artistic, explore the full potential of HDR photography.
  • Sharpener Pro – Bring out hidden details consistently with the professional’s choice for image sharpening.
  • Dfine – Improve your images with noise reduction tailored to your camera.

Start by looking at Define and Sharpener Pro.  These are the best noise reduction and sharpening tools I have ever used.

Problems with Free Wi-Fi Hotspots

imageQ: I have had increasing issues connecting to WiFi with my phone from free access locations at airports and motels. I get messages like “server not available” or “cannot connect to server”. So far, I have gotten around the problem by turning off WiFi and relying on cellular connection. However, I want to solve the problem, because once we are traveling to Canada we will rely on WiFi to send emails. Any explanation or suggested remedy?

A: I often times see the same thing coming from free wireless connections. In many cases you have to chalk it up to you get what you pay for. These free Wi-Fi connections are many times not very good and even more often don’t work. I find this to be very prevalent in airports.

But there are a couple of other things to consider when you connect to the free Wi-Fi hotspot. I’m finding more more often that these hotspots require you to open the Safari browser after you make connection to them and agree to some hold harmless agreement. I think the lawyers have gotten involved and people who offer free Wi-Fi are afraid someone will use the Wi-Fi for illegal purposes.  They allow you to connect, but unless you immediately go to Safari and agree to their license agreement, which often comes up automatically if you run Safari immediately after connection, you don’t actually have any Internet access.

The other possibility is that some of these are not truly free Wi-Fi sites. They may be connections other people are offering from their computers in the hopes of someone connects  Then, once connected, they are able to scan their computer for private information. It’s very hard to do this on the Mac, and nearly impossible on an iPhone or iPad, but on a Windows machine if you connect to one of these fake hotspots, and don’t have your firewall turned on, a thief can scan your computer for all kinds of private personal information. People create these fake access points hoping to get unsuspecting individuals to connect to them.  Nothing to really worry about with a Mac or an iPhone, but frustrating because they act exactly as your are describing when you try to connect to the Internet.

Finally, many free wireless hotspots, particularly at hotels, will not allow you to send email. They block the email ports in the Internet connection to keep you from using their systems to send out spam. I found this happen a lot in nicer hotels.  In fact, when I was traveling for business, it almost went without saying that if you paid for Wi-Fi at a hotel, it would always have mail blocked.

The best thing I can tell you, is to only connect to the  hotspots that your sure are legitimate. If a business says they offer a hotspot, it’s usually a good one to connect to. But if you see one named something similar to “Free public Wi-Fi” I find 90% of the time these are scams so only connect to one that you’re familiar with.  Also keep in mind that the only benefit of providing a free Wi-Fi connection to a business is marketing, so restaurants, and hotels, tend to put their names in the Wi-Fi connection. If you see an unlocked connection with an odd name you’re not familiar with it’s probably not one you want to connect to.

Those are just some of my thoughts.  Rest of shared, it’s not you or your devices that are having the problem, Everybody sees the same thing and has the same problems.


Windows 10: Lets give it a chance

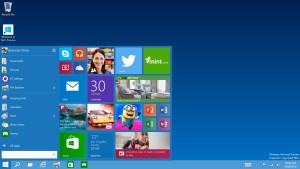
IMG_0415If you’re a Windows user you probably know it’s that time again. Microsoft is about ready to release its latest version of windows, Windows 10. How you feel about this may be directly be related to what version of Windows you’re using today.

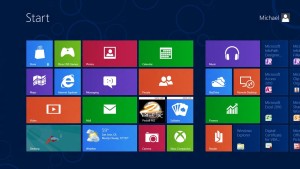
If you’ve purchased a computer in the last few years, particularly from a retail outlet, you’re likely running Windows 8, or Windows 8.1. Microsoft’s release of Windows 8 was nothing short of a disaster. in their wisdom, or at least the wisdom of the people running the show at the time ( who are nearly all now gone) , Windows was ready for a complete facelift. Brand-new interface, out with the old in with the new, and a consistent look and feel across all devices. So basically your tablet, computer, and phone what all look alike. That’s what the people in charge thought customers wanted. But what they found out was that nobody wantIMG_0416 (1)ed that. In my experience, working with people using Windows 8, at least 10 to 1 they absolutely hate and despise the change. Nobody wants to learn new things, but this much radical change at once makes absolutely no sense. So if you’re running Windows 8 you’re probably looking forward to Windows 10. I mean the thought is, it can’t get any worse, can it? To you, I completely agree.

Windows 10 is setting itself up to be a pretty good release. Beta testers are saying there are few bugs at this point in the interface change, in a lot of ways, it’s back to Windows 7, and it is a welcome relief. in many peoples mind, they’re ready for the change. As always, with any new operating system, I want to caution you that you may not want to be the first person you know to install windows 10. I would say it’s going to be harder for a lot of people to resist since Microsoft is providing the update for free to windows 7 and 8 users. But with any release, it makes some sense to wait a little while and let other people get a feel for how well the operating system really works in the real world. So Windows 8 users, while I share your enthusiasm, I also hope you don’t jump to soon and end up sorry that you did.

IMG_0417 (1)The next group of people are folks who run Windows 7. If you’re using windows in business, this is likely the version you’re using today. Windows 7 was a terrific release. it was solid, clean, and had a few bugs once the first initial patches were released. In fact if you’re a Windows 7 user you may be dreading windows 10. You were fortunate enough not to be forced into Windows 8 and the debacle that it brought. So windows 10 is probably something you won’t want to jump on right away. And I completely agree with you too. Windows 7 has been such a stellar release, and software developers have continued to develop suffer for it, but putting off the windows 10 update for a while is probably a good idea. If Windows 10 turns out to be as good as it looks like it could be, holding off a little while certainly won’t hurt anything. So to you Windows 7 users, I’m thinking about six months of waiting might be in the cards. Let’s let Microsoft get the operating system out, all of the initial bugs fixed, and hardware developers time for drivers to be updated before we make a big job and move forward.

Now if you’re in the third group of Windows users, those running obsolete system such as Windows Vista, or Windows XP, you have a much harder decision. Both of these operating systems are not being supported by both Microsoft IMG_0418 (1)and third-party developers. If you’re an XP user Microsoft is not even patching bugs or security holes. That’s a very tenuous place to be and you know better than anyone that it’s probably time for an update. But if you’re using these older operating systems, you’re probably going to need to update your computer too. So purchasing a new machine with Windows 10 already installed is probably your best choice. Having hardware built for Windows 10 will likely make it run better and give you a much better experience. but since you’ve waited so long to do an update, you need to be aware that you’re going to have pain. It’s quite likely some of the hardware you have won’t work, many of your software programs may need to be updated and cost you additional money, and some software may no longer be compatible at all. To you I say, it’s always a good idea to prepare for the update by making a list of all of your software, checking with vendors to ensure that they’re compatible, listing the hardware that you will retain after buying the new computer, and making sure they’ll be windows 10 drivers for this hardware. From what Microsoft is telling us nearly everything that runs in Windows 8 will run in Windows 10. So if you want to begin your preparation by checking for software updates available for Windows 8 you’re probably going to get a good idea of where you stand.

I’ve done some testing with Windows 10 and so far I’m quite optimistic. I believe it’s going to be a good release for Microsoft, and after Windows 8 it better be. But like most windows updates, it’s never good to be the first guy doing the installation. So let’s give it a little time before we make the decision to do the update. Hopefully, after we read enough good reviews, we will all be excited about updating all of our computers to Microsoft’s new version of Windows.

And if not, I’d always be happy to help you make the move to the Mac!

Newer Technology Mini Stack Drive – A Nice addition to a Mac Mini

Screen Shot 2015-07-02 at 2.24.11 PMWhen I purchased my Mac Mini, I was excited about the fact that I was going to have much more space on my desk. And for a time, I was able to do that. But, over time when I needed additional disk space, I needed to add external hard drives to give me that space. I’ve always been one to purchase external hard drives based upon price.

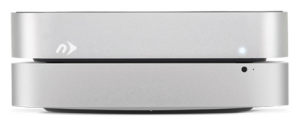
I typically buy whatever is on sale locally. Unfortunately, that has allowed me to have a number of dissimilar drives that all take up space on my desk. I was excited to see NewerTech’s miniStack drive because the form factor of this drive was the exact size of the current Mac Mini. This allows me to place the drive under my Mac Mini and an additional space without using up more disk space.

I was fortunate enough to be able to tryout one of these units with a 1 TB hard drive built-in to see how it performs and how looked when set up with my system.

NewerTech’s miniStack has a number of ports on the back that allow you to be able toScreen Shot 2015-07-02 at 2.24.19 PM connected with either FireWire 800, eSATA (which doesn’t make a lot of sense in the Mac world), or by the common USB3 port that comes on the current model Mac Mini. Since USB3 is faster than Firewire 800, I chose to make the connection with the included USB3 cable.

If you were using Firewire 800, NewerTechnologies was thoughtful enough to include an additional passthrough port for other Firewire devices. Unfortunately, to get additional USB3 ports you need to move up to NewerTechnology’s miniStack Max unit that provides additional USB3 ports and an SD card reader. This unit also allows for a DVD or Blue-ray drive to be included inside.

After placing the drive unit under my Mac Mini, I plugged in the power adapter and the included USB3 cable. Unfortunately, the power adapter included was a large brick type of adapter that required a wide plug to be plugged in. It would’ve been slightly better had a power adapter been built-in internally so the plug-in would only require a standard spaced plug.

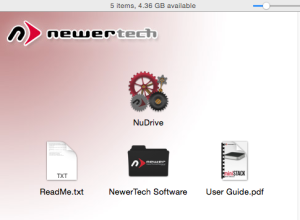
After the initial setup, I was presented with an icon for the new drive software to be installed. I ran the installer and selected the recommended easy-setup option. Having to run software to install a drive was somewhat foreign to me, but running the utility, I accepted the defaults and was presented with an icon for the drive on my desktop. For users who do not install a drive very often, this method of setup is quick and easy. Other options in the process would allow for multiple partitions to be setup if the user wants them.

On the drive was a bundled package of Speedtools OEM version and Prosofts Data Screen Shot 2015-07-02 at 3.06.05 PMBackup 3. In general, these utilities are a little dated. but still functional if you’re using the correct operating system. Windows utilities were also included. For my use, I chose to use Carbon Copy Cloner to do my backup since I already owned it and was familiar with it.

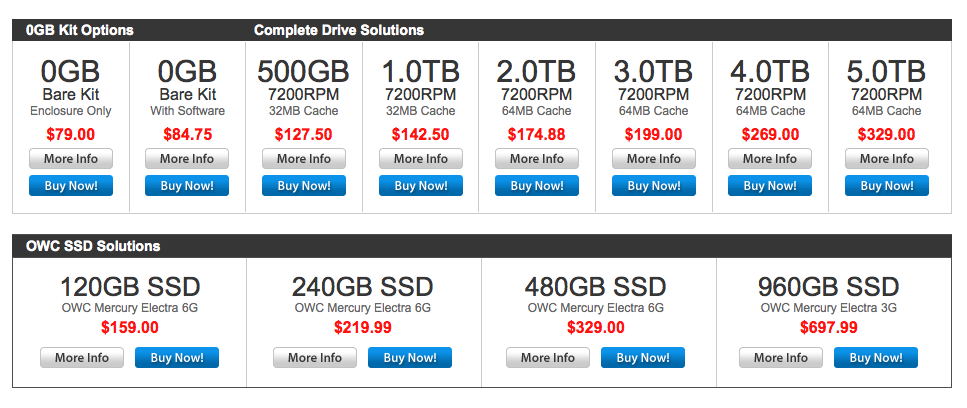
The miniStack drive is available in drive sizes up to 5TB or as a bare unit without a drive. If you really want fast storage, you can also get it with a Solid State Drive SSD in 120GB to 960GB sizes.

Screen Shot 2015-07-02 at 2.25.16 PMOnce the drive was setup and formatted, it was easiest to use just as any other drive on a Macintosh. I set up a Carbon Copy Clone task and copied my main drive due this new drive as a backup. That all without a hitch. Speed was as good as any USB3 drive that I’ve used before. The fan in the drive proved to be very quiet. It did not add much noise to my working environment. While there is a switch on the back of the drive, I doubt that I will use it as I will allow the Mac to continue to run almost all the time.

If you’re looking for a small footprint drive for your Mac Mini, NewerTechnologies many stack is a great solution. The footprint is exactly the same as the Mac Mini and by having a USB3 port it complements the drive internal to the Mac Mini. If you have an older Mac with a FireWire 800 port, and you’re looking for a drive to be able to use it with, the miniStack is also a good choice.

Price varies from $79 to $693 depending on Drive size and type.
For more information check out the Other World Computing website.

Google photos: the photos service that Apple should have developed

imageThe world of photos storage and manipulation, for the average user, has been turned on its head this spring with Apple releasing its new photos app to replace iPhoto, and now google introducing its own photos service that replaces Google+ photos and Picassa. Also the spring, Yahoo has greatly enhanced it’s Flickr service as a competitor to both the big dogs. With all these options for photo storage and manipulation, how does a person make a choice?

So let me start off by being perfectly clear. If you’re a Photoshop user these are not competitive products to you. If you use Lightroom to store your photos, then these are probably not services you’re going to have interest in either. If you were an Aperture user and Apple abandoned you, you’ve probably already looked into lightroom and likely selected it as your new system. But if you were in iPhoto user, someone who uses Windows Photo Gallery or still a Picassa user, the time is right to look at your other options.

I’ve written about Apple photos before and described how it was a good start at a new photo application for Apple. If you’re a Mac User this may be all you need. But if you’re a Windows user, or you’d like to get your photos into the cloud for storage without paying an arm and a leg, the other options are quite compelling.

imageNow I like Flickr. Flickr is very well developed and with its new release has many features that people will find very useful for dealing with their photos.  If your a Flickr user and have already worked out a workflow for putting your photos up at Flickr, then I see no reason to make a change. But if you have photos on your computer, that are haphazardly stored in folders, Google photos maybe just the ticket for you.

Like most Google services, Google photos is available as a web service in your web browser. First off you have to have a Google account to use the service. If you have a Gmail address you already have the account set up.  Once you connect to Google photos you have the ability to be able to put photos into the service and have them backed up. One of the benefits of Google photos is that they allow you to store up to 16 megapixel images uncompressed for free. If you’re using a camera that takes larger images, photos will down sample the image to that size or you can choose to pay for storage space to store full size images. For most users using the free unlimited storage is good enough.

So what makes Google photo special? Google photos has a lot of intelligence built-in similar to what iPhoto users had been used to with faces and places. Google photos gives you the ability to put photos up and then Google uses their algorithms to scan those photos to help organize them in a very simple way.

imageGoogle has made available a small application for both Macintosh and Windows users that allows you to automatically upload any photos on your computer. This application runs in the background and will send any new photos up to Google photos as soon as they’re on your computer. This makes using Google Photos extremely easy. You basically continue to work with photographs the way you always have and Google Photos sends copies of those photos up to their web service and stores them for you as a backup. If you’re in computer user that has photos stored on your computer and is not religious about backing them up I see no reason to not use Google photos just for that service. Even if you do nothing with the photos you put up in Google photos, just allowing Google to back them up for you at no cost is a big win. To do this you don’t even have to go to the website, you can just download the small application, run it, and let the backups begin.

But some of the real power of Google photos begins once your photos are stored with Google. As your photos are put online in an area that is secure and only accessible to you, Google analyzes these photos both by reading the metadata and also by analyzing the image itself. From this Google automatically creates things called stories that are basically short booklets of images that are related often by time or location. You really have to see this in action to understand it. I’ll tell you upfront I was pretty amazed. In addition Google organizes photos by peoples faces, locations, and generic terms such as lakes, mountains, flowers, and helicopters. I am certainly not very good at tagging my photos but the way Google analyze them and puts them into groups was amazing.

imageHere are some of the things googles literature says that it does.

• VISUAL SEARCH: Your photos are now searchable by the people, places and things that appear in your photos. Looking for that fish taco you ate in Hawaii? Just search “Hawaii” or “food” to find it even if it doesn’t have a description. Note: Face grouping is not available in all countries.
• AUTO BACKUP: Keep all your photos and videos safe and accessible from any device. Choose free, unlimited cloud storage available at high quality, or store up to 15GB original size for free (shared across your Google account).
• SAVE SPACE ON YOUR DEVICE: Google Photos can help you clear safely backed up photos and videos from your device so you never have to worry about deleting a photo to make space.
• BRING PHOTOS TO LIFE: Automatically create montage movies, interactive stories, collages, animations, and more.
• EDITING: Transform photos with the tap of a finger. Use simple, yet powerful, photo and video editing tools to apply filters, adjust colors, and more.
• SHARING: Share hundreds of photos instantly with shareable links and use whichever apps you’d like to share.
You can read more about some of the amazing things Google photos can do on Google’s website at http://www.google.com/photos/about/

Google currently has applications for photos on the iPhone, iPad, and android devices. And for first releases, they are very good.  They also promise native apps for Macintosh and Windows coming soon.

So if you don’t have a photo storage strategy, or your strategy has been blown apart with the discontinuing of iPhoto, or even if you just want to try a good way to back up your photos automatically, I highly recommend Google photos as your new photo storage service. I’m not completely counting out Apple photos at this point, but Google photos is the app Apple should have released. So I’ll continue to use the Apple photos app in addition to Adobe lightroom to manage my imagery, but I’m going to let Google backup my photos because I can see the amazing potential of what they released this week.

New Mediacom Mail Server allow for IMAP mail

PLEASE NOTE:  Since the article was written, the Mediacom server settings have changed.  The setup instructions still work but the outgoing server settings need to be changed.  Use  Outgoing:  smtp.mediacombb.net, Using SSL, Port 587, Authentication required

If you are a subscriber to Mediacom, you may have gotten an email telling you that your mail account has been moved to their new server. Typically they send an email about a week before they’re going to do it and then again I’ll follow-up email telling you they’ve completed it. The email that you get for completion may look like this.
Screen Shot 2015-05-01 at 10.59.47 AM

One of the features provided in Mediacom’s new mail service is the ability to use IMAP mail.   These days most of us look at mail on more than one device. IMAP email allows you to leave your mailbox on the server rather than downloading all your mail to each device. This way if you delete one message from any device it gets removed from all devices.

You can set this up on your iPhone or iPad but it does require a little bit of trickery to get it to work. Setting it up on a Mac needs to be done in the same way.

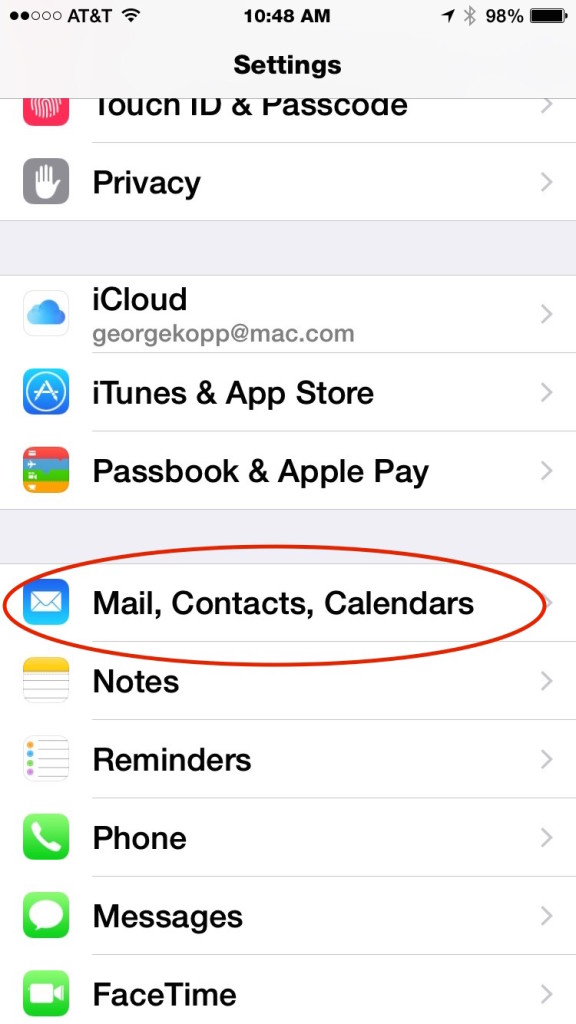
The first step in the process is to go into settings: Mail contacts and calendars: and remove your existing Mediacom account from your device. Any mail you have left on the server Will come back down when you readd the IMAP account.  But if you have mail that’s fairly old it may have been deleted from the server so be sure you’re willing to do without that if you delete your account.

IMG_1715

With your account deleted you’ll need to go through the process of setting up a new mail account on your iOS device.

IMG_1716

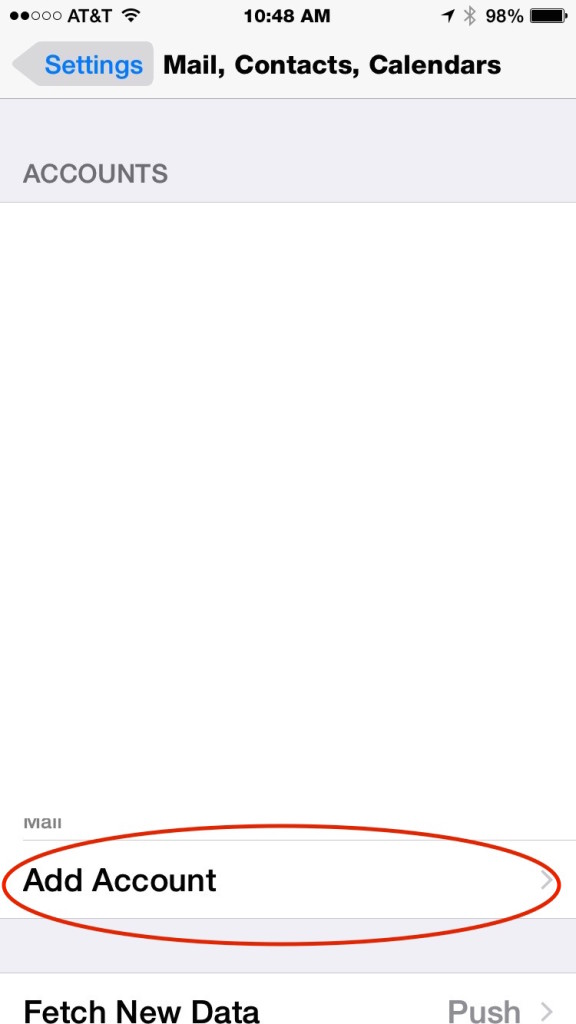
Go to Settings: Mail Contacts and Calendars and select Add Account.

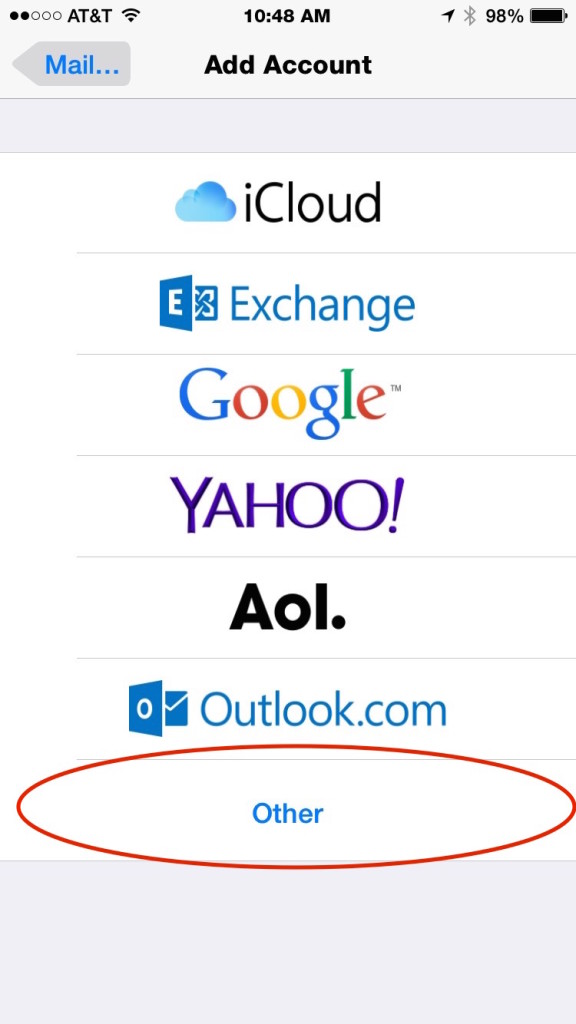
IMG_1717Select Other for the account type

IMG_1718

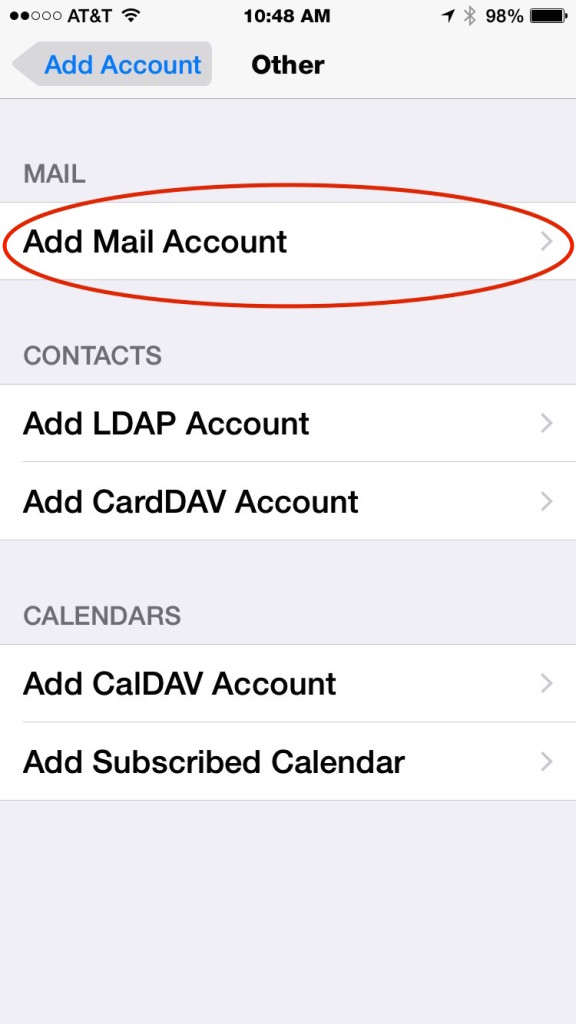
Select Add Mail Account

IMG_1719

Now here is where you need to trick the iOS mail setup application.  Apple’s auto mail setup goes out to look for the correct settings and unfortunately defaults to setting up the email as a POP account again.  So we will use a fictitious email address to trick it.

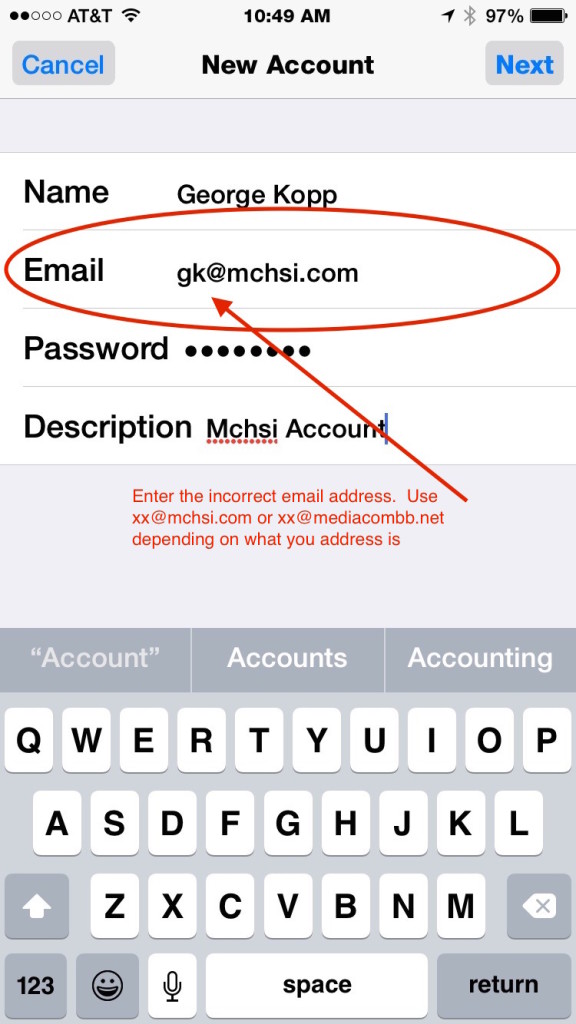
Enter your name and then enter an email address where the first part of the address is incorrect.  Be sure to use the correct portion of the address that comes after the @.  For instance, I entered gk@mchsi.com but you could also use something generic like xx@mchsi.com too.  Enter your password correctly and give the account a descriptive name.

IMG_1720


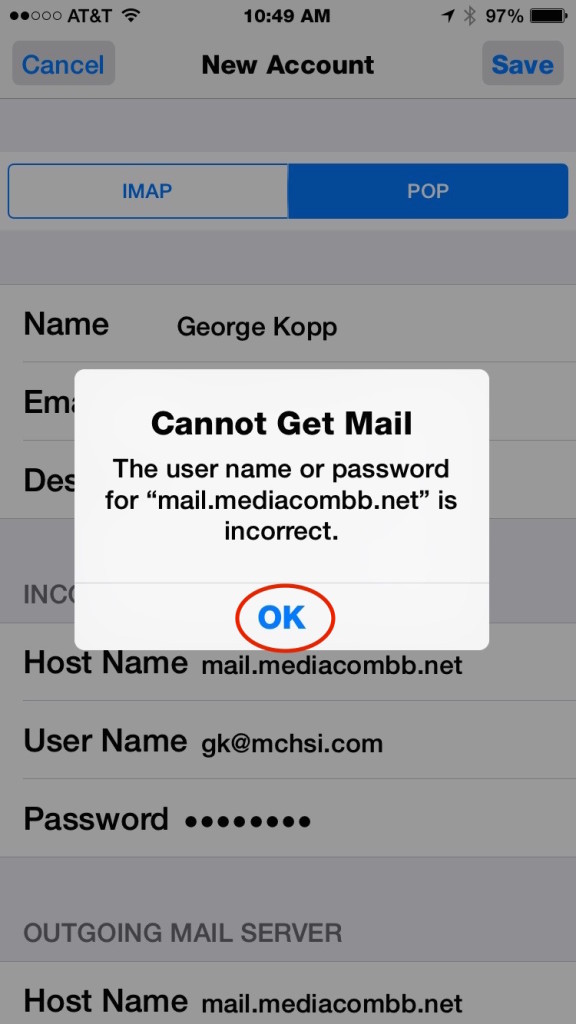
after a few seconds of looking out the server information, you will see the cannot get mail dialog popup.  This error is correct since you used an incorrect email address. Press OK.

IMG_1721

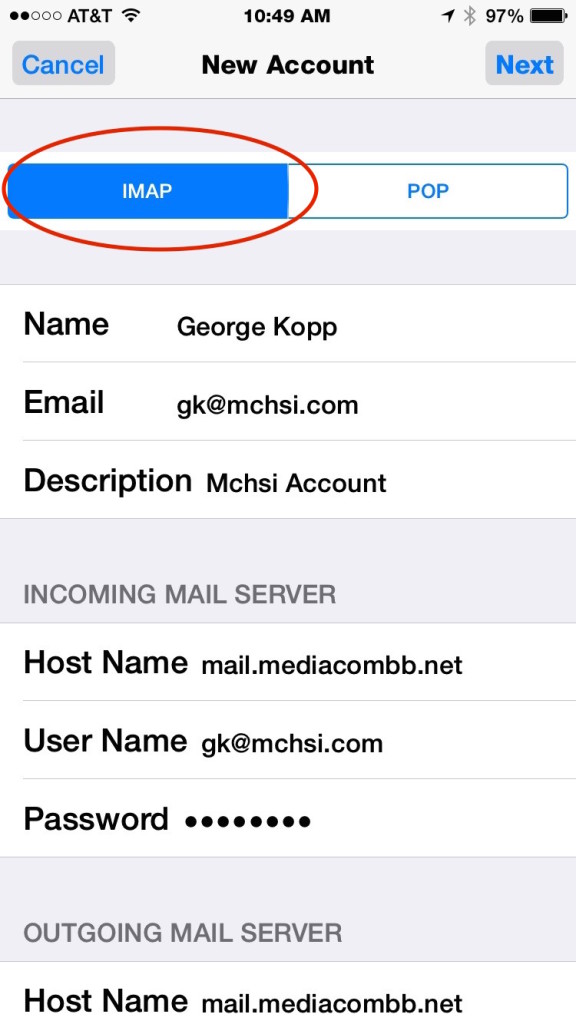
Next change the toggle at the top from POP to IMAP.

IMG_1722

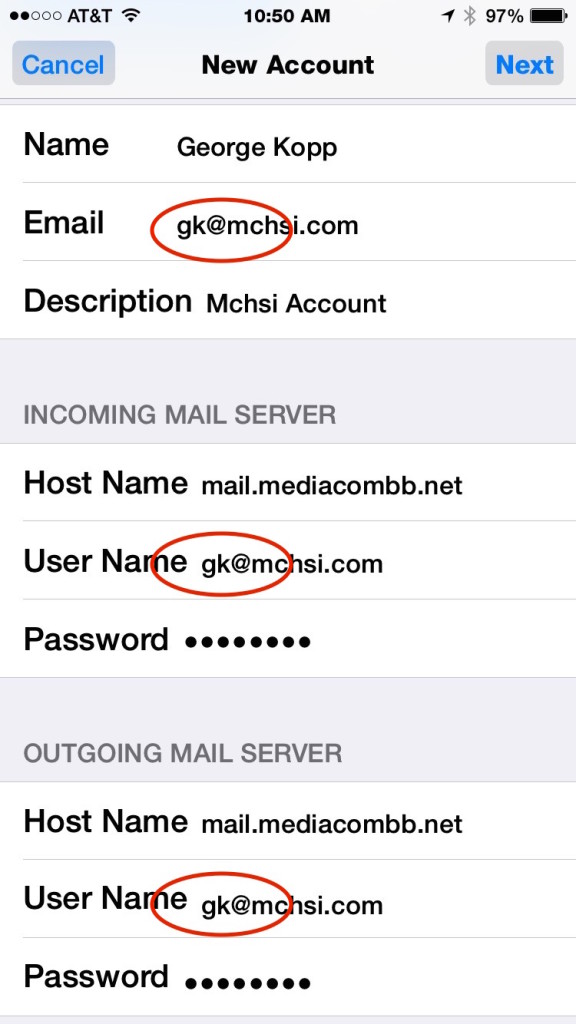
Finally the last step is to correct the fictitious email address you used.  In each of the three locations, edit your email address to the correct one. Press Next in the upper right corner.

You should see blue checkmarks next to the user name and password fields to verify you got them correct.

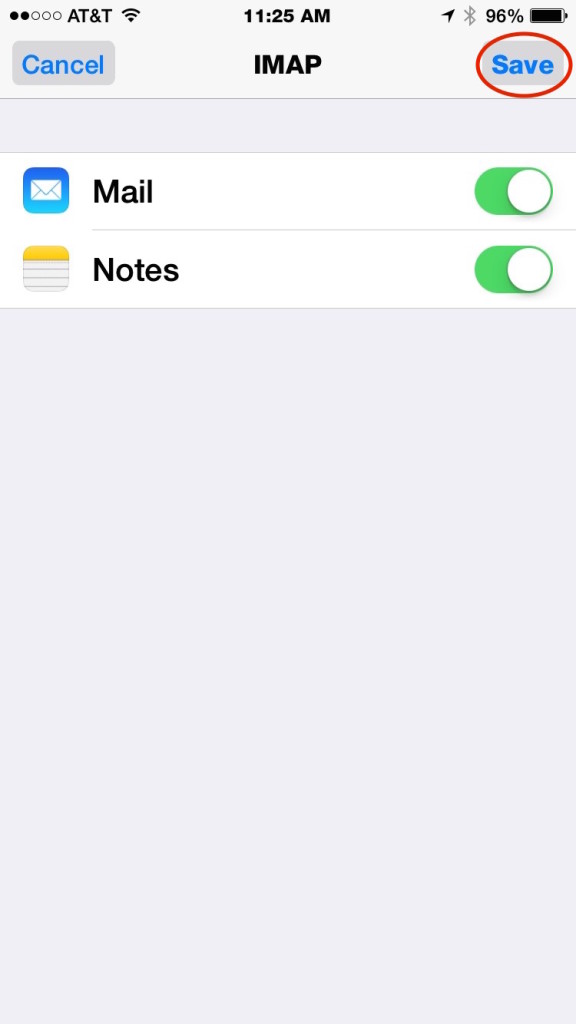
IMG_1723You will see that the account is setup for mail and notes.  Notes will allow you to share notes using the mediacom server between all your devices.  You can choose to leave it on or turn it off but if left on the notes show up in the Notes application on your devices.  Press Done and you are finished.

I have also tested this process for adding the account to my Mac and it works basically the same.  I suspect Windows will work similarly also.

With an IMAP account now you only have to look at your mail in one place and delete it one time and it will be kept up to date on all your devices.

AOL Users: Beware of Phishing Attempts

Recently, I have been dealing with a number of clients who use AOL and have had their AOL account compromised. Some of those report having recently received an email from AOL that their mailbox was full. They went to the link logged in and took care the problem themselves. But in fact, what they really did was give their AOL password away to someone with the intent of locking their account. Many of them had their entire address book deleted but only after emails were sent to everyone they know telling that they had been abducted and needed money to get away or that they were in jail and needed money for bail.

This is a very common phishing attempt that has been going around for long time. Some of my clients that continue to use AOL have their accounts for a very long time and don’t want to have to change their email address.  Even though many times I have recommended that they should get a different email address and leave AOL they continue to stick with it because they don’t want to deal with the effort of change.

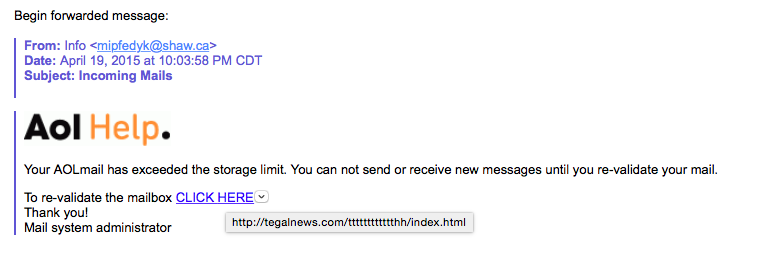
AOL remains one of the greatest risks for phishing in the email industry. People sending these phishing efforts realize that AOL users have used the system for a long time and as a result they realize they’ll do anything to continue to be able to use it. So these hackers send out emails similar to this:

Screen Shot 2015-04-20 at 10.09.23 AM

So let’s dissect this message. First look at where the email came from. That email address is not an AOL email address. But more importantly hover over the click here before you click.

Screen Shot 2015-04-20 at 9.43.10 AM


As you can see, it’s quite obvious it’s not taking you to an AOL server. But people in a hurry, forget these easy to use rules for staying safe. So let’s say it just one more time:

Never, Never click on any email link without seeing where the link takes you.  But then make a conscious decision that the link is going to someplace that makes common sense in the context of what it is supposed to do.  If it doesn’t, don’t click.  If your not sure, forward it to someone that can assist you in determining if it is something you need to do.

Using this common sense approach will keep you from having to deal with all the issues related to an email account being compromised.  Take the time to look forgot clicking.