 In a continuation of my previous post, here they are, the top 5 mistakes people make when they’re considering a computer purchase
5. Waiting until your old machine fails to purchase
When is the worst time to buy new computer? That answer is simple. If your computer has just failed, it is the worst time to have to buy a new machine. Not only do you tend to rush your decision, but you also may have issues with whether your data is well backed up and you can recover the data from your old machine. Let’s be honest with ourselves. Computers fail. That probably is not going to change. So planning your new purchase on a timeframe is often a good idea. I tell people that if your computer is five years old it’s time to start considering a new machine. It may run well today, but a failure of any part of that machine is often too expensive to repair. In fact, a hardware failure on the machine as young as two years is sometimes more expensive than replacing the device.
Don’t expect your computer to last forever. And if your computer is very old, make sure you have a good data backup. There’s nothing I hate worse than telling someone all of their pictures, all of their music, all of their documents, and many times their business records, are gone because they didn’t have a backup. Many times people ask me if there’s any way to retrieve that data. There are companies that will attempt to retrieve the data for you. But beware, these services do not come cheap.
About 12 years ago I have experience with a customer who lost a 400 GB raid device. Unfortunately, there was no backup. Since this date or was absolutely critical to his business, he contracted with a company called Drive Savers to recover his data. They were able to recover every bit of the data he had. But unfortunately, the cost was over $20,000. If that seems like a lot of money, it is, and while prices may have gotten less expensive, our data storage needs have gotten much larger than 400 GB. So when people ask me about recovery companies to retrieve data on a failed hard drive, I always tell them that Drive Savers does a great job, but you probably won’t want to pay for it. Do yourself a favor, and have a good backup strategy for your computer. It will pay dividends if you ever have a failure. One copy of your data is never enough.
The other problem with waiting for a computer failure to replace your old machine is that you’ll never get a good price. Having to make a purchase without giving yourself time to do the research, it will always cost you more. If your computer is older don’t wait till it dies to make the decision to replace it.
4. Not considering other platforms
You’ve always use the PC. Why would you want to change? I’m not saying the change is always good I’m just saying that it’s often a good idea to consider all the options.
Ask yourself if your computing needs could better be served with a tablet device. Could you get by with a browser-based computer such as a chrome book? Is it time to consider a platform change to Macintosh? There may be many reasons one of these solutions is a better fit for you than just buying a another computer like you had before. Think about how you use the computer. Think about where you use the computer. Is a laptop better for you this time than a desktop? Consider all your options before you make a decision on what direction you want to go. You might be surprised at how well you enjoy a change of pace.
3. Believing that all your peripherals will work with a new computer
This is one of the most common problems I see. You go out and purchase a new computer, set it up and do all the software installs, and finally get around to installing your peripherals that you already own only to find out that your printer, thats seven years old, doesn’t have a driver for a new operating system. I see this happen a lot with printers, scanners, and occasionally specialty pieces of hardware. Checking for availability of drivers for the new operating system you’re going to get on your new computer is often a good idea before you make the decision to purchase. While this rarely will change your mind on your computer purchase, it may set your expectations as to what else you may have to replace at the same time as the computer.
Hardware vendors sometimes don’t make drivers for new operating systems. They leave their peripherals left behind in old versions. That doesn’t mean these printers and scanners don’t continue to work, as long as their left on an older version of software. It does mean that these devices may not be able to move forward with you to a new machine. If you know this upfront, you can often better plan your purchase. Checking usually only takes a few minutes on the peripheral vendors website to see if drivers are available.
2. Not discussing your plans with a expert you trust
Making an informed decision on your computer purchase is a great idea. Doing research and looking into what you want or need is the perfect first start. After that, making a plan on what you want to do is the next step. What some people often skip is the idea that what you read on the web is not always the full story. Talking to someone you trust about what you plan to do is a great idea. I’m always happy to talk to people about what they want to accomplish. In many cases we can come up with an easier, less expensive, or better way to do it if we just talk it out upfront. The worst time to try to get advice is after you’ve already made the purchase. A quick phone call upfront will often save many hours of frustration in the end.
 Not getting assistance soon enough
This is probably the problem I see most often. People often believe that they can continue to work on things and solve even though they don’t really know what the problem is. They make changes to settings, reinstall drivers, uninstall software, all in an attempt to get a problem fixed. By the time they finally get assistance the damage they’ve done requires much more effort to fix then it would’ve been to fix the problem in the first place. I have seen cases when people uninstall portions of the operating system that and up requiring a full restore to fix. All in an attempt to fix minor issue with some new peripheral or device they purchased.
I certainly believe in self-sufficiency when it comes to computer use. I believe people should attempt to fix the problem themselves if they feel they can. But the best recommendation I can give is that if you’re making changes, because you don’t know what else to do, that may be the time to get assistance. In some ways, knowing when to say when is a tough thing.
Well there it is. 10 mistakes I see all too ofter. If now is the time to make a computer purchase, I hope you give some consideration to these mistakes so that you don’t end up repeating them. The purchase of a new computer can be an exciting thing. Don’t temper the excitement by causing yourself any of these problems.
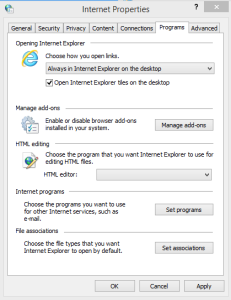
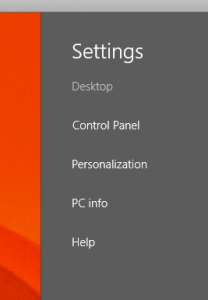 One of the minor annoyances in Windows 8 is the fact that Microsoft is chosen to provide two versions of Internet Explorer. The windows 8 tile version of Internet Explorer is launched from the tile on the windows 8 start screen, While the desktop version of Internet Explorer is launched whenever you’re in the desktop. This is quite confusing for a lot of people. But there is a way to set Internet Explorer to always launch the desktop version regardless of whether you click on the tile on the start menu or run it from the desktop.