Maybe it’s time to Upgrade your Flash Drive…

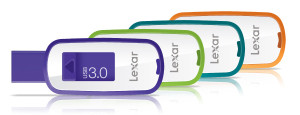
lexar_S23_groupI got this advertisement in the email today and it made me think….

New USB 3.0 drive stores and transfers content faster

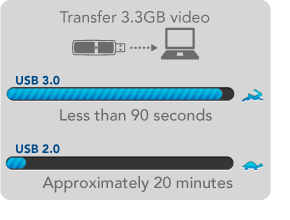
Spend less time waiting for your files to transfer with the new Lexar® JumpDrive® S23 USB 3.0 flash drive. Transfer a 3.3GB HD video clip in less than 90 seconds, 13x faster than the 20 minutes it takes using a standard USB 2.0 drive.*

One of the smallest USB 3.0 drives available, the slim, retractable JumpDrive S23 comes in colorful capacity options—from 8GB to 64GB—giving you a handy color coding system to help you organize your drives and their contents. And it’s backwards compatible, so it even works with all your USB 2.0 devices.

I can remember the trials of burning files to CD.  I even remember 360K floppy drives.  That takes you back.  Then floppies got bigger to 720k and 1.44mb.  We moved to 100mb zip drives and then 250mb.  Not to forget the orb drive too.  But today, file storage is as easy as a flash drive.  Easy and inexpensive.  Sure, the future is storage in the cloud unless you get somewhere with poor internet speed or god forbid no internet at all.

lexar_usb3_transfer.2When I saw this add, and checked Amazon’s price for these, it has become clear that faster is definitely better when the price remains low.  Sure, not everyone has a USB3 port but they soon will.  SO maybe its time to update that flash drive you carry to a USB3 one and perhaps even a larger one.

Think about it…. What is your time worth.

HELP! “Mailbox quota exceeded”

StacksThat’s the bounce back message your friends may see if you fill up your server based email box.  Just because you download your messages you cannot be sure that they are being removed from the server by default.

There are two types of email server systems in common use today.  These systems are referred to as: POP and IMAP.

IMAP (Internet Message Access Protocol)

IMAP is a protocol by which you can read email. IMAP allows you to view your email from more than one place. E.g. from your desktop computer at work and from your laptop at home and from abroad and from your mobile device – multiple locations.

IMAP keeps the messages on the server until it is told to delete them.  In a typical IMAP implementation, all the messages you see on your mail program are located on the server.  With IMAP you have a service provider imposed storage limit called a  quota. If you run out of space on the server you will not be able to download new emails into your account!

POP (Post Office Protocol)

POP is better if you have no need to check your email in multiple locations. If you only ever check your email on one computer at, then POP is fine for this purpose.  In most cases, when you bring the email message down to your computer, it removes it from the server.  But this is a setting and some people, in a hope to save everything they ever get in email, just in case, set it to not remove messages.  In these cases you can also see the same message when you run out of space.

Which one is better?

One big problem here is that not all service providers provide both types of email access to choose from.  Most services that are intended for use on phones, tablets, or computers, may only offer IMAP.  Examples of IMAP providers are:  Gmail, iCloud, Outlook.com, Yahoo, and AOL.  In the over al scheme of things, IMAP is a much more modern protocol because it, having a centralized storage database for mail, allows you to delete a message from one place and have it deleted from all your computers or phones attached to this mailbox.

But not every provider provides IMAP.  Many Internet service providers will only give you access by POP.  These are typically companies more interested in providing internet service than mail.  An examples of this is Mediacom, a local internet service provider where I live. These companies don’t want to provide IMAP because while it is much better for the consumer, it requires more server infrastructure to store these messages on their end.

How do I deal with “Mailbox quota exceeded”?

This depends on the type of account you use.

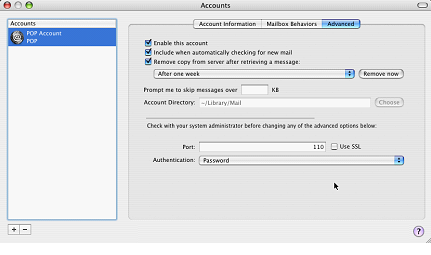
For a POP account, you need to be sure your mail client is set to delete messages from the server. Most mail clients are very similar in setting this up.  You need to go to the account settings and look for a checkbox that says something like” Remove from server after:” and provides some choices such as one day and one month.  One Month is usually a reasonable setting.  With this turned on there is often a “Remove now” button that will remove all server mail older than the one month setting you chose.  But don’t worry, with a POP account, if the messages are on your computer, even though you delete it from the server, it will stay on your computer.

For an IMAP account, it’s not quite as straight forward.  Since the messages on the server match those on your computer, the only ways to clean this up are to either delete messages, move them to a local folder, or increase your quota.

Deleting messages is simple but requires quite a bit of time since you need to make decisions on what is good to keep and what is not.  Be sure to empty the trash in mail to clear them out after marking them as trash.  Moving them to a local folder requires you to create a folder within your mail client and select messages from your inbox to copy to this local folder.  This then stores this mail on your computer and removes it from the server.  If the domain is something that you host of have control of, you can often go into the service providers cpanel (control panel) and increase the mail quota.  This is a little different for all providers so you might want to read their instructions before trying to do it.

The most important thing to keep in mind is to not be a hoarder.  Clean up your email and don’t let many thousand messages accumulate just because you don’t have time to go through them.  Setup up a junk filter and have these messages deleted immediately.

[stextbox id=”info” caption=”Setting Mac Mail to delete messages on a POP account”]


MacMailIn Mail, do the following:

Go to the Mail menu and select Preferences
Click on the Accounts icon and select the Advanced tab
Click the checkbox on for “Remove copy from server” and select “On Month” in the dropdown box below the setting
Now press Remove Now

Remove mailo dialog

[/stextbox]

The Two Faces of Windows 8

Win8I am a Macintosh guy at heart and will likely stay that way so this article may be a little difficult for some of my Mac buddies.  Let me start with a clear statement, “Windows 8 is really not that bad”.  I say this because if you read the tech press, you get the feeling that Microsoft has really stumbled with the Windows 8 release.  In many ways, I believe this is true but I think the perspective is different depending on the hardware you use it on.

Many in the tech press have installed Windows 8 on a machine that they own.  Usually this machine was running Windows 7 and was relatively powerful.  The problem with this perspective of the new operating system is that it tries to run a truly new generation operating system on a previous generation hardware.  Now I am not saying you need more power to run Windows 8.  Microsoft has actually made the operating system faster and more fluid on older hardware in this release.  So many people believe that they have a machine capable of running Windows 8 in the machine on their desktop now.  While this is true, the magic of Windows 8 really does not begin to show up until you try it with a single new component: A touch screen interface.

I have worked with a number of people who have had to replace a PC since Windows 8 came out and have purchased a standard desktop or laptop that included Windows 8.  Every instance I have worked with have hated the interface changes windows 8 has brought.  They feel it is harder to find things, difficult to get used to, unresponsive, and in general a real step back for personal computing.  And I have to admit, under these circumstances, with this hardware, or older hardware intended for Windows 7, these people are absolutely correct.  Without the single new element of a touch screen display, Windows 8 is difficult to use and a pain to configure.  But add this touch screen and quite honestly, Microsoft may have something here that is magical.

Why a Touch Screen

A touch screen ads to the usefulness of Windows 8 in many ways.  The new interface makes so much more sense once you use it with touch.  The movements that are truly hard to get to work with a mouse are simple with your finger.  Swiping, a gesture used in Windows 8 very often, is nearly impossible with a mouse but truly effortless with a touch screen. Moving your mouse all the way across the table to get to the charms bar (a method to get to more applications and settings in Windows 8) is tough to do but swiping from the left of the screen is simple.  Now I will agree that Microsoft made a few mistakes in the release of Windows 8.  The insistence of having no Start menu and the inability to boot the machine directly to the desktop are a couple you hear about a lot.  And these really make sense to those using the old mouse and standard screen that many used to test Windows 8.  But even these complaints make much less sense if you can simply swipe on the screen or touch an icon with your finger.  Fortunately, Microsoft was listening to the criticism and added these features back in the soon to be released Windows 8.1 version as a free update.

I have until recently been talking about Windows 8 in a similar vein.  I tested it when it was released on existing hardware and found all the problems and difficulties to be valid.  I recommended people I work with to seek out a Windows 7 machine (which are still available from Dell Small Business) and skip the Windows 8 “experience”  But this past weekend I picked up a low cost Windows 8  convertible machine with a touch display and I have to say that just these few days have made me change my opinion.

A convertible laptop is a tablet screen that can be docked into a keyboard to make it function like a more traditional laptop.  This style of machine is a mix of older hardware, with a trackpad and keyboard, and newer touch screen technology.  It allows the undocking of the screen, which really contains the computer, and allows its use as a tablet.  With Windows 8, this type of computer is a perfect combination (listen up Apple). Using the tablet with Windows 8 is a real pleasure.  While I am not yet a fan of the Metro style interface, I can see how things are supposed to function in Windows 8.  Then when I need a keyboard, docking the unit back to the keyboard dock, which has an additional battery that recharges the tablet, is a fine way to work on older Windows applications.  The specific unit I have used has a less than optimal touch pad but other than that, works in traditional fashion very well.

Now that I have used this device, I must say my Windows 8 recommendations are a little different.  I am not as skeptical that Microsoft missed the mark.  I really think that Microsoft may be thinking a little too far ahead for the traditional Windows computer user.  In an effort to get ahead of the curve, Windows 8 really caters itself to new generation hardware.  In its current release, it makes computers without touch capability actually harder to use.  Windows 8.1 will assist by adding a few requests from the masses but it still will not make it all work easily without touch.

My recommendations on Windows 8

Do not upgrade a standard Windows 7 machine to Windows 8.  Wait for your next computer purchase to make a change

If you need to purchase a new computer with Windows 8 now, only consider machines (desktop or laptop) with a touch screen display

If you want to purchase a new standard machine without touch, wait until later this year when Windows 8.1 is released to ease some of the frustration

It’s time to give Microsoft a break here on Windows 8 and look at it in the context of what it was intended to run on.  If you do that, your Windows 8 experience will be much improved and you may actually grow to like the changes just like I have.

As for my beloved Apple…. watch this convertible form factor.  I would love a Mac with a touch display that could be undocked to run as an iPad.  Now that would be really cool.

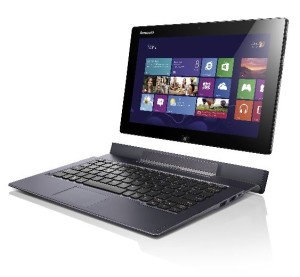
IdeatabThe Lenovo Ideatab Lynx

The Lenovo Ideatab Lynx is a tablet computer running full Windows 8.  It has an optional keyboard dock that makes it into a convertible style laptop.  With an Atom processor, 2gb ram, and 64gb solid state disk, it is not a powerhouse by today’s standards but runs Windows 8 and all standard office applications very well.

Want to access your home web camera but your IP address continues to change?

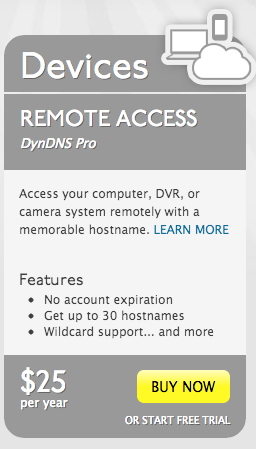
Screen Shot 2013-07-05 at 9.49.26 AMIn todays connected world, many people would like to be able to access their computer, DVR, webcam or camera system remotely without having to remember a confusing (and ever changing) IP address? DynDNS is a great option for those who need Dynamic DNS and Remote Access capabilities without any bells, whistles or fireworks.

What Does It Do?

DynDNS Pro allows you to assign an easy to remember hostname (such as yourname.dyndns.org) to your location’s IP address. By installing an update client on a device at that location, your hostname is automatically updated whenever the IP address changes, ensuring you can access your device remotely at any time.

Most internet service providers charge you extra to provide a fixed IP address that does not change. Others don’t make that an option at all. DynDNS allows you to get around those restrictions and still get access to devices in your home or business. This service works in conjunction with a good router or firewall in your location. THink of the router as the locking system for your internet. And DynDNS as map of how to get to your front door.
After signing up and paying a low one year subscription rate of $25, you download a small client piece of software that you run on your Mac or Windows machine. The software needs to run on a machine that will be left on all the time. This software senses your external IP address provided by your internet service provider and sends it to the DynDNS service. On the service you setup a permanent url with DynDNS as the access point for your network. An example might be http://myhouse.dyndns.org. The software you have installed on your computer checks for the actual IP address you are using from your service provider every 5 minutes. Lets say for example it is 100.120.130.140. It then tells the DynDNS service that the url ttp://myhouse.dyndns.org is at the ip address 100.120.130.140.

To access the devices in your location, you simply configure them for http://myhouse.dyndns.org rather than the ip address numbers. DynDNS does the network address translation to rout any requested traffic to your location front door. Once at the door, port forwarding on your router needs to be configured to provide the necessary secure access. This process may sound difficult but a networking professional could assist you in setting it up.

With a service like DynDNS you can get access to those security cameras, network storage devices, or DVRs easily from anywhere in the worls. When you service provider will not give you a fixed IP address for a reasonable cost, DynDNS can come to your rescue and make your connections work.

Home Control with the Nest Thermostat

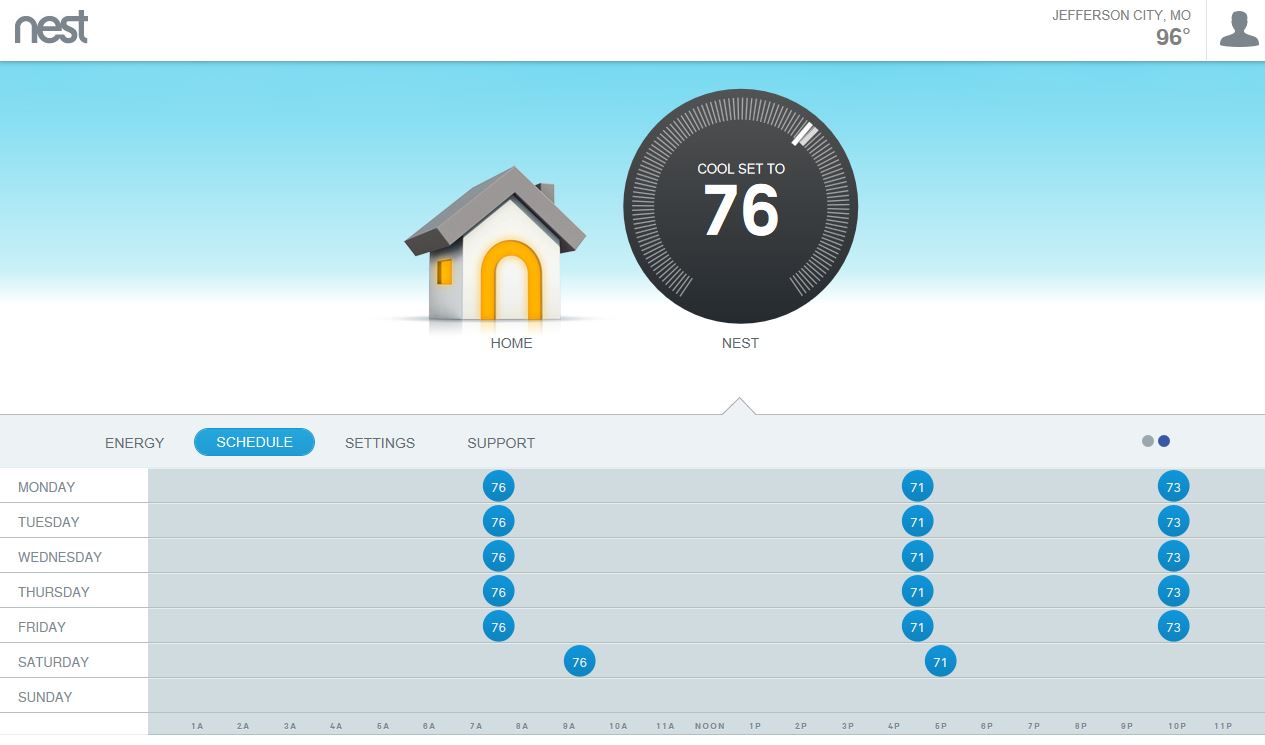
Nest 1For the last 15 years, I have had a controllable setback thermostat in my home.  When we first moved in, I created a program for it.  As the season changes, I would reset the program.  Unfortunately, I would forget to adjust it sometimes and leave it setup for the wrong season.  Then I would manually adjust it to the temperature I needed and try to remember to set the program back on later.  I did not do a very good job of remembering and after the first 6 or 8 months, I ended up leaving it set on a specific temperature and forgetting about it.  That definitely was no way to save energy!

When I first read about the Nest thermostat it intrigued me.  A computer controlled thermostat that I could adjust from anywhere sounded like something I would actually use.  Not only that but if the device actually learns my habits, it could be even better at anticipating my needs.  If a Nest thermostat could learns my schedule, program itself,  and can be controlled from my phone it would be awesome. Not only that, but if teaching it well could let Nest lower my heating and cooling bills up to 20% it would pay for itself.

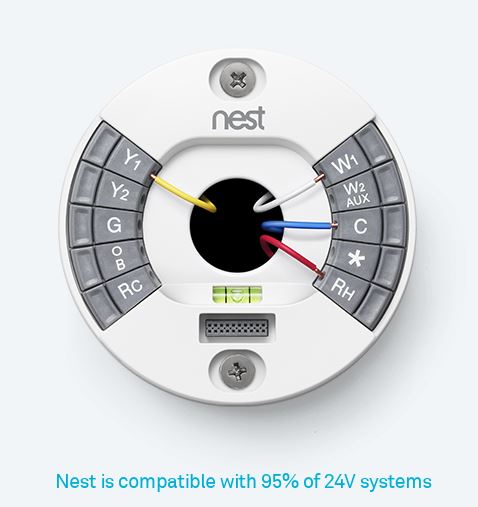
Nest 2I looked into the Nest and checked out my system at home only to find out that the first generation Nest could not control my Heat Pump system.  I was absolutely thrilled when Nest introduced it’s more advanced system that met my needs.  I ordered one immediately.  If you’re comfortable installing a light fixture, you can install Nest yourself. Three out of four people install Nest in 30 minutes or less.  You can also buy our Nest Concierge installation service from nest.com or call 855-4MY-NEST for more info.

Nest 3First, you answer a few basic questions during the install, connect it to your home WiFi, and after that, Nest will optimize itself for your system and start learning from your temperature changes.

Nest knows one size doesn’t fit all. So you tell Nest what system you have and System Match will turn on specific features to keep you comfortable and help you save.  My system is a Heat pump so nest knows

After you connect Nest to Wi-Fi you can access it from your smartphone, tablet or laptop. Changing the temperature or schedule remotely is just like making a change directly on your thermostat. So when you turn up the temperature on your phone it’ll affect Nest’s learning and schedule, and that info will show up on your Nest at home. You can even set features such as Early-On to get the temperature you want when you want it. If your schedule says 72ºF at 6am, Early-On will start heating or cooling early so it’ll be

Filters are incredibly important for systems that blow air out of vents. A clogged filter can increase your bill by 5%. Unlike other thermostats that just alert you once a year or once a month to change the filter, Nest’s Filter Reminders are based on how many hours you’ve used heat or AC. That means they’ll only

One of the really innovative features is called Sunblock.  Sunblock senses when Nest is in direct sunlight and automatically adjusts so Nest reads and sets the correct temperature. It uses Nest’s built-in light sensor to track the sun’s patterns and temperature sensors to detect—and adapt to—heat spikes from the sun. Sunblock is enabled by default in every Nest thermostat, and will turn on after at least one day of Nest being in direct sunlight.

If you live in an excessively humid area (Mid Missouri Summers) and don’t have a dehumidifier, you already know the only way to control humidity – and the mold that comes with it—is with the air conditioner. With Cool to Dry, Nest uses its humidity sensor to detect when humidity reaches potentially unhealthy levels. Then it automatically turns on the air conditioner when needed—for as long as its needed—to help keep your home dry.

The Nest Mobile app works on all iPhone, iPad, and Android tablets, including Nexus 7 and Kindle Fire. You can also log on to your nest from the Web and make changes to your unit or review your energy use.

The thermostat on the wall is absolutely beautiful.  For the first time, I have a thermostat that I can understand what my energy use is and stay comfortable in the process.  Nest can’t control the weather (yet), but with all it’s features it can help make this a better, cooler, more comfortable summer. And you could even begin to save money in the process.

Why do my iPhone text messages show in different colors

photo 1If you use an iPhone You may have noticed that sometimes when you send a text message, the text is in blue and other times it’s in green.

Apple is introduced iMessage as a tool for sending text messages. iMessage uses the Internet, or your data service, to send text messages rather than using text services provided by your cellular provider. This way, texts do not cost you when you send them. But iMessage also allows people using Macs to be able to see text messages coming in by using your iCloud account.

If you tie your iCloud account to your phone messaging application, a text message sent from your phone will also go to iOS devices and Macs that are logged in to iMessage. Apple indicates an iMessage connection between two devices by showing those text messages and blue. So if you’re using I message and the person you’re sending two is also using I message them those text show up as blue text.

The other benefit iMessage provides is that it  is two-way conversational. Once you send a message, below that message you’ll see the word delivered. That says that the message you sent made it to the other person’s device. When the other person looks at the iMessage Below the message will change from delivered to read. This way I text conversation between two people in iMessage allows you to track when the messages received and when the person looks at it.

photo 2But what if a person doesn’t use I message or you’re sending a text message to someone on a different style phone. That’s why the text you sent sometimes look green. If the text messages being sent using your cellular provider’s text messaging system, the message shows up as green.

The extra benefits of being able to tell when a message is delivered or read makes iMessage a great tool.  Unfortunately both you and the recipient must be using a Mac or an iOS device for this to work.

Posted in iOS

Firewire is Dead! Mac Users better get ready for it.

firewire-logo[1]The IEEE 1394 interface, was developed in the late 1980s by Apple. Apple called this interface FireWire to put a more consumer oriented name to it. This interface is a serial bus interface standard for high-speed communications and synchronous real-time data transfer. Basically, we all know it as a method to transfer data from a storage device to a computer.

When firewire was first developed, the real competition was serial cable transfer or a brand new standard called USB. But firewire was hundreds of times faster than USB. This allowed firewire to become the standard for video camera data transfer as video moved into the digital arena.

Many Mac users were first introduced to using firewire with a video camera. A firewire connected video camera was an important part of Apple’s iMovie introduction because using this type of camera interface allowed the new iMovie software to not only load the video data but to control the playback of the camera. This was a huge advance from the need to press play on the camera and then capture on the computer. It allowed iMovie to become the standard for video production in homes and businesses world wide.

But firewire not only allowed video data transfer, it allowed data transfer of all types. Firewire harddisks became the gold standard on the Macintosh side of computing as people used the fast transfer ability to have quick backups and even use the external drives to run the operating system of their computers. Eventually, USB caught up in speed with USB2 but because USB was a shared bus system, slower devices or multiple devices on the bus reduced the speed to a crawl.

Firewire advanced to be twice the speed of USB2 but it never really caught on as the video camera industry moved to solid state memory and memory card storage. This left firewire to primarily a disk storage interface.

For years, I have recommended firewire to mac users (and PC users with a firewire interface) for harddrive storage. It has always had better throughput than USB2 and it was chainable so you could add an additional drive to the chain and get more storage.

Unfortunately, that time has passed. Apple has given firewire the boot in early June 2012 with it’s introduction of thinner machines. Firewire was already jettisoned from the MacBook Air since it’s introduction. At first, this was worrisome since USB performance just was not up to the large data transfer tasks. But with the introduction of Thunderbolt in Apple’s new systems, all that remains is availability of peripherals to put the nail in the firewire coffin.

Thunderbolt (originally called Light Peak)is an interface for connecting peripherals to a computer via an expansion bus. Thunderbolt was developed by Intel and Apple together. Thunderbolt provides a much more capable bus than firewire ever did and does so with blinding speed. But the technical capabilities will not kill firewire. The size of the connector is what has done that.

As devices get smaller, the space for a connector becomes precious. Firewire connectors are just too large for new devices while thunderbolt connectors are much smaller. Combine a better technical solution with one that fits and that explains firewire’s demise.

So for Firewire users world wide, it’s been a good run. Fortunately, Apple has introduced a Firewire 800 to Thunderbolt adapter to get us by until our firewire peripherals need to be replaced.  Firewire served us well but its time has come for the old parts bin. Faster connectivity is here with thunderbolt and even with USB3 to some extent. Don’t morn it’s passing but revel in the faster data transfers of the future.


Posted in Mac

Taking your Photos Beyond iPhoto

Elements 1Do you want to do more with your photos than iPhoto can do?  Perhaps make some edits to the photo itself or a portion of the photo?  I previously wrote how Lightroom from Adobe might be an answer for your photo needs.  I believe for many people looking to move forward from iPhoto, it is.  But some users have a need to be able to edit a portion of a photo.  In that case, Photoshop Elements may be the right tool to use for this need.

iPhoto gives you the ability to make some terrific modifications to your photos.  If you need to adjust the color or saturation of a photo, it gives you great tools to be able to deal with these kinds of corrections.  But what if you need to make a change to the image itself?  Perhaps you need to fix the color of only a portion of the image.  To do this you need additional tools.

The industry standard for such work is Photoshop.  Photoshop gives a professional photographer the ability make nearly any change to an image that could be dreamed of.  But Adobe Photoshop is an expensive program that can only be obtained on an ongoing subscription basis at $29/month and it has a steep learning curve.

Fortunately, Adobe recognizes that the photo enthusiast cannot spend this much money to do minor edits to their photos.  Adobe also sells a product called Photoshop Elements.  Elements provide much of the ability to make modifications to photos that an amateur photographer might need.  In addition, they also provide additional tools that make typical modifications you might want to make even easier.  As good as iPhoto is, there are times it is just not quite enough and elements gives you those extra tools you need to save that all important shot.

Some of the great features in Elements include:

  • Cookie cutter tool
  • Smart brush tool
  • Photomerge modes, like Group Shot, Scene Cleaner, Faces, and Style Match
  • Guided Edits and Quick Fix mode
  • Automatically divide scanned photos when using a scanner
  • Photo creation templates for photo books, greeting cards, calendars, and more.
  • Easy online sharing options for Facebook, Flickr, etc.

Adobe sells Photoshop Elements for $99 in a box but you can often find it for as low as $69 from the at Amazon.  Elements is cross platform with the same license so it will run on Windows or Mac with no problem.

If you are looking for the next tool to put into your photo fixing bag of tricks, elements might just be the one for you.  At the lower cost, it is a great way to begin looking at serious photo editing and provides the easy to use tools to get those fixes right the first time.

To find out more about Photoshop Elements 11, check out the features from Adobe’s web site at the link provided.

Logitech Harmony Smart Control: The one to Purchase.

Harmony 1Universal Remotes.  I can personally remember 4 different ones I purchased over the years.  Some as simple as a universal Sony remote about the size of a hard backed book that did a good job with simple on off and channel commands.  Others as complex as a Harmony remote with a screen on it that was programmed by a USB cable.  All sort of worked.  None really worked well.  That all changed with my purchase of the Logitech Harmony Smart Control.  Finally. I have found a smart remote that I feel can put all my other remotes in a drawer.

What makes this one so special?

How many people sit on the couch to watch TV these days and have their iPhone or iPad right at their side.  Logitech takes advantage of this with this new remote product.  ALl programming of the remote is done through your iOS device.  And yes, Android is also supported.  Using the Harmony app (free from the Apple app store)you connect to the device and program it from the web.  You simply follow the prompts, make selections of the brand and model of devices you have, tell it what port the device connects to the TV on and it all gets programmed for you.  It even creates shortcuts to common activities like Watch a Movie that can turn on the TV, turn on the Blu-ray player, and set the correct connection port.  All of this happens from the push of a button.  This integration with iOS makes getting the remote to control all your devices very easy.

Not only will it control all your devises that use an infrared remote, but the unit has Bluetooth built in so it seamlessly addresses devices like the PS3 game console that uses Bluetooth.  Unfortunately for my aging Bose system, it does not do Radio Frequency (RF) devices.  In addition, this device handles the AppleTV very well.  Other units make it hard to access the menu button but this one maps it automatically for you.  Everything is seamless.

Harmony 2With this unit, you can easily control your home theater devices.   Anyone in the house can download the Harmony iPhone or Android app turn their mobile phone into a personal universal remote control, including 50 favorite channel icons and gesture control.  When your mobile phone is not available, you can use the included simple remote control. It lets anyone in the family change the channel and adjust the volume.   Simply press one button to switch to favorite activities, like watch TV or play a game.

It controls what you already own.

Logitech says you can consolidate 8 remote controls into one simple mobile app. Harmony is compatible with over 225,000 home theater devices. And unique to Harmony is their patented Smart State technology, which remembers your devices’ power and input settings and automatically adjusts them based on what you want to do.  If you are unsure if your device is supported, Logitech provides a great presale site to check.

Here is the best part of this product.  It’s reasonably priced for a smart remote.  Priced at just $129, it is a universal remote that I can finally recommend to people.

My Windows 8 Laptop makes no Sound

Q: My Windows 8 computer says it cannot find any Audio hardware on my Laptop.  It used to make sounds but now does not.  Is this a hardware issue or a software issue?

A:  It could be either but we should be able to easily tell.  To do this we need to look into Device Manager.  In windows 7, it was as easy as going to control panels but Windows 8 is a little different.

Before proceeding, I would first make sure the volume is turned up using the keyboard key on the machine.

Now, Follow these easy steps to open Device Manager in Windows 8 from the Control Panel:

1.From the Start screen, swipe up and tap the All apps icon.  If you have a mouse, right-click on the Start screen and then click All apps.

2.Once on the Apps screen, scroll or swipe to the right until you see the Windows System heading.

3.Tap or click on Control Panel, located under Windows System.  Windows 8 will bring up the Desktop and automatically open the Control Panel.

4.Tap or click on the Hardware and Sound link.

Sound Driver

Note: You won’t see Hardware and Sound if your Control Panel view is set to Large icons or Small icons. In your case, just tap or click on Device Manager and then move on to Step 6.

5.In the Hardware and Sound window, click or tap Device Manager, located under the Devices and Printers heading.

6. In Device Manger , you need to look for The Audio portion as shown in the image.  We are looking for any of those to show with an X, a yellow triangle, or a red mark.


If the Audio devices are completely missing from Device manager, it is likely a hardware issue with the laptop and you should call the manufacturer.  It the devices show up but have an X, a yellow triangle, or a red mark by them, it usually means it is a driver issue. To fix this you would double click on the device, choose the driver tab, and update the driver.  If this does not fix it, the next thing to try is to uninstall the driver from the same location and reboot the machine.  Windows should then reinstall the driver on the next boot.