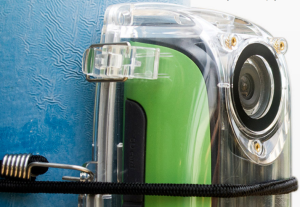
Here is the time-lapse I did last night. This time I had better luck with the UltraWarmer hand warmer. I strapped the warmer to the front of the camera and it kept the lens clear overnight.
Author Archives: koppg
Brinno Timelapse Camera
For the last few days I have been working with a new time-lapse camera called Brinno. The Brinno camera is a self contained camera with the main purpose to create time-lapse video.The particular model of brine I am working with is intended to be a construction camera.
Brinno has been a recognized leader in Time-Lapse Cameras. With the industrial-Grade professional construction camera, BCC200, a wire-free, weatherproof camera bundle, offers quick and easy installation, without cumbersome wiring or power requirements. It illustrates the entire project, no matter how many days, months, or years taken, in few minutes instant HDR time-lapse video which presents the project with a high publicity factor on project and marketing management.
The camera is quite easy to setup and configure for the particular need that you want to capture. You set the camera to take a photo at a particular time intraval and you set the frame rate of the final video the camera creates from the photos.
The example below was taken with a 20 sec image intraval and the final video was created at 15 frames per second. SO the video takes 3 photos per minute and uses 15 photos, or 5 minutes of time to create 1 second of video. The video is created automatically in the camera. Unfortunately, it creates a windows AVI video but iMovie can import and convert it to video you can then edit.
Overall, I was quite pleased with the result considering the limitations of the capture such as a cloudy cold night and the capture being done in the city with quite a bit of ambient “city” light. I also used a UltraWarmer warming pad around the camera to prevent the condensation but unfortunately it did little good.
I will be continuing to work with this in the hopes of being able to get more comfortable with the settings.
Mac Ransomware found in the wild…… Don’t panic!
Update: With the help of security researchers, Apple over the weekend quickly blocked a cyberattack aimed at infecting Mac users with file-encrypting malware known as ransomware.
Facebook, Twitter, and the headlines on all the computer new sites this morning are counting the first occurrence of Mac ransomware found in an application distributed to users computers. In fact, I’ve already had emails from people I provide support for worried that they may be infected. Here are a couple of things that are important to understand about Malware such as this.
Here is the description of the malware that was found from Appleinsider’s website:
“Users who downloaded the Transmission BitTorrent client on Friday or Saturday are being warned to update to the latest 2.92 version to avoid being targeted by a ransomware that infiltrated an earlier version of the open source software…… The malware then “demands that victims pay one bitcoin (about $400) to a specific address to retrieve their files.” Researchers say the malicious code is “under active development” and seems to be trying to also encrypt users’ Time Machine backups to also prevent them from being able to recover their backed up data.”
So basically, unless you downloaded the transmission bit torrent client recently, you have nothing to worry about this particular instance.
Some of you may ask what is a bit torrent client? Wikipedia says, “BitTorrent is a communications protocol for the practice of peer-to-peer file sharing that is used to distribute large amounts of data over the Internet. BitTorrent is one of the most common protocols for transferring large files, and peer-to-peer networks have been estimated to collectively account for approximately 43% to 70% of all Internet traffic”
Basically, bit torent clients are used to download large files, typically large files such as pirated movies, still in applications, and other things that you can’t make generally available on the Internet.
So again, unless you’re downloading files of this type using this particular software you don’t need to worry about this particular infection.
The big concern about this particular malware is that it’s only the beginning of others that we may see. Only time will tell, but I fully expect to see more of these in the near future. These types of infections are very prevalent on the Windows side and I have seen a number of computer users lose all their data as a result.
So what’s a person to do?
Back up your data. Not just once, but twice, and keep one copy of the back up not connected to your computer. I typically back up with time machine is my every day back up and then use carbon copy cloner as a secondary back up on a drive it is not mounted to my computer. This way if I were to get infected with something like this, and it were to infect my back up that’s connected, I still have an additional copy of my data to recover from.
People think that’s a little paranoid, but believe me if you ever need to recover files having a second copy certainly makes you feel better. With external hard drive’s running about $60, there’s really no excuse, get a second Drive, purchase Carbon Copy Cloner, and set up a back up routine for yourself. If there are any problems in the future, you’ll be happy you did.
Restore your Chrome bookmarks from Time Machine
Have you ever really messed up your chrome bookmarks on your mac and wanted to restore them from your Time Machine Backup? Here are the steps to accomplish it.
1) Your Time Machine backup drive needs to be plugged in.
2) Start off by closing all the windows better open on your computer so that you’re only looking at the desktop.
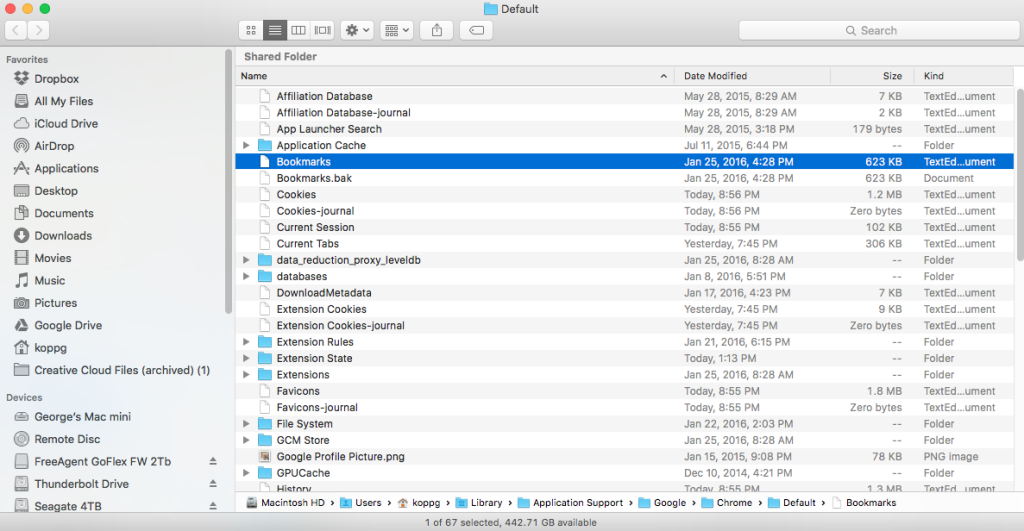
3) From a finder, select the go menu and choose go to folder: Enter this in the box that has opened:
~/Library/Application Support/Google/Chrome/Default/
4) Single click on the file in the window named Bookmarks
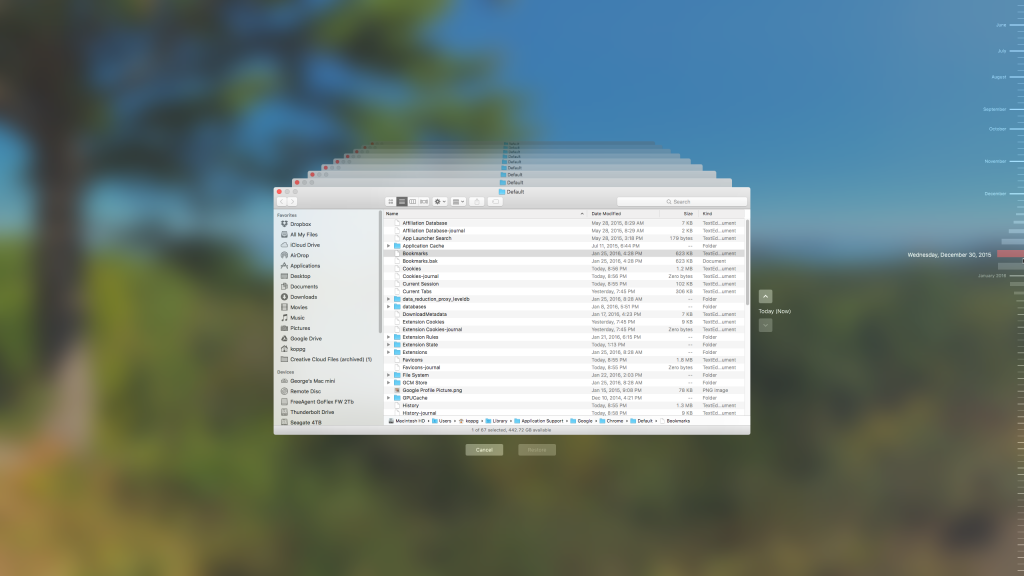
5) Now you should have one single finder window open. Next you’re going to want to go to the Time Machine icon. It may be in your dock or it is in the applications folder. Double-click on it to run it
6) On the right, Select a date that is before the date you deleted the bookmarks.
7) Once you have selected the date on the right, click the restore button.
8) When it asks if it can replace the one you have now, tell it that is OK.
That should restore the bookmarks to that date. Run Chrome and check if the folder is back.
The above steps should also be similar to restore any file you need from the Time Machine backup.
DJI Osmo steps up the Handheld Gimbal Market
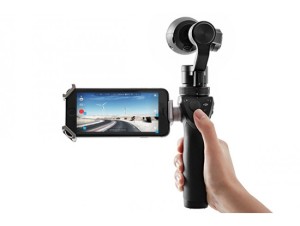
Almost a year ago, I wrote an article about a product called DSLRPros Mantis, a handheld 360° gimbal for a go pro camera. This handheld camera holder provided a motion sensitive gimbal that stabilized video taken with the go Pro camera. Recently, DJI released a similar device called the Osmo. I was fortunate enough to get an opportunity to play with one of these gimbals.
If you’re into sports photography, and you’re looking for a way to stabilize video that you’re taking, the DJI Osmo may be exactly what you’re looking for. Unlike previous products, DJI’s has released this device with their own camera that had been used previously in the Inspire helicopter drone. This camera, can shoot 4K video at 24 or 30 frames per second or 1080p video at up to 120 frames per second. Since DJI ships this with their own camera, they have the ability to be able to make their software work very well to control the camera. To utilize the device, you need to have either an iPhone or an android phone. Utilizing the DJI GO app, a free download from the respective App stores, you have full control over all the video or still shot parameters and even the movement of the gimble.
The Camera utilizes a microSD card, that’s included, to record video and still images taken with the device. Easily accessible controls on the handle allow you to move the gimbal up down and around. They also allow you to start and stop video or take still images. The handle is extremely easy to use and fairly lightweight. This makes the Osmo a very good addition to tools used for motion photography.
The handle also includes a well-designed phone holder that securely holds your phone to give you the ability to preview video as you’re shooting it and make changes to settings. This is truly one of the best phone holders I’ve seen in that it grabs your phone on one side and onto corners on the other side for a very secure hold. The holder is fully adjustable for the smallest or the largest phones.
At this point, the Osmo is not without its minor problems. The camera seems very good in outdoor photography, which is likely what it was designed for, but actually doesn’t read light very well when you’re inside in nonoptimum light conditions. You do have the ability to be able to tap the screen and focus on a particular point reading the light reading at that point also. This works pretty well but is actually another step you have to make to ensure good indoor photography. The audio quality captured from the built in mic is not very good either but you do have the ability to plug in an external mic and overcome that problem. The other issue is that at this point the Osmo is not compatible with either DJI’s X3 camera, that comes installed on the inspire aircraft, or their X5 and X5R cameras that are higher quality add-ons to the inspire. DJI promises an add on control board that will allow these to work and firmware updates to fix the incompatibilities.
Below is some sample video that you can hear the pronounced hum.
Overall, the Osmo is a great camera for motion photography. It certainly isn’t the best video quality at times, and in fact the owner that allowed me to use this device for my review states that his iPhone 6s Plus takes much better video and photography. But the stabilize gimbal included in the Osmo allows you to take photography while in motion that the iPhone would provide little stability for. I was very impressed with the Osmo’s ability and feel confident that DJI will take care of the minor problems and enhance the device was software in the near-term.
How to Backup your Critical iCloud Information
In the early days of iCloud, it was very common for something to go drastically wrong and iCloud and delete or scramble your data. After seeing this happen many times, I had gotten into a routine where I would back up my critical information by hand from iCloud. For the last few years I haven’t seen this problem and have become quite complacent about it. Unfortunately, complacency generally feeds disaster, and in my case that almost happened.
The great thing about iCloud is that you can change something one time and it synchronizes around to all of your devices keeping them all up-to-date. Unfortunately that’s also the Achilles’ heel. If something goes wrong on anyone device or if you accidentally delete something from one device it synchronizes to all your devices and the information that you had before may be permanently lost. Such was my recent case with iCloud.
Somewhere along the line in updating to iOS 9.0 or 9.1, and updating my Mac to El Capitan, I came to notice that my Safari bookmarks or not the same as they used to be. Looking at them closely I saw that many of my bookmark categories had been duplicated, others had been rearranged, and if you were missing entirely. It seems that one of those upgrades did something nasty to my bookmarks. And since I had gotten out of the habit of backing up my critical information by hand, my only choice was to go back and fix them all by hand and let them sync again. So that’s exactly what I had to do. I set down at my Mac and made all my changes to get my bookmarks back as nearly as they had looked before the problem.
While investing a couple hours and cleaning up my bookmarks was probably not devastating, it did point out to me that continuing the routine of backing up your critical iCloud information makes good sense.
So what information do you consider critical? For me, that would be my contacts, calendars, Safari bookmarks, and my notes. Apple provides a method to back up by hand the first three but unfortunately the new notes application lacks that ability. So here’s how to handle a back up of the first three pieces of critical information that iCloud stores:
Contacts
Open the contacts application on a mac and go to the file menu and select export. Next select export archive from the menu. Pick a location to store your back up, and name it something that has the date included. This way you’ll be able to tell the newest one if you need to recover.
Calendars
Again on a Mac, open your calendars application go to the file menu, select export, and export a calendar archive. If you’ve been keeping track of calendars for a long time this may take a few minutes. It will again ask a location and I typically use the same naming convention I did with my contacts.
Safari bookmarks
Open Safari on your Mac, and select File and then Export Bookmarks. Pick the same location to store your back up, and name it something that has the date included.
Notes
When it comes to notes that’s another story. You can export individual notes as a PDF file but backing up hundreds of notes that way would be difficult. If you want to dig down into the bowels of your computer, your notes file is actually stored in…
~/Users/<username>/Library/Group Containers/group.com.apple.notes
Once you selected that folder, you can simply go to the edit menu and say copy. Then paste that file into your backup location. If you can’t find it from the path you probably don’t need to be down in these folders in the first place.
Next I set a calendar alarm to remind me to do this once a month. By doing this monthly I am sure myself but for some reason iCloud has a hiccup, my information will be easily recoverable and reloadable.
iOS9: How about some tips and tricks
Here are some of the best iOS 9 tips and tricks that I have found since it’s introduction.
- Proactive Assistant – New search feature accessed by swiping right from the home screen. You can turn it off in Settings> General> Spotlight searching
- Keyboard – Many folks complained about the inability to tell whether the “caps” key was engaged or not. So, Apple gave us a keyboard with lower case letters by default. When you tap the “up arrow” on the left, the keys change to upper case. You can change the keyboard back to display upper case keys all the time by going to Settings > General > Accessibility. Scroll down to “Keyboard” and tap there. Under Software Keyboards it shows a button next to “Show Lowercase Keys. Tap it off to return to all caps all the time.
- Button Shapes – Go to Settings > General > Accessibility. Scroll down to “Button Shapes” and click on the button there. If you look at the top of the screen as you tap it, you will see a grayed area appear behind the text “General.” The grayed area will now appear behind many of the text buttons throughout your OS. For instance in Calendar app the text buttons on the bottom of the screen “ Today”, “Calendars,” “Inbox” will now show that grey background behind them making them standout from the white background.
- Larger Text – Just tweaking up the size of the text displayed on the iPhone can really make a big difference when taking a quick glance at Contacts, Mail or Messages or overall system text. On your iPhone or iPad, go to Settings > General > Accessibility. In the Accessibility screen scroll down to Larger Text and tap there. A new screen appears with a sliding button that scales up or down for size of text. It is set in the middle by default, but you can actually see the text on the screen above the slider grow larger as you move it to the right. I set mine just one “tick” to the right of middle. If you click on the Larger Accessibility Sizes, you’ll see even larger text settings.
- New notes – The Notes app has always been great for jotting down your thoughts. And now it’s great for so much more. Want an easy way to make a checklist of to-dos? Consider it done. Or add a photo, map, or web link to a note. You can even draw a sketch with your finger. And thanks to iCloud, changes to your notes will be updated across all your devices and on iCloud.com.
- Public transit in maps – Now you can use public transportation with Maps as your guide. In select cities around the world, a new Transit view shows you lines and stations for subways, buses, trains, and ferries right on the map. When you plan a route, every step of your trip is laid out from point A to point B. Not yet available in Missouri.
- Shortcuts in maps search to nearby places – with the Nearby feature, it’s easier to see what’s around you and decide on places to shop, eat, and more.
- Low-power mode – Across the entire operating system, apps and key technologies have been made more efficient to trim battery usage wherever possible — so you get more battery life for the things you do every day. Thanks to ambient light and proximity sensors, your iPhone knows if it’s facedown on the table and prevents the screen from turning on, even when you receive a notification. The new Low Power mode lets you extend your battery life even further.settings battery – also see what apps are using your battery
- News app – iOS 9 adds a new app to your Home screen. News puts all the stories you’re interested in, all in one place — so you don’t have to hunt through different apps and websites to make sure you’re not missing the next big story. Articles are pulled from a wide range of sources, from top news organizations to indie publications. Stories are chosen for you based on what you like to read, and the more you use News, the better it gets at picking out just what you’ll want to see
- Wallet app replaces passbook – Use Apple Pay to securely and easily make purchases with your credit cards, now including Discover. You can even access Wallet by double-clicking the Home button when your iPhone is locked. Soon you’ll be able to use store credit cards, like Kohl’s Charge or JCPenney Credit Card. And you’ll be able to add rewards cards, like Dunkin’ Donuts DD Perks, Walgreens Balance Rewards, and MyPanera, to your Wallet app and receive and redeem rewards
- New Wallet Features – Double-click from off to pay with wallet or choose a different card
- New App navigation – Link back to where you came from with “back to”
- iCloud drive application – The new iCloud Drive app built into iOS 9 allows you to access any file you save to iCloud from just one place — right on your Home screen. Easily search within the app and find the file you’re looking for. Browse all your files by date, name, or any tags you added on your Mac. You can also preview and organize your files without leaving the app.
- Find my phone and find friends preinstalled
- Set a reminder about what’s on the screen – Say remind me about this to Siri
- New Siri preferences – Turn on hey Siri, Silence Siri, and have it learn your voice
- Slide Over – Now you can open a second app without leaving the one you’re in. So you can quickly browse the web, respond to a text message, or jot something down in a note, then slide that app away and get back to the one you were using before. (iPad only)
- Split View – With Split View, you can go a step further and have two apps open and active at the same time. Work on a sketch with the reference photo beside it. Or write a paper while copying citations from a book in iBooks. When everything you need is right in front of you, it’s easier to focusSearch inside settings (iPad 2, iPad Mini 4, and iPad Pro only)
- Picture in Picture – While using FaceTime or watching a video, press the Home button and your video screen scales down to a corner of your display. Tap to open a second app, and your video continues to play — even while you use the other app. So keep watching your favorite TV show while you reply to the email that just came in. (iPad only)
- Wi-Fi assist in settings cellular – Allows you to use Celular for data when Wi-Fi fails (Uses data from your celular plan)
- Six digit passcode -Keeping your devices and Apple ID secure is essential to protecting your personal information — like photos, documents, messages, email, and so much more. iOS 9 advances security by strengthening the passcode that protects your devices
- Quickly trash all mail – hit edit button to trash all
- Add attachments in mail – Press and hold to add attachments from iCloud Drive.
- Better upgrading process – iOS 9 does even more to efficiently stream new updates to your device without having to first download and unpack them — which means you don’t need as much free space to update
- Disable shake to undo – in accessibility
- Check Your battery in Notifications and Widgets – Pull down from the top of the screen
- Pinch to zoom in video – When watching some supported video, you can now pinch to zoom in
- New smart albums in Photos for selfies and screenshots
- Directly select photos by gliding over with your finger
- Hide photos in your photo library – Hide tyhose photos in your library you dont want others to see when they look at your device
- Request safari desktop site and turn off content blockers on the fly – by pressing the reload icon.
- Quicktype – Shape up your text in no time with an all-new Shortcut Bar, convenient editing tools, and a handy new way to select text with Multi-Touch gestures. And now when you use a wireless keyboard with your iPad, you can enjoy even more keyboard shortcuts. You can even use your on screen iPad keyboard as a mouse!
- Safari Content Blockers – Safari content blocking extensions don’t automagically identify ads and prevent them from loading. Instead, they identify elements and resources on a web page and can, optionally, hide those elements and prevent those resources from loading. The goal is to show how fast the modern web—read: Safari—really is when you remove all the extraneous code that’s been dumped on top of it.
- Find on the page in Safari – Safari has a Find in Page feature, although it’s a bit hidden. To perform a search for words on the current page, tap the address bar and type your search. Tap the Find option under On This Page at the bottom of the list to search the current page
- Safari Reader Enhancements – Customize safari reader mode with color and font and Background
iOS9: Viewing the Desktop Site or turning off Content Blockers
When browsing on the iPhone or iPad, many times the site you see is different from the normal website. You may be seeing the mobile version of the site. This is often a better view because the dite gets formatted for a small screen. But sometimes, the mobile site does not give you everything you need to see.
Another issue you may see is that now that we have the ability to instasll content blockers, these blockers may get in the way of seeing the full view ofthe site.
In iOS9 it is easier to view the desktop site or temporally disable content blockers. All you need to do is it press and hold the reload site icon in the URL bar to get two options to releave these problems. Once you press and hold the reload icon you get the options to reload the full desktop site or to load the site without the content blockers you have installed.
This allows you to easily get all the information you would normally get from a full web browser on a computer,
OS X El Capitan: Changes in the Spaces Functionality
Spaces has changed a bit in El Capitan. Apple has a great help article that covers how it works in the new operating system version. Here is what Apple has to say:
If your desktop becomes cluttered with open app windows, you can create additional desktops, called spaces, to organize the windows. When you work in a space, you see only the windows that are in that space.
You use Mission Control to show the Spaces bar, where thumbnails represent your spaces and apps you’re using in full screen or Split View.
Create a space
-
Enter Mission Control, then click the Add button in the Spaces bar.
You can create up to 16 spaces.
-
When you’re done, click a space in the Spaces bar or a window in Mission Control.
Move between spaces
Do any of the following:
Swipe left or right with three fingers.
Press the Control key and the Right or Left arrow key.
Enter Mission Control, move the pointer to the top edge of the screen to show the Spaces bar, then click a space.
Move an app window from one space to another
Do any of the following:
Drag the window to the edge of the screen. After a moment, the window moves to the next space.
Place the pointer over the window’s title bar. Hold down the trackpad or mouse button, then press the Control key and the Right or Left arrow key.
From the space that has the window you want to move, enter Mission Control. Then drag the window up to the space you want to use.
If you drag the window onto an app in full screen, you can use the apps in Split View.
Assign apps to spaces
If you assign an app (or System Preferences) to a specific space, the app will always open in that space.
-
Press and hold an app’s icon in the Dock.
You may have to first open the app from Launchpad to see its icon in the Dock.
-
From the shortcut menu that appears, choose Options, then one of the following:
-
All Desktops: The app opens in every space.
-
This Desktop: The app opens only in the current space. If you use the app full screen, it appears in its own space.
-
Desktop on Display [number]: The app opens in the current space on a specific display (if more than one display is available).
-
None: The app opens in whichever space you’re using at the time.
-
By default, when you switch to an app, the desktop automatically switches to a space that has open windows for the app. For example, if you create a new TextEdit document in Desktop 3, but TextEdit windows are already open in Desktop 2, your new document opens in Desktop 2. To change this setting, choose Apple menu > System Preferences, then click Mission Control.
Delete a space
-
Enter Mission Control, then move the pointer to the top edge of the screen to show the Spaces bar.
-
Place the pointer over the space you want to delete, then click the delete button that appears.
If the space contains open windows, they are moved to another space.
You can quickly stop using an app in full screen or Split View by moving the pointer over the thumbnail in the Space bar, then clicking the exit button that appears.
OS X El Capitan: Display a message in the login window
Here is a great new feature for portable users in Mac OS 10.11, El Capitan.
You can add a short message to the login window that is displayed when your Mac is locked. The message can be anything appropriate to users attempting to log in, for example, to provide information for guest users. The message can also act as a virtual engraving, to provide contact information for a misplaced computer.
-
Choose Apple menu > System Preferences, click Security & Privacy, then click General.
-
Click the lock icon to unlock it, then enter an administrator name and password.
-
Select “Show a message when the screen is locked,” then click Set Lock Message.
-
Enter the message you want to display in the login window.