Backing Up your iOS Device

iPhone BackupHow important is your data? Most of us realize that a good backup is worth it’s weight in gold. Many of us have backup methods are we back up our computer data and even sometimes take that data offsite. But more and more we are finding our most important computing device these days to be our smart phone or tablet. These devices are with us all the time. We store information in them that’s extremely personal to us but critical for us to have available. Having a good method to backup your handheld device is extremely important. If you have an iOS device, there are typically two methods to choose for backup. 

Backing up to iCloud

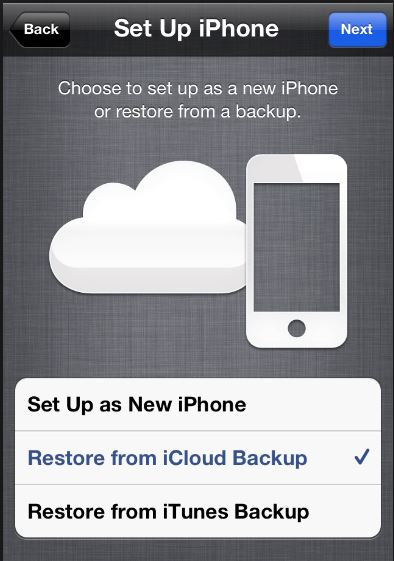
A wireless backup in the cloud. How perfect could that be. Seems like a no-brainer to use this method for backing up our device. There are problems associated with a cloud-based backup strategy. The biggest problem is the limited amount of storage space Apple provides us on iCloud. Sure iCloud is a free service and you can add additional storage space for a cost. Unfortunately these costs are not trivial. Many of us have iPhones or iPads with a relatively large storage capacity.

iCloud Storage Options
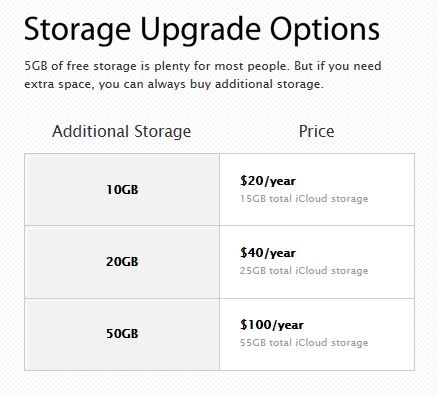
When you sign up for iCloud, you automatically get 5GB of free storage. That may be plenty of room, particularly if you only have one device, because of the way iCloud stores your content. Your purchased music, movies, apps, books, and TV shows — as well as your Photo Stream — don’t count against your free storage. That 5GB goes a long way for your mail, documents, account information, settings, and other app data. And if you need more storage you can easily purchase an upgrade right from your device. But many people have a single issue that causes them to run out of space very quickly.

Photos you take on your device go into the Camera Roll. All these photos get backed up to iCloud and DO use part of the storage that iCloud provides you. People who routinely keep hundreds of photos in the camera roll will quickly exhaust the 5GB of space Apple provides and not realize why they have done so. If you sync your photos to your computer, or be sure you have saved them there from your Photo Stream, you should be able to remove these photos from the Camera Roll.

Many people believe they need to leave them there to keep them on the phone. But, you have to keep in mind that if you have Photo Stream turned on, they will be copied to the stream and available from that selection on your device.

Another way to deal with this is to sync your photos to your computer. This is in my opinion a preferred method for ensuring those photos are backed up. In general, I recommend people keep no more than 100 photos in the Camera Roll. With that many photos, a standard iCloud account should provide enough storage for two iOS devices.

Backing up to your computer

In the early days of iOS backing up your computer was the only option. Your computer typically has larger amounts of storage has the ability to keep copies of the backup. But even this can cause a space problem in the attic. If you have a new machine with an SSD drive, you may have limited storage space available. Backing up your device to your computer will make a copy of everything on it so it’s much larger than the storage space that iCloud uses for it’s backups. Since iCloud storage eliminates the need to copy anything you’ve purchased from Apple, it is able to store more information in a smaller space. When backing up to your computer though all information gets copied and takes much more space.

If you have storage space on your computer, backing up to get may be a good solution for you. By plugging your device into your computer, you not only can back it up, but you can download those photos out of the camera roll too.

But just like backing up to iCloud, there are things you need to be aware of when backing up to your computer. When you back up your computer it keeps a full copy of the device. If you change devices often, you may have full copies of older devices you no longer own still stored on your computer.

iOS Backups If you want to delete a backup created by iTunes, follow these steps:

  1. Open iTunes Preferences:
    • Windows: Choose Edit > Preferences
    • Mac: Choose iTunes > Preferences
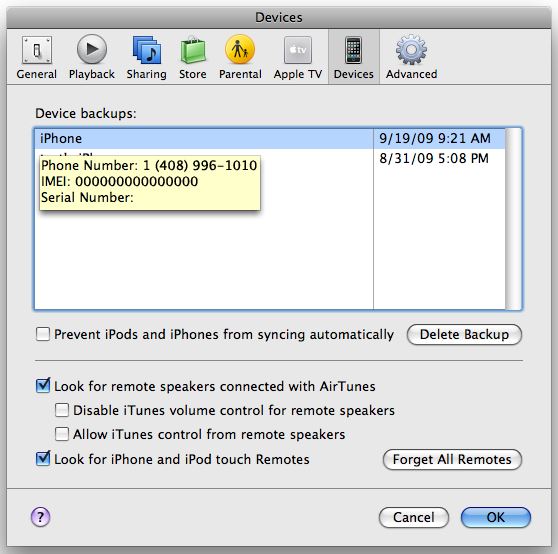
  2. Click Devices (the iOS device does not need to be connected).
  3. iTunes will show the phone number, IMEI, and serial number of the backed up iPhone when you position your mouse pointer over a backup (iTunes shows only the serial number for iPad and iPod touch). Use this to locate the backup for the iOS device you want to delete. Select the backup you want to remove and click Delete Backup.
  4. Confirm you wish to remove the selected backup by clicking Delete Backup.
  5. Click OK to close the iTunes Preferences Window.

Deleting extra copies of old devices can save significant storage on your computer.

George’s Recommendation

Because backing up is something that needs to be seamless, I recommend using iCloud is your main backup process. In doing this, you must keep in mind that you need to sync your photos once in a while to your computer to reduce the number of images that are stored in your camera roll. As long as you do that, iCloud storage is usually sufficient to be able to backup both your iPhone and your iPad if you have one.

[stextbox id=”info” caption=”Turning on iCloud for Backup”]

iCloud automatically backs up the most important data on your device using iOS 5 or later. After you have enabled Backup on your iPhone, iPad, or iPod touch in Settings > iCloud > Backup & Storage, it will run on a daily basis as long as your device is:

  • Connected to the Internet over Wi-Fi
  • Connected to a power source
  • Screen locked

You can also back up manually whenever your device is connected to the Internet over Wi-Fi by choosing Back Up Now from Settings > iCloud > Storage & Backup

[/stextbox]

HELP! “Mailbox quota exceeded”

StacksThat’s the bounce back message your friends may see if you fill up your server based email box.  Just because you download your messages you cannot be sure that they are being removed from the server by default.

There are two types of email server systems in common use today.  These systems are referred to as: POP and IMAP.

IMAP (Internet Message Access Protocol)

IMAP is a protocol by which you can read email. IMAP allows you to view your email from more than one place. E.g. from your desktop computer at work and from your laptop at home and from abroad and from your mobile device – multiple locations.

IMAP keeps the messages on the server until it is told to delete them.  In a typical IMAP implementation, all the messages you see on your mail program are located on the server.  With IMAP you have a service provider imposed storage limit called a  quota. If you run out of space on the server you will not be able to download new emails into your account!

POP (Post Office Protocol)

POP is better if you have no need to check your email in multiple locations. If you only ever check your email on one computer at, then POP is fine for this purpose.  In most cases, when you bring the email message down to your computer, it removes it from the server.  But this is a setting and some people, in a hope to save everything they ever get in email, just in case, set it to not remove messages.  In these cases you can also see the same message when you run out of space.

Which one is better?

One big problem here is that not all service providers provide both types of email access to choose from.  Most services that are intended for use on phones, tablets, or computers, may only offer IMAP.  Examples of IMAP providers are:  Gmail, iCloud, Outlook.com, Yahoo, and AOL.  In the over al scheme of things, IMAP is a much more modern protocol because it, having a centralized storage database for mail, allows you to delete a message from one place and have it deleted from all your computers or phones attached to this mailbox.

But not every provider provides IMAP.  Many Internet service providers will only give you access by POP.  These are typically companies more interested in providing internet service than mail.  An examples of this is Mediacom, a local internet service provider where I live. These companies don’t want to provide IMAP because while it is much better for the consumer, it requires more server infrastructure to store these messages on their end.

How do I deal with “Mailbox quota exceeded”?

This depends on the type of account you use.

For a POP account, you need to be sure your mail client is set to delete messages from the server. Most mail clients are very similar in setting this up.  You need to go to the account settings and look for a checkbox that says something like” Remove from server after:” and provides some choices such as one day and one month.  One Month is usually a reasonable setting.  With this turned on there is often a “Remove now” button that will remove all server mail older than the one month setting you chose.  But don’t worry, with a POP account, if the messages are on your computer, even though you delete it from the server, it will stay on your computer.

For an IMAP account, it’s not quite as straight forward.  Since the messages on the server match those on your computer, the only ways to clean this up are to either delete messages, move them to a local folder, or increase your quota.

Deleting messages is simple but requires quite a bit of time since you need to make decisions on what is good to keep and what is not.  Be sure to empty the trash in mail to clear them out after marking them as trash.  Moving them to a local folder requires you to create a folder within your mail client and select messages from your inbox to copy to this local folder.  This then stores this mail on your computer and removes it from the server.  If the domain is something that you host of have control of, you can often go into the service providers cpanel (control panel) and increase the mail quota.  This is a little different for all providers so you might want to read their instructions before trying to do it.

The most important thing to keep in mind is to not be a hoarder.  Clean up your email and don’t let many thousand messages accumulate just because you don’t have time to go through them.  Setup up a junk filter and have these messages deleted immediately.

[stextbox id=”info” caption=”Setting Mac Mail to delete messages on a POP account”]


MacMailIn Mail, do the following:

Go to the Mail menu and select Preferences
Click on the Accounts icon and select the Advanced tab
Click the checkbox on for “Remove copy from server” and select “On Month” in the dropdown box below the setting
Now press Remove Now

Remove mailo dialog

[/stextbox]

My Windows 8 Laptop makes no Sound

Q: My Windows 8 computer says it cannot find any Audio hardware on my Laptop.  It used to make sounds but now does not.  Is this a hardware issue or a software issue?

A:  It could be either but we should be able to easily tell.  To do this we need to look into Device Manager.  In windows 7, it was as easy as going to control panels but Windows 8 is a little different.

Before proceeding, I would first make sure the volume is turned up using the keyboard key on the machine.

Now, Follow these easy steps to open Device Manager in Windows 8 from the Control Panel:

1.From the Start screen, swipe up and tap the All apps icon.  If you have a mouse, right-click on the Start screen and then click All apps.

2.Once on the Apps screen, scroll or swipe to the right until you see the Windows System heading.

3.Tap or click on Control Panel, located under Windows System.  Windows 8 will bring up the Desktop and automatically open the Control Panel.

4.Tap or click on the Hardware and Sound link.

Sound Driver

Note: You won’t see Hardware and Sound if your Control Panel view is set to Large icons or Small icons. In your case, just tap or click on Device Manager and then move on to Step 6.

5.In the Hardware and Sound window, click or tap Device Manager, located under the Devices and Printers heading.

6. In Device Manger , you need to look for The Audio portion as shown in the image.  We are looking for any of those to show with an X, a yellow triangle, or a red mark.


If the Audio devices are completely missing from Device manager, it is likely a hardware issue with the laptop and you should call the manufacturer.  It the devices show up but have an X, a yellow triangle, or a red mark by them, it usually means it is a driver issue. To fix this you would double click on the device, choose the driver tab, and update the driver.  If this does not fix it, the next thing to try is to uninstall the driver from the same location and reboot the machine.  Windows should then reinstall the driver on the next boot.

Is this Spam?

Here is a little trick to help you determine if an email sent to you is real or a spam email.  Most of these emails that make you question whether they’re real, include a web link in them. The web link is usually written out so that you can see the entire link.  People sending out spam have realized that if you see the link, and it looks real, the odds of you clicking on it are much greater. Your mail program gives you the ability to help determine whether those links are really real. If you hover over the link with your pointer or cursor, a link will pop up showing where that link actually really takes you.

Take a look at the example below:

Screen Shot 2013-06-11 at 8.04.13 PMThe link in the above email looks like it goes to a page at Amazon.com. But when I hover over the mail you see that it’s actually going to a completely different place. By hovering over the link before you click it you have the opportunity to determine for yourself whether that email is probably spam, or a real email that you need to address.


But it’s Not Spam!

spamA question I often hear from people has to do with why their emails often end up being marked as spam by the person they send it to. Determining spam is a difficult situation these days. It’s very hard to determine if an email is truly informational or is intended as marketing spam.  There are many software solutions that help make these determinations for people, and often times these solutions are outside of the control of the individual user.  Sometimes email sent to you is going to be marked as  spam even though you normally would want to see them. You are even absolutely sure you never marked them as spam, but they continue to fall there anyway. This can be a result of a server being used for your mail account trying to determine spam from a blacklist compiled by others or even from others in your own company marking the sender as a spammer.

Here is a great article I found on how this happens.  It’s important to understand that once this occurs, it is often difficult to reverse.  This is why I always advocate using a separate email address for any marketing correspondence you send.  This protects your primary email address from ending up caught in the quagmire of spam and junk mail filters.

You should also understand you email clients spam or junk mail features so you know how to unmark an email as spam that is incorrectly filtered.  This process is different for every mail client but basically consists of going to the spam or junk mail box on your computer and selecting a command in the mail client menus that tells the software the email is not spam.

For example, in Microsoft Outlook, you would do the following:

To mark a particular message as not junk, follow these steps:

  1. Screen Shot 2013-06-05 at 5.09.42 PMIn Mail, click the Junk E-mail folder in the Navigation Pane (Navigation Pane: The column on the left side of the Outlook window that includes panes such as Shortcuts or Mail and the shortcuts or folders within each pane. Click a folder to show the items in the folder.).
  1. Right-click any message that you want to mark as not junk.
  2. On the shortcut menu, point to Junk E-mail, and then click Mark as Not Junk.

The process is quite similar in Apple Mail.  For Outlook express.  Take a look at this article from Microsoft for more details.

[stextbox id=”alert” caption=”A couple other comments about spam”]

If your looking for an email address to use that has a great spam filter associated with it, try a gmail address.  Google has great spam filters that are very accurate and a gmail address is available for free.

If you are a Mac user overwhelmed by spam, consider a program called Spamsieve.  Spamsieve runs in conjunction with Apple Mail and provides a great deal of configuration ability in determining spam.  With a few days of training it can eliminate 90% of the spam from your mailbox automatically.

[/stextbox]

I Just can’t keep track of my Mac’s Cursor….

Screen Shot 2013-05-17 at 12.06.56 PMDo you ever lose your curser on your big screen Mac? Perhaps it is hard to follow it on your new retna display laptop. There is an easy fix for this that allows you to make your Mac curser get larger.

It’s easy to make your cursor bigger and it’s built into your Macs’s operating system. Open your System Preferences and select Accessibility. This system preference lets you choose from many accessibility options, including enabling access for assistive devices. The Display selection lets you change the size of the mouse pointer and adjust the contrast of your display.  The VoiceOver selection lets you toggle VoiceOver off and on and open the VoiceOver Utility. There are other options to let you turn on and configure display zooming and other display enhancement settings such as grayscale, enhanced contrast, and Black on White/White on Black. The Audio selection lets you control whether the screen will flash when an alert sound occurs. The Keyboard selection lets you turn Sticky Keys off and on and configure them, and also can set a delay to ignore accidental keystrokes. The Mouse & Trackpad selection lets you use the numeric keypad in place of the mouse, add a delay or maximum speed to the mouse pointer.

Once Accessibility is opened, you want to select the Display selection from the menu on the left. Under this option you see a slider to adjust the Cursor Size from Normal to Large. One nice thing about this slider is that the cursor grows as you slide so it is easy to see just how much larger you are making it.

While you are in this System Preference, you may want to try some of the many other options that are included there.

So if your big screen causes you to misplace the cursor, or your high resoloution Rgetna display cursor is just too small, you can easily fix it without having to install anythin on your Mac.

How to Migrate to a New Mac Quickly

imagesMoving large amounts of data requires a dedicated connection.  Firewire or Thunderbolt target disk mode is the answer for this.

Important: Unplug all other Thunderbolt or FireWire devices from both computers prior to using FireWire target disk mode. Do not plug in any FireWire devices until after you have disconnected the two computers from each other, or have stopped using target disk mode. If using Thunderbolt, it is ok to leave your Thunderbolt display plugged in.

To use FireWire target disk mode

  1. Make sure that the target computer is turned off. If you are using a MacBook or MacBook Pro as the target computer, you should also plug in its AC power adapter.
  2. Use a FireWire cable (6-pin to 6-pin) to connect the target computer to a host computer. The host computer does not need to be turned off.  If you do not have a firewire port on your new computer, Apple makes a Thunderbolt to firewire adaptor.
  3. Start up the target computer and immediately press and hold down the T key until the FireWire icon appears. The hard disk of the target computer should become available to the host computer and will likely appear on desktop. (If the target computer is running Mac OS X 10.4 Tiger or newer , you can also open System Preferences, choose Startup Disk, and click Target Disk Mode. Then restart the computer and it will start up in Target Disk Mode.)
  4. When you are finished copying files, drag the target computer’s hard disk icon to the Trash or Eject from the File menu (Mac OS X).
  5. Press the target computer’s power button to turn it off.
  6. Unplug the Thunderbolt FireWire cable.

The process of making this connection is exactly the same if you are using the migration wizard that runs on a new mac or using the Migration Assistant application in the Utilities folder.