A USB-C Docking Solution for your Macbook and 13” Macbook Pro

When Apple announced the 2015 Macbook with a single USB-C port, Many potential users were put off by the fact that if you plug the machine again to charge it, you had no other connections that you could use on that MacBook.  This made a machine problematic for many things including plugging in an external hard drive for backup.  Fortunately the battery life of the new MacBook was quite good so that you didn’t need to charge very often but it was difficult to imagine not having the need to plug something in, anything in, while you’re charging the machine.

A number of new port extension devices were immediately announced to add additional ports back that Apple removed. One of the first that actually saw the light of day, was from Other World Computing, OWC. OWC’s USB-C Doc was announced right after the new MacBook but didn’t ship for a number of months. When it did ship, users of the new MacBook finally had a port extension device that would allow them to make full use of their new computers.

While it was introduced shortly after the 2015 Macbook, the OWC USB-C Dock is compatible with both the 2015 and 2016 Apple MacBook and 13″ 2016 MacBook Pro  models.  The 2016 15” MacBook Pro is not compatible as per the MacSales website.  I suspect this is due to the higher charging wattage required for the larger screen device.  With a 80w power supply, the dock does not have enough power to charge apples new 15” flagship model.

When paired with one of the compatible machines, the dock adds a plethora of ports for the user to make use of.  These ports include:

  • 5x USB 3.1 Gen 1 ports (including 1x USB Type-C)
  • High-speed Gigabit Ethernet
  • Front-facing SD card reader
  • HDMI with 4K display support
  • Combo audio in/out port
  • 80W of power to charge your computer and devices

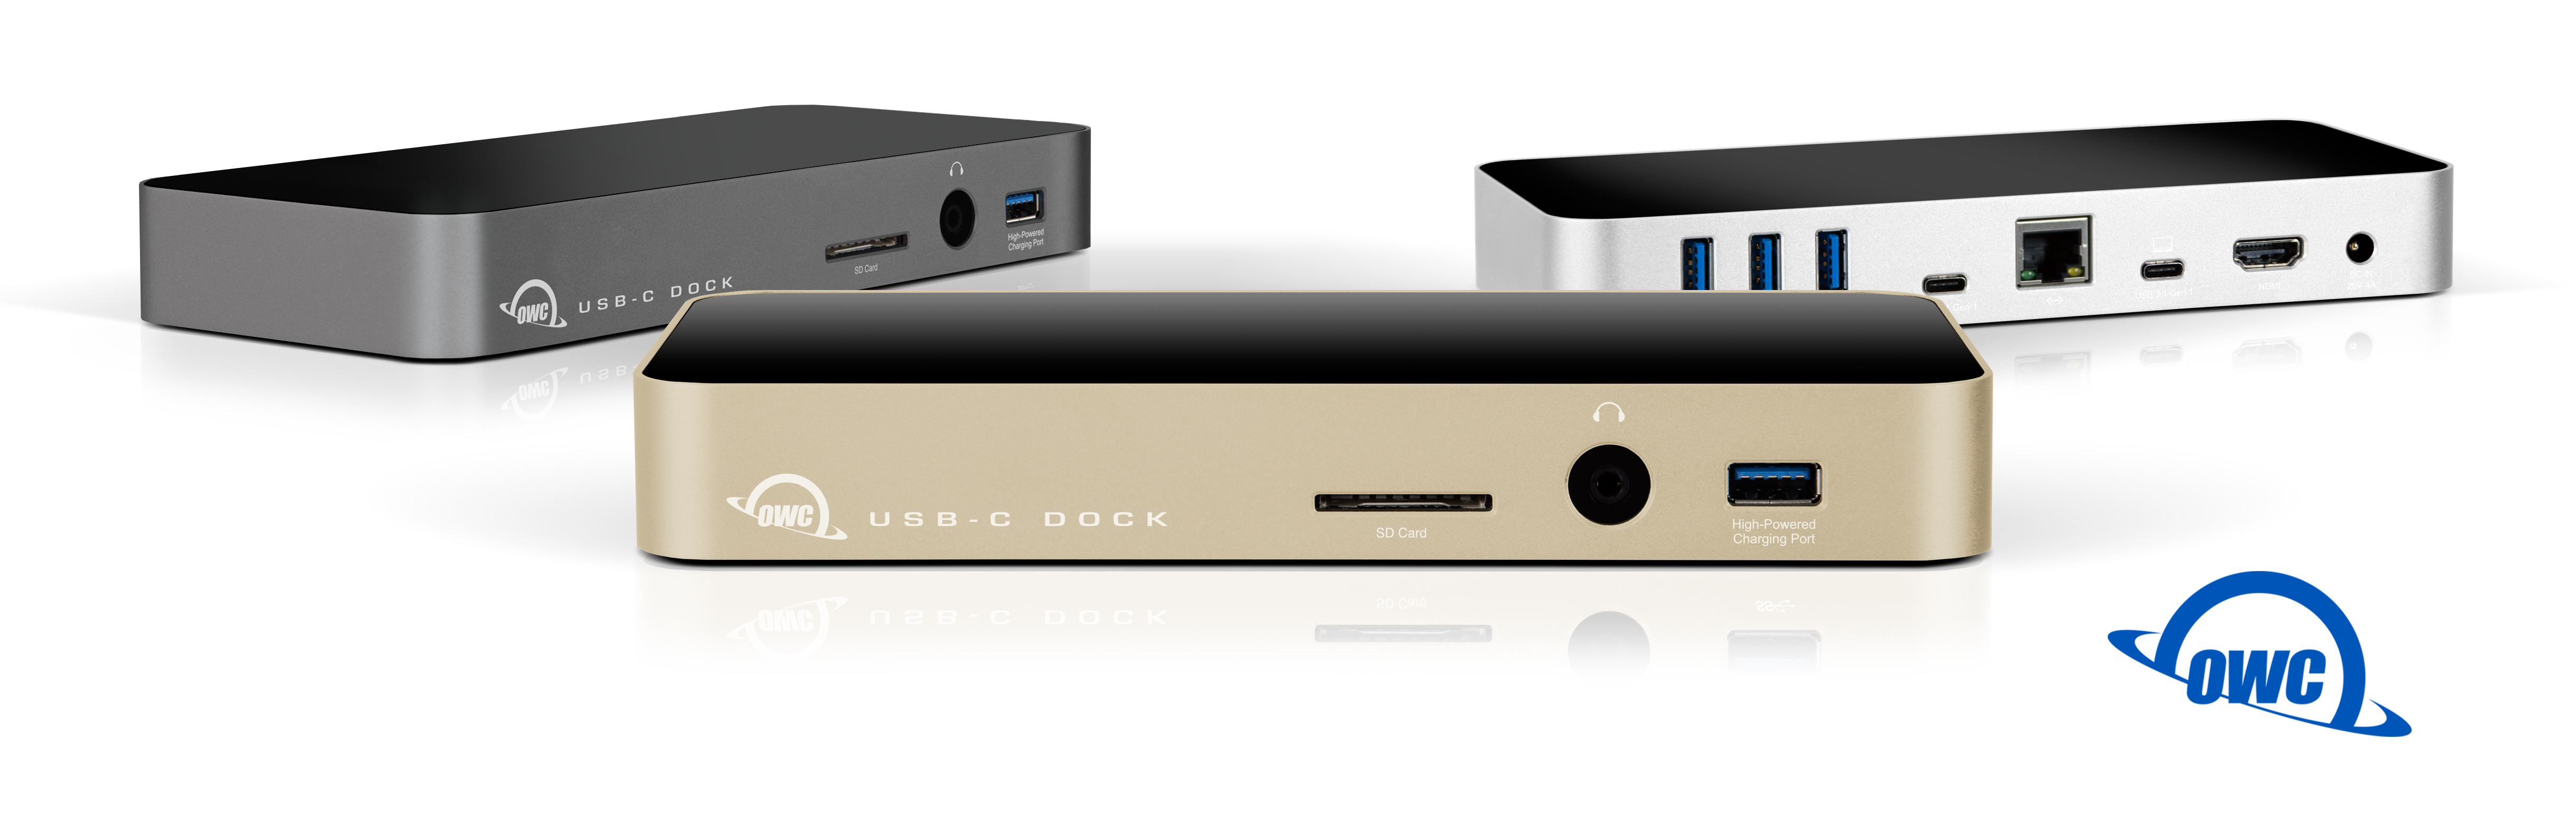
The dock is available in all 3 of the colors that the Macbook is available including Silver, Space Gray, Gold, and Rose Gold for a perfect match with your new laptop.  If you have a 13” Macbook Pro, the Silver and Space Gray colors match your unit too.

Ascetics of the Dock

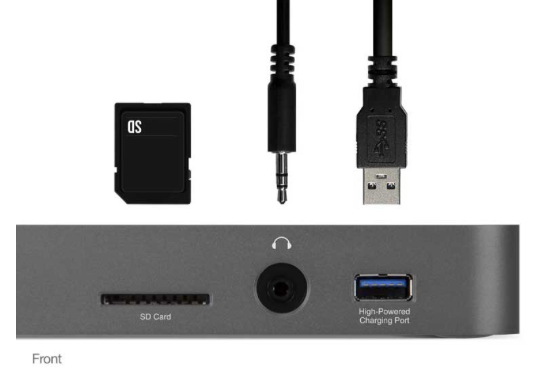
The dock is made of plastic and metal and weighs enough to keep the unit firmly placed on your desk.  A blue LED light shows from the bottom of the device indicating it is powered up and ready.  A green LED is also on the bottom that shows data connection with the laptop has been made.  The front of the doc has the SD card reader, audio port and a USB 3.1 port that remains powered even when the laptop is disconnected.  This port is high power enough to charge an iPhone or iPad.

The back of the dock contains the majority of the ports including the port to connect it to your laptop.  It is important to note that of the 2 USB-C ports on the back, the one with the small computer above it is the port that must be used with the included cable to connect to the computer. The other USB-C port is an active port for plugging in other USB-C devices.

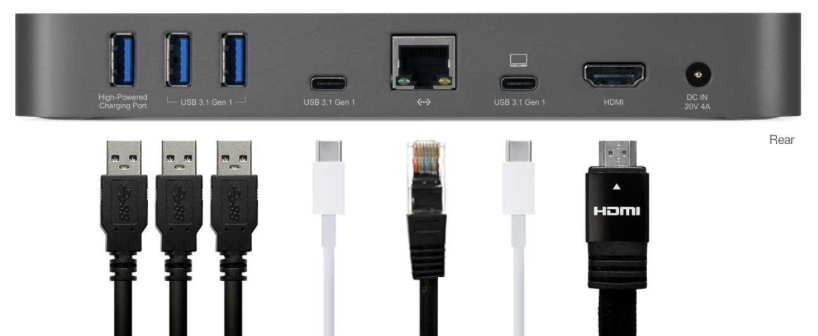
Also on the back of the dock are 3 USB 3.1 ports, with the left most port also being of the higher power type, an 10/100/1000 Ethernet port, a HDMI port capable of driving a 4K display, and a place for the included power adapter to be connected. One item of note is that the use of the Ethernet port required the installation of a driver from OWC that was available on their website but with the release of MacOS Sierra, the driver is no longer necessary.

How Well Does it Work?

In my experience in using the dock with a 2015 Macbook, the dock worked flawlessly.  All of the ports connected fine to the laptop and worked with expected speed.  In fact, I was encouraged by the fact that USB-C seems speedy enough to handle multiple streams of data being copied to devices.  While this was likely not something necessary in the real world where for the most part a single device at a time will be used, it is good to see that for me it worked very well. I did find that if I did not eject some older drives from the Mac before allowing the Mac to sleep, they sometimes did not come back without unplugging them and plugging them back in.  For my use, my laptop is set not to sleep while the power adapter is connected so I do not feel this is a major issue.

From talking with other owners of the dock there may be a problem with some older USB devices plugged into the dock not being recognized.  This may be related to the sleep issue I experienced.  I was unable to reproduce that problem when I did not allow the Macbook to sleep.

I was quite happy with the fact that the dock remained sturdy on my desk and did not move around when the cables were tugged slightly.  Some competing units that are much lighter exhibit this problem.

Even a bonus…

I also used a USB-C to USB 3.1 cable to connect the dock to my 2013 Macbook Pro.  To my suprize I was able to confirm that the USB ports, card reader, audio port, and Ethernet port  worked fine.  I did have some difficulty getting a TV connected by HDMI to connect but for a completely unsupported use of the device, it was very impressive.

Conclusions

OWC has a winner in their USB-C dock for users of Apples smaller laptops.  It works easily and performs very well.  For a Macbook user with only one USB-C port, or a 2016 13” Macbook Pro without touchbar with only 2 Thunderbolt 3 ports, this device adds the expansion that Apple believes users no longer need.  The only recommendations I have are that the USB-C cable proved short for many applications.  In long term use a longer USB-C cable will likely be necessary unless you ar going to position the dock right behind on next to your laptop

OWC provides a 2 year warranty with the dock.

iOS 10 will be a great upgrade for iPhone and iPad users


I have been playing around with the iOS 10 beta on one of my iPads now for a couple of months. As this update has gotten closer to being completed I continue to be pleasantly surprised with both the quality of the software in beta and also the deep feature set of the update. There has been a lot in the press about the new features in iOS 10 and I can say I have tried most of them. The additions Apple is made in this release, while seemingly not major, certainly enhance the ability of all iOS devices.

I installed the beta in the first place to try out apples new home app. Home is an application that allows you to control HomeKit devices from a single common place. The app lets you control lights, thermostats, and all other existing HomeKit devices. I was pleasantly surprised how well it worked after about the second beta.

There are many other nice additions including a major overhaul of messages. Just this morning I saw one of the nice new tricks messages brings to the table. Quite often I text a link to a product one of my clients has asked me to look for for them. It’s really no big deal as they typically click the link and have it open in Safari to see the product on the products website. This morning, I texted a link to a product on Amazon and rather than sending the actual link, messages converted it to show an image of the product, a short description, and a link. While not earth shaking, it is pretty cool.

With the new iPhone release schedule for September, iOS 10 is right around the corner. Apples new process of going through public beta will certainly provide a better product on day one. I’m excited about getting these changes on all my iOS devices, including my phone.

iOS: Updating your carrier settings


Carrier settings updates are small files that can include updates from Apple and your carrier to carrier-related settings, such as network, calling, cellular data, messaging, personal hotspot, and voicemail settings. You may receive notifications from time to time to install new carrier-settings updates.
If you see the prompt for this update go ahead and accept it. If you do select not now, you can follow these instructions to update your carrier settings:

Make sure your device is connected to the Internet.

Tap Settings > General > About. If an update is available, a prompt will appear.

Note: Occasionally a carrier may release a mandatory update. This type of update will display only an OK button instead of an Update button, to let you know that the update was downloaded and installed.

If you need to know the version of the carrier settings your device has, tap Settings > General > About and look next to “Carrier”.

OS X El Capitan: Changes in the Spaces Functionality

Spaces has changed a bit in El Capitan.  Apple has a great help article that covers how it works in the new operating system version.  Here is what Apple has to say:

If your desktop becomes cluttered with open app windows, you can create additional desktops, called spaces, to organize the windows. When you work in a space, you see only the windows that are in that space.

You use Mission Control to show the Spaces bar, where thumbnails represent your spaces and apps you’re using in full screen or Split View.

The Spaces bar showing a desktop space, apps in full screen and Split View, and the Add button to create a space
Tip:   Make your spaces unique by assigning a different desktop picture to each one. Just assign System Preferences to all desktops (see the instructions below), then change the desktop picture in each space.

Create a space

  1. Enter Mission Control, then click the Add button  in the Spaces bar.

    You can create up to 16 spaces.

  2. When you’re done, click a space in the Spaces bar or a window in Mission Control.

Move between spaces

Do any of the following:

Swipe left or right with three fingers.

Press the Control key and the Right or Left arrow key.

Enter Mission Control, move the pointer to the top edge of the screen to show the Spaces bar, then click a space.

Move an app window from one space to another

Do any of the following:

Drag the window to the edge of the screen. After a moment, the window moves to the next space.

Place the pointer over the window’s title bar. Hold down the trackpad or mouse button, then press the Control key and the Right or Left arrow key.

From the space that has the window you want to move, enter Mission Control. Then drag the window up to the space you want to use.

If you drag the window onto an app in full screen, you can use the apps in Split View.

Assign apps to spaces

If you assign an app (or System Preferences) to a specific space, the app will always open in that space.

  1. Press and hold an app’s icon in the Dock.

    You may have to first open the app from Launchpad to see its icon in the Dock.

  2. From the shortcut menu that appears, choose Options, then one of the following:

    • All Desktops: The app opens in every space.

    • This Desktop: The app opens only in the current space. If you use the app full screen, it appears in its own space.

    • Desktop on Display [number]: The app opens in the current space on a specific display (if more than one display is available).

    • None: The app opens in whichever space you’re using at the time.

By default, when you switch to an app, the desktop automatically switches to a space that has open windows for the app. For example, if you create a new TextEdit document in Desktop 3, but TextEdit windows are already open in Desktop 2, your new document opens in Desktop 2. To change this setting, choose Apple menu > System Preferences, then click Mission Control.

Delete a space

  1. Enter Mission Control, then move the pointer to the top edge of the screen to show the Spaces bar.

  2. Place the pointer over the space you want to delete, then click the delete button that appears.

    If the space contains open windows, they are moved to another space.

You can quickly stop using an app in full screen or Split View by moving the pointer over the thumbnail in the Space bar, then clicking the exit button that appears.

Mac: Starting apps using Spotlight

SpotlightThere are many applications on a Macintosh that I only use once and a while. Rather than find the applications folder and look for that applications icon, I use a better way that allows me to go directly to where I want to go.

If there’s an app I need to use that’s not in my Dock, I start it by hitting Command + Space bar to open the Spotlight search box, then I begin typing its name. After just a few characters Spotlight has usually realised which app it is, and I just hit Return to start that app. Simple, and quick. No mouse required!

In the next release of the operating system, Yosemite, Apple will make this even more prevalent. When you hit this command key combination, the spotlight dialog will pop up in the middle of the screen so it will be easier to see.

How do you know so many answers to tech questions?

Screen Shot 2014-03-06 at 4.14.17 PMMany people ask me how I know so many answers to tech questions.  Part of what I know is how to perform a good Google search.  Here are some tips from the Google Support site on how to do a good Google search.

Tip 1: Keep it simple

No matter what you’re looking for, try to start with a simple search like [where’s the closest airport?]. You can always add a few descriptive words if necessary.

If you’re looking for a place or product in a specific location, add the location. For example, [bakery seattle].

 Tip 2: Search using your voice

Tired of typing? Click the microphone icon in Chrome’s search box to search by voice.

Tip 3: Use web friendly words

Use words that are most likely to appear on websites. For example, instead of saying [my head hurts], say [headache], because that’s the word a medical site would use.

 Tip 4: Don’t worry about the little things

Spelling. Google’s spell checker automatically uses the most common spelling of a given word, whether or not you spell it correctly.

Capitalization. A search for [New York Times] is the same as a search for [new york times].

Punctuation. Most punctuation, like ?!,.%^*()[]\, is ignored when you search.

Tip 5: Find quick answers

For many searches, Google will do the work for you and show an answer to your question on the search results. Some features, like information about sports teams, aren’t available in all regions.

Weather. Search [weather] to see the weather in your location or add a city name after Weatherweather to find weather for a certain place.

Dictionary. Put [define] in front of any word to see its definition.

Calculations. Enter a math equation like [3*9123], or solve complex graphing equations.

Unit conversions. Enter any conversion, like [3 dollars in euros].

Sports. Search for the name of your team to see a schedule, game scores and more.

Quick facts. Search for the name of a celebrity, location, movie, or song to find important information.

Maybe it’s time to Upgrade your Flash Drive…

lexar_S23_groupI got this advertisement in the email today and it made me think….

New USB 3.0 drive stores and transfers content faster

Spend less time waiting for your files to transfer with the new Lexar® JumpDrive® S23 USB 3.0 flash drive. Transfer a 3.3GB HD video clip in less than 90 seconds, 13x faster than the 20 minutes it takes using a standard USB 2.0 drive.*

One of the smallest USB 3.0 drives available, the slim, retractable JumpDrive S23 comes in colorful capacity options—from 8GB to 64GB—giving you a handy color coding system to help you organize your drives and their contents. And it’s backwards compatible, so it even works with all your USB 2.0 devices.

I can remember the trials of burning files to CD.  I even remember 360K floppy drives.  That takes you back.  Then floppies got bigger to 720k and 1.44mb.  We moved to 100mb zip drives and then 250mb.  Not to forget the orb drive too.  But today, file storage is as easy as a flash drive.  Easy and inexpensive.  Sure, the future is storage in the cloud unless you get somewhere with poor internet speed or god forbid no internet at all.

lexar_usb3_transfer.2When I saw this add, and checked Amazon’s price for these, it has become clear that faster is definitely better when the price remains low.  Sure, not everyone has a USB3 port but they soon will.  SO maybe its time to update that flash drive you carry to a USB3 one and perhaps even a larger one.

Think about it…. What is your time worth.

Selecting a Good Printer

Icon-Printer02-BlackPerhaps one day we’ll all be at the point where we no longer need to depend upon printed documents. That day make come along soon but it certainly isn’t today.  I’m often asked what kind of a printer should I have to use with my computer. That depends a lot on what you intend to use the printer for.  There are a number printer categories available today on the market. Each one depends a little bit on what you intend to use the printer for as its primary use. I’m going to cover some things to look for in a printer regardless of type of printer you want.

First off let’s talk about some things it’s very important to look for printer regardless of which category you are interested in.

Network Connections

Regardless of what type you choose, it needs to be network compatible. That typically means either a Wi-Fi connection on the printer or at least an Ethernet cable connection.  Wi-Fi connected printers are very handy because you can put them literally any place you need them. Ethernet connected printers are often more stable to be able to keep connected.  If your printer is going to be located close to an Ethernet port, always use the Ethernet connection. If not, Wi-Fi will have to do.  Even if you intend on plugging the USB cable into the printer from your computer, look for a printer that contains networking. Things change and it’s very easy to move the printer if it’s network compatible. If it’s not compatible with network connections it’s almost impossible to move easily and without additional cost.  Have a networking on a printer is usually a very small additional cost.

 AirPrint

If you own any type of an Apple iOS device, having a printer that supports airplay is a great idea. AirPrint gives you the ability to be able to print from your iOS device directly to the printer. The printer needs to be connected on your network but other than that it’s all automatic.

Color vs Black and White

If your main printing needs to print business documents choosing a black-and-white only printer will save you money. Black-and-white only printers today are typically laser printers. Toner cartridges are less expensive per print than the liquid inkjet cartridges.  Color printers on the other hand are available in either inkjet or toner-based laser varieties.  Laser color printers will typically be less expensive if you print a lot of color pages. But laser color printers are typically only used for business color documents. If color matching, or photography printing is important to you you probably need to go with inkjet.

 Separate Color Ink Cartridges

Some color printers have three colors that are all included in the same ink cartridge. Purchasing color ink this way means that if any one color runs out you’ll need to replace the entire cartridge. I highly recommend if you’re looking for a color printer to find one that uses separate color ink cartridges for each color. These printers typically cost a little bit more upfront, but you will end up paying less in ink down the line.

Photo Printers

It’s generally acknowledged that for printing photographs, the more colors the printer supports the better off the print will be. I typically recommend looking at a printer that has independent ink cartridges of multiple colors if I want to print photographs. The more colors the better.

 Printer Types

Now that we’ve covered some of these general areas of things to look for, let’s look in a little bit more detail a different printer types.  As I said above, today’s printers come in typically either laser or inkjet style.  Laser printers used toner and inkjet printers use liquid ink.  Each of these different printer types come in many different styles.  Printers today can be available in a printer only variety, or what’s typically call an all-in-one device.  All in one devices usually combine a printer and copier and a scanner.  Sometimes they also include a fax machine but this is not always the case so if a fax machine is important make sure that you find a printer that includes that is a feature.

Most consumer printers today are available as all-in-one devices.  People typically want to have a single device that can do all of these referral functions for them.  This method often saves money and gives you the ability to be able to do these things that are not often done without having to have a special device to do them.  Today, scanning is not used as often as it had been in the past.  More and more documents are available in digital format and as a result of having to scan in a paper copy is not used.  Some of these consumer all-in-one devices have the ability to scan photographs very well also.  If that’s important to you be sure to look for a scanner that can handle a high enough resolution to ensure your photos are captured with high fidelity.

There are many different brands of printers available on the market today and I am often asked which type or brand is best.  I think I can say that I’ve seen good printers from nearly every manufacturer and I’ve seen bad printers from nearly every manufacture too.  If you make your printer selection based upon the functions you want to perform, most manufactures printers will do a fairly good job.

I will say, if you’re looking to print higher-quality photographs. I would recommend looking at an Epson printer or Canon printer.  Both of these manufactures doing much better job of color matching than other companies.

With all that said, here are couple of my favorite printers on the market today.

 Screen Shot 2013-05-21 at 4.33.36 PMBrother® MFC-J4510DW Inkjet Color All-in-One Printer

I recommend this printer as a general work horse home printer.  It has a ton of features and it doesn’t cost a fortune.  It is also one of the only printers on the market it prints the paper sideways.  This makes it possible to print up to 11 x 17 sizes with ease.  The color on this device is good but not the best but for general printing this is a good one. 

Screen Shot 2013-05-21 at 4.35.38 PMCanon® imageCLASS® MF4880dw Mono Laser Multifunction Printer

I really like the Canon ImageCLASS printers for black and white only printing.  This one is a multifunction laser device that is quite fast and has great quality.  If your primarily print documents for business, you can’t beet the quality of a good laser printer.


Screen Shot 2013-05-21 at 4.37.40 PMEpson® Artisan® 1430 Wide-Format Printer

This is a color wide format printer that produces great photo quality images.  It is only a printer (as most higher end photo printers are) but it makes up for features in the great quality you get for photos.

There are many great printers on the market today.  I usually till people to take a look at the weekly ads from Staples and Best Buy and see what’s on sale. Just because of printers she doesn’t make it great, but very often great printers are sold at a discount price through these ads on Sunday.

Hopefully this gives you a few ideas of what to look for in a new printer. Printers are not things we need to buy too often, because they typically last longer than the computers that we used to print from.  But when the time comes, be sure to get the features are your really interested in.