iOS 8 and iPhone 6 Impressions

Screen Shot 2014-09-21 at 6.33.38 PMApple has hit another home run with the new iPhone 6. I selected the smaller of the two devices because I felt like it better fit my lifestyle. The new iPhone 6 is dinner yet has a larger screen than my previous iPhone 5s. It also seems to be faster. But the real star of the show will be the new Apple pay when it becomes available in October. Apple pay will give us the ability to use our phone to make purchases securely. That’s the real killer feature of the new phone. So if you’re closing your contract or have a need or want to upgrade to a new phone, seriously consider the iPhone 6. It’s a very nice phone with a great screen and under contract still at a reasonable price.

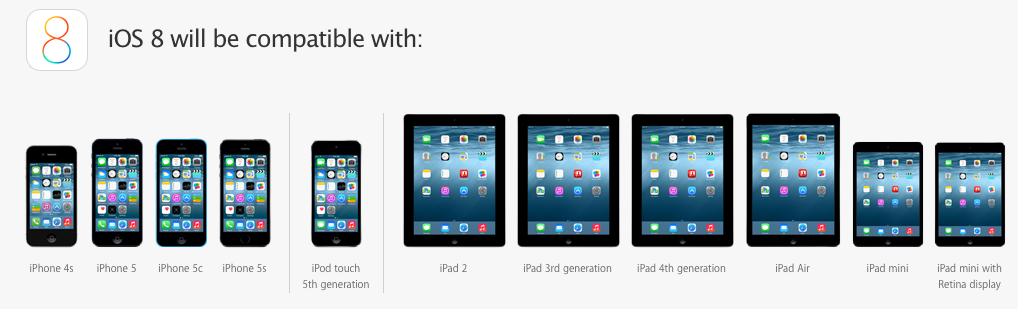
Whether you purchase a new iPhone 6 or not if you have an iPhone, iOS 8 is a terrific upgrade. iOS 8 is compatible with iPhone 4s, iPhone 5, iPhone 5c, iPhone 5s, iPod touch 5th generation, iPad 2, iPad with Retina display, iPad Air, iPad mini, and iPad mini with Retina display. So it looks like the iPhone 4 is not going to make the cut. If you perform the upgrade directly from the phone it looks like it’s going to require about 5.5 GB of space for you on your phone. But if you connect your phone or iPad to iTunes, the free space on the phone requirements are dramatically reduced. I was able to update one device with as little as 2.5 GB free.
When you perform the update, there’s lots to like about the new OS. Unlike the last release, the look and feel of iOS 8 will not be dramatically different than iOS 7 was. Many people have a difficult time with the transition from iOS 6 to iOS 7 because the look and feel was a lot different. You won’t see that with iOS 8. The features in bedded in iOS 8 are a little more self. You have to take a look at the list of what’s available to find some of the new things. But it’s well worth looking at.
Some of the things to check out in the new update are:

  • Safari extensions
  • Updates to the Camera application
  • More extensive use of touch ID if you have an iPhone 5s or newer
  • Interactive notifications
  • Updates in the Messages app to allow you to send voice messages and video messages
  • Third-party keyboards
  • Easier ability to delete emails
  • Family sharing
  • Apple’s all new health kit

And those are just the highlights.Iowa State is an excellent update. And if you have a newer phone or a newer iPad it’s all free.

I always recommend making a back up of your device in iTunes before you start the update. And then allow yourself to to three hours for an average update. The larger the memory space on your phone the longer it will take.

And as always, if you feel uncomfortable with making the update yourself, or would like a little assistance, feel free to get a hold of me.

Posted in iOS

Links From My Recent Mac Class

Screen Shot 2014-09-14 at 7.58.26 PMLast night I had the opportunity to teach a class on Macintosh applications. We covered the applications that are included in the Mac operating system. You can never have enough tips about any application, I found the sites on the Internet that provide some great tips for some of these included applications.

Feel free to check these out.

80 handy iPhoto tips and tricks | News | TechRadar
Get more out of Apple email – How to – Macworld UK
How to use the Calendar in OS X Mavericks – How to – Macworld UK
Tips for using Maps on a Mac – How to – Macworld UK
Tips for using Safari 7 in OS X Mavericks – How to – Macworld UK
iMovie (2013): Tips For iMovie ’11 Users
12 Cool Tips and Tricks for iMovie ’11 | Mac|Life
10 Tips for Getting More Out of iCal | Mac|Life
7 FaceTime for Mac Tips, Tricks, and Features | Mac|Life


Posted in Mac

Own Android but Tempted by the New iPhones?

Screen Shot 2014-09-17 at 10.21.37 AM

Apple just continues to innovate. Sometimes it’s actually amazing. But not everybody owns an iPhone right now. Many people choose android, and that’s a good solution also. But once in a while, people want to change platforms for their phone. Go from my android phone to an iPhone. And some vice versa. Apple has a new website it gives you information on how to get data over from android to an iPhone. Some of the suggestions are purely common sense but others are really good ideas for being able to get all the stuff that you have from your android phone over to a brand-new iPhone.

So if the new iPhones have you tempted, take a look at the site to see what it’ll take to get your phone information moved over to an iPhone.

Get Ready for iOS 8!

Screen Shot 2014-09-07 at 11.32.00 AMWith Apple about ready to release iOS 8, it’s always good to go back through the list of things that you need to do to prepare before updating your phone with a major operating system update. If you follow these simple steps, the odds of your update going well are greatly increased. Over the years Apple has made installing new updates pretty simple. When the update is ready it will show you on the device by showing you a small red number on top of General icon in the Settings application.  But many times if you go into system updates and check for an update it will show you it’s available before the icon shows. If you’re in a hurry to update, you might give this a try.

1.) Check to see if your device is iOS 8 capable

The iOS 8 update is compatable with the iPhone 5S, iPhone 5, iPhone 5C, iPhone 4S, iPod touch fifth-gen, iPad 2, iPad Air, iPad mini with Retina Display, iPad mini, iPad 4, and iPad 3.  If Apple releases any new devices, iOS 8 will be standard on them.

Screen Shot 2014-09-07 at 11.33.05 AM

2.) Make sure you have enough space for the update

iOS 7 required 700MB of space and while its unknown how much its successor will require, you can be sure its going to be similarly large amount. Apple will prompt you before downloading if you do not have enough space, so either way you will either have to get rid of some unnecessary apps, photos, music/TV shows/movies or other data you might not need right on your device .  One place that I see space often used on iOS device is in the camera roll. If you sync your photos over to your computer and delete them from your phone that will free up that space. You can always put photos back on the phone using iTunes at the time of sync.

You can check how much space you have by going into settings and then general.  Select about and then it will tell you in the list how much free space you have on your device. iOS updates often have additional applications updated too. Apple generally updates many of their apps at the time of the system update so you’ll need additional space for those. Don’t cut your space to close.

3.) Is your device running iOS 7.1.2?

To update to iOS 8, you’ll likely need to be up to date with the latest iOS 7 version, meaning you won’t be able to switch unless you’re running iOS 7.1.2.

4.) Do you have the latest version of your apps?

If you don’t want to lose your app or its data, make sure they are up to date. This will also ensure you get the most out your apps in iOS 8, as they will have been tinkered with for iOS 8 integration. Just check for updates, and apply all updated applications that you find prior to the operating system install.

5.) Back up your device!

This is the most important step you need to take before updating. While everything is done to ensure the transition to iOS 8 goes smoothly, major updates can go awry. To back up, simply follow these steps:

  • Connect your iPhone or iPad into your Mac or PC and open iTunes.
  • Select your device under Source and select “Summary.”
  • Under “Backups” select “This Computer” and then “Back Up Now.”

I also recommend encrypt in your back up. If you encrypt your back up, and give it a password that you have to enter when you restore it, all of your passwords that you stored on your device will remain. This keeps you from having to go back in and reenter passwords in applications, or mail, before you can use the new OS.

[stextbox id=”info”]For most general users, it is often good to wait a few days after the new OS is available to make sure there are no issues with it.[/stextbox]

That’s about yet. You’re ready to go. Enjoy the new OS. All the new features will be great fun to play with.

Posted in iOS

Get ready for your Trip to Yosemite

Screen Shot 2014-09-07 at 11.06.37 AMOS X Yosemite is the newest major operating system release for Mac users, versioned as OS X 10.10, and it’s due to be released soon. This release includes many new feature enhancements and refinements. I have been working with the Beta release and it looks to be a great release of OS X and all users that can update their Macs should do so.  But before you run the updater to install it on your Mac, there are a few things you should do just to ensure that your upgrade goes well.

Yosemite is super easy to install, and it’s similar enough to Mavericks and Mountain Lion that it’s unlikely most users will encounter any trouble with the update regarding app compatibility or system support. But any major new operating system releases offer a good time to run through some simple maintenance  to insure compatibility of the Mac itself, your apps, and also to do some general clean up and, the most important thing of all, back up.

So here are a few things you might want to consider before upgrading your computer to Yosemite

1: Check Mac System Compatibility

At it’s core, updating to OS X Yosemite requires the following:

  • 64-bit Intel CPU
  • 8GB of free disk space
  • OS X Lion or OS X Mountain Lion, or Mavericks
  • Internet connection so that it can be downloaded from the Mac App Store

If some of that sounds like jargon gibberish, but basically, if your machine runs Mavericks, it will run Yosemite. Apple is not published a list of machines but Yosemite will run on, but here’s the list for Mavericks.

  • iMac (Mid-2007 or later)
  • MacBook (13-inch Aluminum, Late 2008), (13-inch, Early 2009 or later)
  • MacBook Pro (13-inch, Mid-2009 or later), (15-inch, Mid/Late 2007 or later), (17-inch, Late 2007 or later)
  • MacBook Air (Late 2008 or later)
  • Mac Mini (Early 2009 or later)
  • Mac Pro (Early 2008 or later)
  • Xserve (Early 2009)

Perhaps the biggest requirement for many users will be having at least 8GB free on the Mac hard disk.  Don’t skimp here. Make sure you have enough free space for the updates before you start. Running the installer puts all of the new software on your computer and then removes the old. So additional free space is needed at the time of install to make it work well. Running out of space would not be a good thing.

2: Install General System Updates & Update Mac Apps

Keeping system updates and apps up to date is good policy for stability and security, but you’ll often get new features too. This can be particularly true when apps have been updated to support new major OS X releases, where a potential new feature built into the operating system may need to be independently included within the apps themselves.

Updating OS X and your apps through the Mac App Store is remarkably simple:

  • Launch the “App Store” from the Applications folder
  • Go to the “Updates” tab and choose “Update All”

3: Do Some General System Clean Up

Major OS X updates are a great time to perform some general system maintenance and clean up to help insure things are running well. Much of this is optional, but if you have the time it’s a good idea to perform some cleaning on the Mac:

  • Delete old apps you no longer use, usually tossing them into the Trash is enough but you can do a more thorough uninstall if desired
  • Trash useless old files from the ~/Downloads/ folder
  • Delete unnecessary caches from user folders and old apps
  • Clean up files from the desktop, either throw them all into a ‘cleanup’ folder or individually into their appropriate places in your home directory – this is an easy task that helps to speed up older Macs

Now go to the utilities folder inside the applications folder and run Disk Utility.  Select the Macintosh HD in the left pane and press the Repair Disk Permissions button.  Apple doesn’t say this is necessary, but I’ve seen far too many times but not doing this causes you problems down the line.

4: Back Up with Time Machine

Last but certainly not least, back up the Mac. Having back ups of your important data and files is very important, and Apple’s Time Machine makes it so easy to backup everything that there is little reason not to do it. Always, always, back up your Mac before installing a major system update. It’s unlikely something will go wrong, but if something does go haywire you can quickly recover if you have a fresh backup handy.

[stextbox id=”info”]For most general users, it is often good to wait a few days after the new OS is available to make sure there are no issues with it.[/stextbox]

That’s about it,  Now go ahead and download and enjoy OS X Yosemite, free is a great price for a great operating system update!

Once the install is complete I typically run the system updates again. This ensures that if Apple has patched the system beyond the release version you get those updates too. It also ensures that any Apple applications or vendor applications that have been updated for the new operating system get installed on your computer


“Wink” Provides and Integrated Approach to Home Control

Screen Shot 2014-09-02 at 1.18.02 PMI’ve dreamed for years about having a home that I could control electronically. Turn lights on and off from my phone, change the temperature of the thermostat, and open and unlocked doors. Over the years I’ve tried a number of products and many have worked very well. The one thing they lack was an integrated approach to being able to handle the controls.

A new product called Wink provides the ability to be able to control many other vendors devices from a single application. Just released in July, this unit allows you to connect other devices into a single integrated approach. While every device I have does not connect today, the open API provided should allow other vendors to make their connections work. This is the same approach Apple has to their HomeKit integration. While I’m absolutely sure that Apple’s products will be terrific, there was one thing I really IMG_0191liked about the Wink system. Wink has a single home unit that includes multiple radios to be able to connect to nearly any type of device. Wi-Fi, Bluetooth, zigbee, and Z-wave radios are all included in the device. These multiple radios allow many vendors devices to be able to connect and integrate together. The real beauty of this approach allows a best-of-breed solution for home control. You can purchase devices that do the best job of providing a particular home control service regardless of how they connect with each other or with other devices you already own. This approach gives you the best opportunity to find the perfect device that fits your needs.

I’m trying out the Wink system in my own home. I was able to purchase two Lutron light switches and get the Wink box for free through a special offer Wink has at the present time. These light switches were easy to connect to each other and to the app on your phone. So the Z- wave radio within the Wink device connects them to my wireless network at home. Then I can use the Wink app on my iPhone to be able to control the switches

IMG_0192Wink also provides the ability to script actions that can be put together. An example is a single button that can turn all the lights in the house that are connected to control switches off. It also has the ability to create what it calls robots. These robots are scripts that are basically if then situations. If a particular light turns on to 100%, then turn another light off. You get the idea.

Wink has committed to providing connectivity to as many devices from other vendors as possible. I’m anxious to see if I will be able to control my nest thermostat and my WeMo light switches through this same application. If Wink continues to develop the way it looks like they have, I look forward to a day where a single app on my phone may be able to control all my intelligent devices in my home.

But Apples HomeKit will be a contender also. So as I purchase new controllable devices, IMG_0190I’m keeping my eye open for support for HomeKit too. That way if HomeKit becomes the better solution, all the devices I purchased can be used with it. Since the Wink controller was provided at no cost with the purchase of the two switches I just bought, I had no investment to lose by giving this a try.

Wink devices are available through Home Depot at Amazon.com.

I’ll continue to give updates on how I’m doing with Wink and home control. Hopefully that control I’m looking for in my home is just around the corner.


Internet Slowdown Problems

Screen Shot 2014-08-15 at 11.26.09 AMQ: Lately I’ve noticed that the internet has slowed down a great deal. I also tried to purchase music at iTunes and got an error message, three times, that the network connection had ‘timed out’

A: In my experience Internet slowdowns are often a result of two things. Obviously it could be a slow down at the cable company providing the service. But the second thing actually happens more often. The devices that connect us to that Internet sometimes get confused. These are boxes at tend to run 24 hours a day so any little glitch can cause a problem. The first thing I always do when the network seems slow is to unplug the router and unplugged the cable modem. But it’s important to reconnect them in the right sequence.

While these boxes are unplugged, restart your computer. It’s always a good idea to shut down all the way to power off and then turn the power back on.

Next, plug the cable/DSL modem in and then wait about a minute. Now plug the power into the router. This allows the cable modem to reset and make a connection prior to getting the router powered back up. Once you’ve done that the next thing to do is to test the speed of your Internet and see if you’re getting what you’re paying for.

I often use one of these websites to test Internet speed.

http://www.speedtest.net/
http://www.dslreports.com/speedtest

There are also apps to do this on the iPhone or the iPad.

If you’re not getting the speed you’re paying for, it’s time to call your Internet service provider and see if they can do anything to help.

Transcend’s JetDrive Lite : A Low Cost and Fast Storage Upgrade

Screen Shot 2014-08-13 at 8.20.04 PMTranscend’s JetDrive Lite 330 Expansion Card gives you the chance to instantly boost the total available capacity of your MacBook Pro system without the need to upgrade to a larger capacity SSD.

With their substantial amount of storage space, Transcend’s JetDrive Lite 330 expansion cards provide plenty of space for professional-quality photos and videos as well as a large music collection. Each 64GB card for instance, can store over 31,000 high-resolution photos, 16,000 mp3 songs, 16 hours of Full HD quality video, or seemingly limitless number of documents.

When inserted into the SD card slot of a MacBook Pro 13″ Retina Display, the low-profile Screen Shot 2014-08-13 at 8.20.18 PMJetDrive Lite 330 won’t stick out like a normal SD card and can even be left in place for on the go storage. What’s more, the JetDrive Lite 330 makes fast and efficient file transfer possible with incredible transfer speeds of up to 95MB/s read and 60MB/s write.

Thats the great part. It’s unbelievably fast. I installed the beta for the Yosemite operating system on the drive and it’s nearly as fast to me as running from a internal SSD drive.  I really love the way if it’s flush in the SD slot.

For just $40, I’m able to get 64 GB of pretty darn fast SSD space for my MacBook Pro. It’s a great way to safely try out a new operating system. You got a love that.

Posted in Mac

Mac: Starting apps using Spotlight

SpotlightThere are many applications on a Macintosh that I only use once and a while. Rather than find the applications folder and look for that applications icon, I use a better way that allows me to go directly to where I want to go.

If there’s an app I need to use that’s not in my Dock, I start it by hitting Command + Space bar to open the Spotlight search box, then I begin typing its name. After just a few characters Spotlight has usually realised which app it is, and I just hit Return to start that app. Simple, and quick. No mouse required!

In the next release of the operating system, Yosemite, Apple will make this even more prevalent. When you hit this command key combination, the spotlight dialog will pop up in the middle of the screen so it will be easier to see.

MacBasics: Mac OS Productivity Apps Training in Jefferson City

A few times a year, I am asked to do some training for aappleJAC, our local Macintosh Users Group.  One of these classes is coming up in September.  This class will cover the Mac operating system beyond the basics. A basic Macintosh class will teach you to get around in the operating system and find things but Apple has include so many applications with the Macintosh OS that it really cannot cover these in one class.This class, will cover all those applications that Apple includes free as part of the operating system.

Information on the class is below. Everybody’s welcome.

6a00d8341fbd4c53ef01a3fd41d6d7970b-640wi


Posted in Mac