Protect your home with Nest Protect

IMG_0009By now, most everyone must of heard of Nest. Nest is a company famous for their Nest thermostat. This thermostat connect to the Wi-Fi in your home and give you the ability to modify thermostat settings from any place that you have Internet access. It also provides a great deal of intelligence related to setting schedules for thermostat.

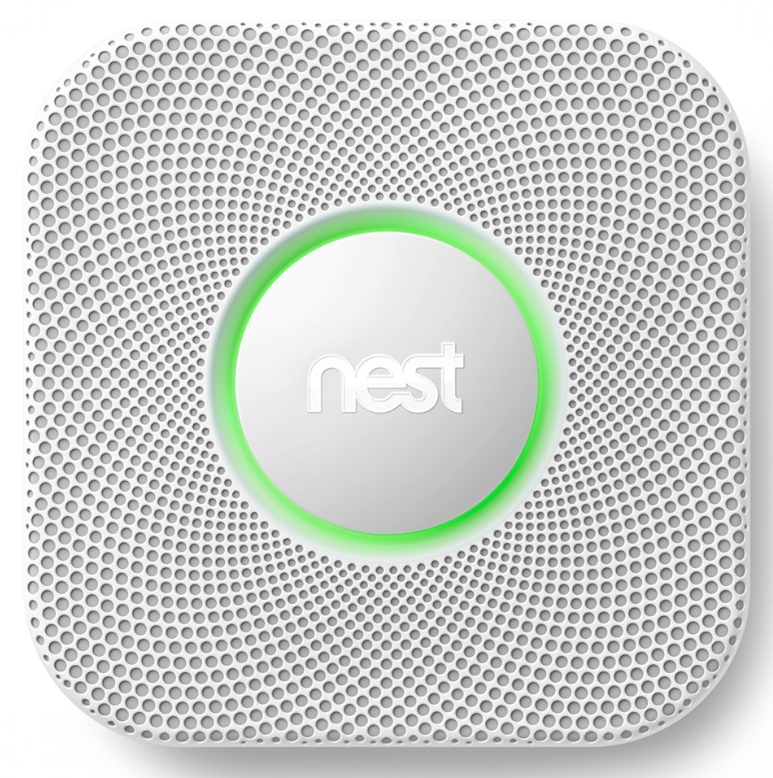
Nest’s latest product is called the Nest Protect. Protect is a connected smoke alarm and carbon monoxide detector. Similar to the nest thermostat, the nest protect connects to your Wi-Fi network and provides the ability to monitor smoke and carbon monoxide detection within your home.
Protect is easy to install. Actually it’s quite a bit easier than the thermostat.  Prior to installation you must decide which model of the unit you want to purchase. Nest provides both a wired connected device and a battery only device. That’s not to say that the wire device doesn’t also have batteries, it does, but the battery only unit does not connect to electricity. You also have to determine whether you want the light color or the dark color version of the device.
IMG_0007Once your protect arrives, it’s extremely easy to install. I installed the wired version in my home.  You begin by removing the existing smoke alarm in the house. My particular alarm was a three wire connected unit a positive, negative, and interconnect wire.  Since nest connects with Wi-Fi, the interconnect wire is no longer necessary.  The installation process wires the two wires in to the unit and mounted to the wall.
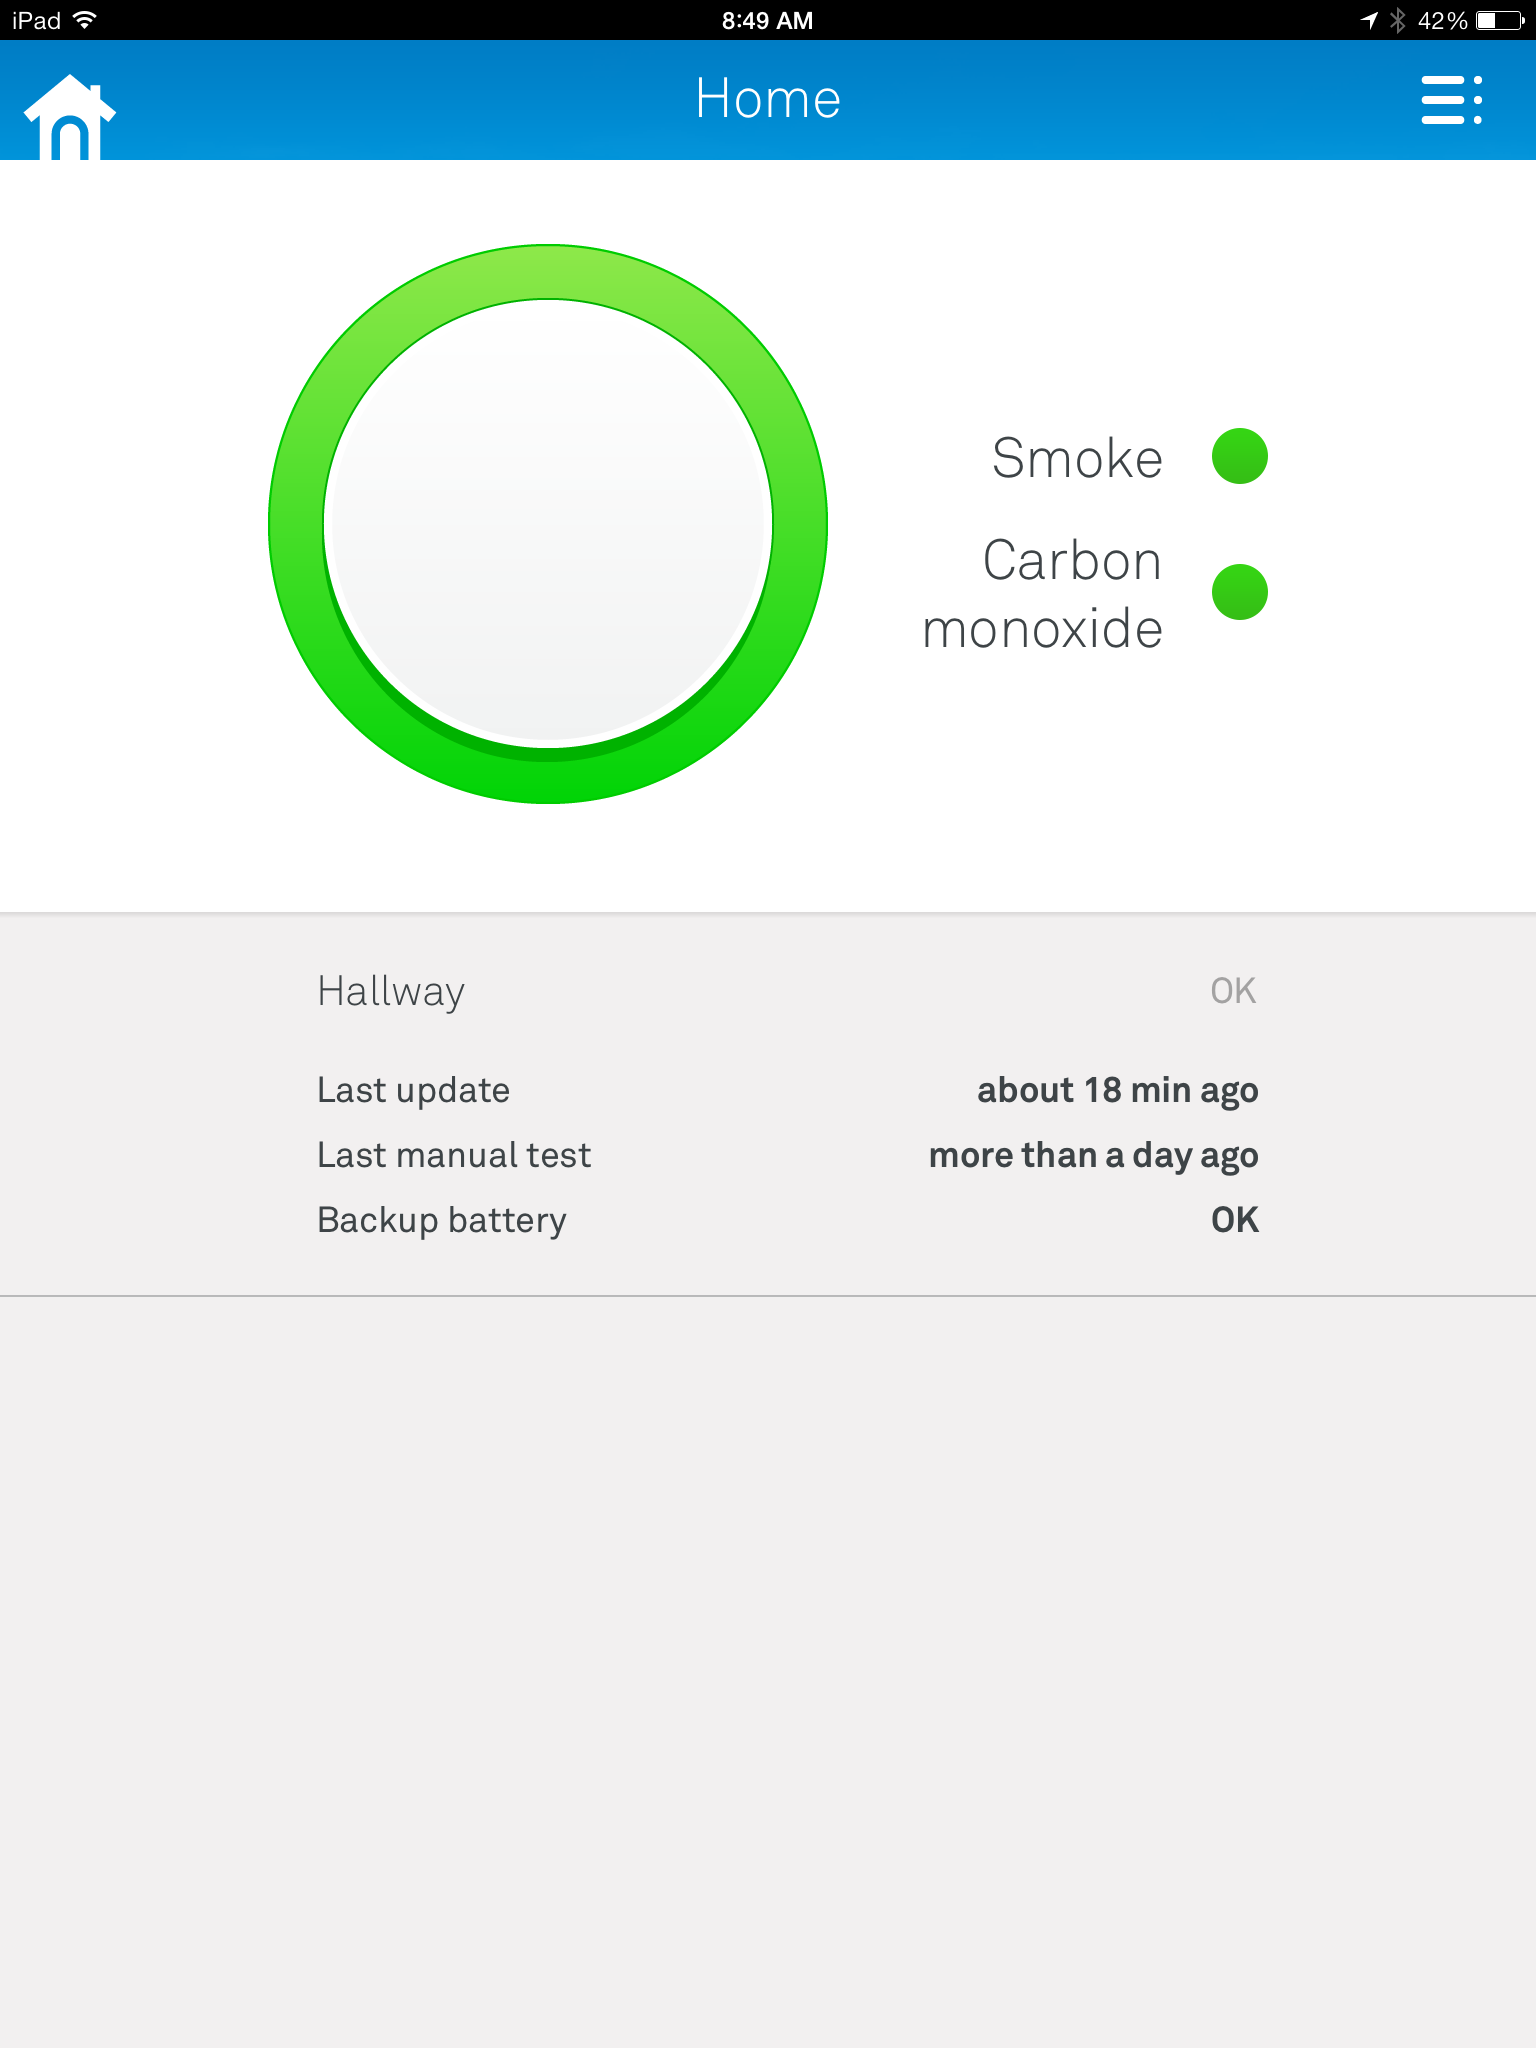
Next you run the test on the unit to make sure it’s functioning properly. The test provides audible information from the speaker in the unit in addition to tones that identify both smoke and carbon monoxide. Running the test allows you to understand what the different tones sound like. An LED light ring on the box also provides information about what type of an alarm is being sounded.
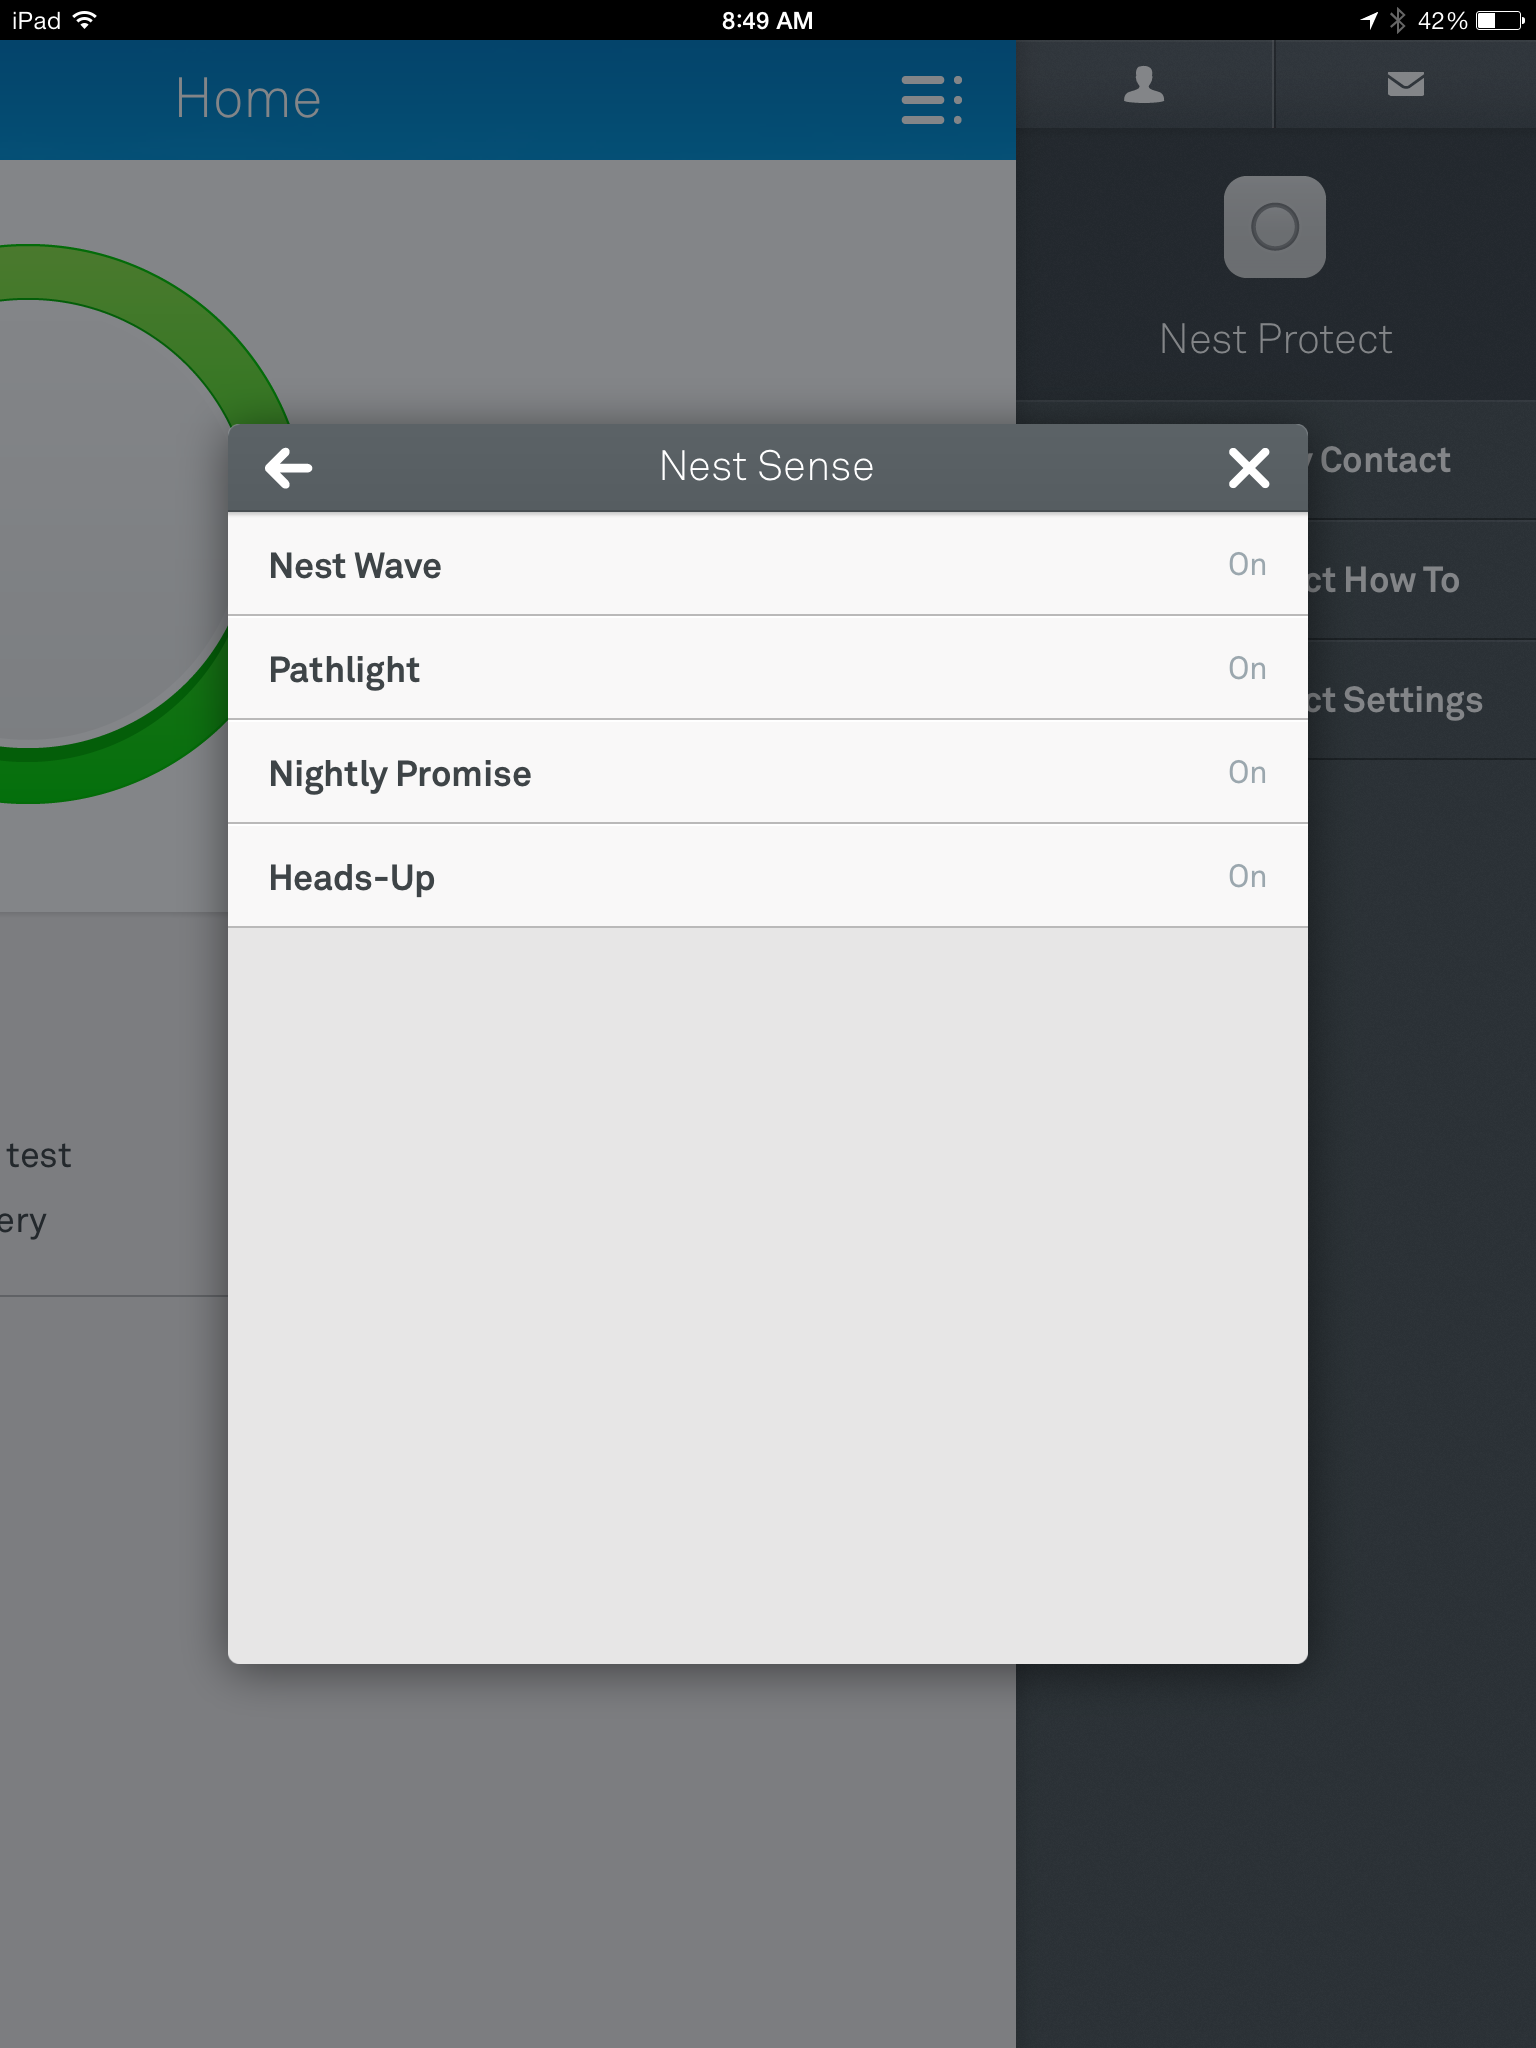
After running the test, you connected to your nest account. After updating the software onIMG_0007 my iPad, I simply press the add device button and walked through the process as it found the protect and connected it to my nest account.  Now that it’s connected, the unit works in conjunction with my wireless network to provide me information in case an alarm sounded.
One intriguing feature of the alarm is that in case of an alarm sounding, it has the ability to both text or email me letting me know if I’m away from home that the alarm is going off. The unit also has the ability to like the way if the alarm is sounded by using white LED light through the light ring in the front of the device.
If this entire process sounds simple, it was. Installing the protect took only a few minutes and provides that additional peace of mind.  Is bad as it is to say, I did not have a carbon monoxide detector in my home and all. The nest protect gives me that in addition to much more fruits connected technologies.
IMG_0008From the first time I installed a nest thermostat, I love the technology the company uses. They make things extremely easy to understand, and provide great features in a connected method through both iPhone iPad or any android device, and through the Internet in a web browser.
I’m happy with my installation of the protect. I also look forward to other devices for the home that nest may come out with in the future. I believe this company really understands home connection information and I look forward to them providing other additional devices that can connect my home to me whether I’m there or not.

Adding Security to Documents

Sometimes you create document that you want to provide some security that other people cannot see what’s in the file. Perhaps it’s a list of passwords or security information or it may be something like your Christmas list that you want to make sure your kids don’t have access to. Many applications give you the ability to add a password to an individual file and require that passwords use for the file open.  Some of these applications make it very simple to add a password while others work just as well but are a little more difficult to get it set up.

Let’s look at the process for adding a password to an Apple Pages, Numbers, or keynote file. Apple tends to make this process very easy.   They even add a pulldown menu item that allows you to provide a password for the file. You can save these files either and iCloud or on your hard drive but you must remember the password to be able to have access to open them.

Apple iWork

For this example also some screenshots from Numbers. The other two applications making up Apple’s office trilogy suite work exactly the same.

Screen Shot 2013-12-06 at 7.25.59 AMBegin the process by opening your document.  We are ready to add the password to the document simply select set password from the file menu. A drop down properties tab will open and give you the ability to enter the password, verify the password, and provide a password hint.

There is also a checkbox that allows this password to be saved your  Keychain file. If you check this box your computer will automatically open this file without requiring unit in the password. If the intended this is to continue to use the file on the same computer, it probably doesn’t make much sense to save the password any keychain. If you do anyone will be able to open the file on your computer. This still provides the ability to send this file to someone else and require them to know the password.

Screen Shot 2013-12-06 at 7.26.32 AM

Removing the password is simply as easy as repeating the process, keying in the password, and choosing the remove password button.


Microsoft Office

Microsoft also provides the ability to password protect files. These passwords are cross-platform so if you send the file to Windows user from a Mac or to a Mac user from windows password is left intact. Microsoft makes it slightly more difficult to set a file-based password but they do provide a nice help document that can walk you through it.

Screen Shot 2013-12-06 at 7.41.28 AMThe Process is very similar for Microsoft Word, Excel, and PowerPoint. We will use the word for this example.

Open your document in Microsoft Word. From the menu bar select preferences. Preference is divided into multiple categories. You need to select the security item under personal settings. From this dialogue you have the ability to set a password to be able to open the file and a separate password to be able to modify the file. This could be very handy if sending a file to someone else to review. You can set a password to let them look at the file without giving them the ability to change anything.

Other applications in these two application families work very similarly.

Sometimes security document is a necessary evil. The application you’re using today likely give you the ability to do this. Give it a try. But be warned, don’t forget the password!


Preparing for Major Operating System Upgrades

computer-upgradesOctober looks to be shaping up to be a big month for operating system upgrades. Microsoft has announced it on October 18 Windows 8.1 will be released. While Apple has not yet made an official announcement, there seems to be a lot of conjecture that OSX Mavericks will be made available in October also.  Many people quickly jump in and perform the upgrades without thinking about any preparation. Preparing to make one of these major upgrades is often a good thing to consider.

Regardless of which operating system you use, performing a major upgrade often puts your data at risk. While both Microsoft and Apple do extensive testing on their major operating system upgrades, often times things can go wrong very easily. Apple has the benefit of having a more closed environment so that it can test its operating system among many machines and many platforms to ensure that the upgrade go smoothly. On the other hand, Microsoft, which supports many more machine types and many more upgrade possibilities, has a more difficult time in testing these major upgrades. That’s not to say that either company doesn’t do everything humanly possible to ensure that their upgrade go smooth. It just says there are many possibilities that are hard to account for and doing testing.

So what’s the average user to do to ensure that their upgrade goes well. A little preparation upfront, and ensuring that your backup is up-to-date are the major things that you want to accomplish.

imgresWindows 8.1

More than a year in the making, Microsoft has been preparing for a major upgrade to windows. Since Windows 8 was released, many reports in the press have paned it as a poor operating system for the average user.  In post I made this blog, I’ve explained how Windows 8 is a fine operating system but only if you have a touchscreen machine. Unfortunately that recommendation doesn’t change much with Windows 8.1. Microsoft has spent a lot of opportunity to upgrade this operating system to take care of many things that people of complained about. Unfortunately the ability to use it on a non-touchscreen machine really hasn’t improved that much. That’s not to say that I wouldn’t go ahead and perform the upgrade if I have a Windows 8 machine. Windows 8.1 will add some nice new features and stability to the computer.

Before you begin the backup process you want to make sure that you have a good backup of your data. Unfortunately, in Windows 8, Microsoft backup utility is less than desirable.  This utility is fine for incrementally backing up changes to files made over days but not necessarily the best in the world for complete recovery.  The main thing to be concerned about is your user data. I recommend copying everything in your user folder over to an external hard drive. This ensures that you have it and can recover it if necessary.  Before you do this ensure that you turn on hidden files and folders so the data is stored in the application library can be moved to.

Once you have a good backup, perform the upgrade as you would any other Microsoft upgrade.  Since this is a major upgrade expected to take at least an hour, and ensure that you have your computer plugged into power if it’s a battery power unit.

imgres-1Macintosh OS X Mavericks

Since Mavericks is a major upgrade, the odds that Apple will require a small charge are very good. Like most Apple upgrades these days, they come from the app store. Login to the app store and purchase the upgrade. One important thing to note is that Apple provides license for you to upgrade up to five machines with each iCloud account that you purchase from. But the machine you use must be tied to your iCloud account for this to happen. Before you begin this backup ensure that your Time Machine backup is completely up-to-date.  If you click on the Time Machine icon in your menubar it will tell you the last time your time machine has updated.  I recommend going to the App Store and updating any applications you purchase there before you perform the upgrade to Mavericks.  Once you purchase it from the app store, it will download and begin the upgrade process.  This version is also a major upgrade to the Mac operating system so you should allocate at least an hour for the upgrade process to happen, and more time if you have a slow Internet connection for the download. Also if your machine is a laptop ensure that it’s plugged into power. Recent Apple updates have stopped in the middle of the process if you were not plugged into power and ensure that you plug it in before you start.

Keep in mind, these are pretty major upgrades. In all upgrades I would recommend waiting three days to a week before you apply.  This just ensures that the manufacture doesn’t find something immediately after the upgrade and put out another patch that you would have to later apply.

I want to reiterate the fact that both Microsoft and Apple put a lot of time into these major upgrades.  Having a backup of your data before you risk it to some upgrade only makes sense. The odds are highly in your favor that you will not need to use these backups but that doesn’t mean that you shouldn’t go ahead and have them.

Hopefully everything in your upgrade will go well. I have done some preliminary testing on both of these releases and fielder both a good upgrade for you to perform. Feel free to leave feedback as to how your upgrade goes.

How Many Email Addresses Do I Need?

Screen Shot 2013-10-02 at 8.29.08 AMPeople often ask me a question about their email.  They question whether they need an additional email address over the one that their Internet service provider normally provides.  For many people, using the Internet email address put your service provider provides is fine.  Some people, for business or professional reasons, would like to have an additional address that they can use for those purposes. Other people feel that an additional email address, to use for sites that they register on, or for companies who insist upon having your email address, is a good idea to help reduce spam.  I would like to advocate you have more than one email address that you use.  I think that it’s important for you to protect the use of your primary email address from it becoming a spam mailbox. Using an additional email address for this purpose is a good way to prevent that from happening.

But how many email addresses do I need?

There was a time when retrieving email from multiple providers was a difficult thing.  It often requires you to log onto different websites and retrieve mail one site time.  In some cases, it even require you to run a specialized piece of software provided by that email vendor that allows you to get email from them.  But these things of changed. Today is easy to configure your email client to pick up multiple email addresses and merge them together into a single inbox for you to look at.  It’s also simple to segregate those email addresses based upon the way you use them.  For instance, if you have one particular email address that you use for signing up for coupons, you can have all of those coupons put in one location that you can then look at at your leisure.

My rule of thumb is that many people need three email addresses. First off, you need your primary email address that you use with friends and family. These are people that you want to be able to contact, and you want to make sure that that email address does not get compromised with spam.  Secondly, I’m a strong advocate of using a throwaway email address, that you can get free from many providers, for signing up for things that you dont care if you lose contact with.  If this address is sold by someone who you’ve provided it to, and ends up on the spam list, you can easily delete this email address and create a new free email address for this purpose.  Finally, many people that work, have an email address provided by their employer. Others who work for themselves, have a need to segregate their work email from the personal email. So many people will need a third email address for this purpose.

Applications such as Windows live mail, or mail on the Mac, allow you to easily set up these email addresses to all be retrieved the same time, show up in a single inbox if you like, and provide rules for what to do with emails that are on specific subjects.  Even higher in applications such as Microsoft outlook allow you to do the same thing.  In this way, having multiple email addresses becomes transparent to you as a user.

Where do I get another email address?

First off, if you’re setting a new email addresses you may want to consider using a high-quality free email service is your primary personal email address.  This way, if something causes you to change Internet service providers, you do not lose contact with those personal friends and family that are most important to you.  My first recommendation would be to use Gmail for this purpose. Microsoft also provides Outlook email at Outlook.com that’s a free email and also has very good performance.  Apple will provide you an iCloud email address for free also. One caveat with the Apple iCloud email address. If you’re using iCloud on the computer to synchronize contacts and calendars, you can only have one iCloud address active at any one time.

Other providers such as AOL, or Yahoo, also provide email addresses for free. Many people consider AOL, Yahoo and Hotmail spamming email addresses due to the fact that these email addresses of been around a long time and are often thought of as email services with high spam content.  I would also caution against using one of these three email addresses as your business email address.  There’s something about doing business with someone with a Hotmail account that makes people uneasy.

[stextbox id=”info” caption=”Types of Email Arddresses”]

Personal Email Address – your most prized email that you protect aginst spam.  Only give this out to friends and family.

“Throw away address” – one you can give to everyone.  If it becomes too much of a spam pot, you can delete it and start over with another free one.

Business Email Address – an address that you use strictly for business purposes.

[/stextbox]

If you follow this idea, and have more than one email address, you’ll find that your primary email address it’s less difficult to deal with and you’re able to continue to use it for much longer period of time.

Upgrades: How do I know when it is time? Computer Replacement

Obsolete Computer RecyclingIn this continuing series of articles on upgrading your computing experience, we will take a look at computer replacement and it’s value to your computing experience.

Part 3: Computer Replacement

The time has come.  Either you are experiencing a hardware failure or you have out lived the computer you now have.  You have decided either because you want something faster, something different, or you computer has a cost prohibitive failure that the time is right to replace your computer.  When you find yourself in this situation, you need to consider a few things as you are selecting the new computer or computing device that you will be using.  It is always better to be making this decision without any duress.  If you are sitting on a failed computer and you need to get work done, the odds of making a less than informed decision grow exponentially.  Lets look at a few of the decisions you need to think through.

Do I need a traditional Computer?

Many people with light computer use needs are opting for a tablet rather than a computer.  iPads have replaced many computers today and Android tablets are finally becoming a factor.  Windows tablets are sort of a hi-bred of tablet and computer but be sure you are looking at a full windows tablet if you select this option.  Windows is available in a RT version that will not run traditional windows applications.  I recommend distancing yourself from this variant regardless of the low price you may see.  Some people have even decided to look at a Chromebook from Google but these devices must remain connected to the internet all the time since applications and data are in the cloud.   Finally, if your needs are small enough, perhaps a smartphone might work for you as your only device.  Just be sure to factor in the media you have and it’s size to your computer decision.

Computer Operating System?

First off, decide if you want to continue to use the same operating system that you use now.  Often times Mac or Windows decisions are like religion.  You come down on one side or the other and don’t want to change.  Increasingly, adults are being encouraged to change by a number of factors.  First off, you may have had a good or bad experience with an iPhone that leads you to look at the Mac differently.  Secondly, you friend, relatives, or children may have made a recommendation about going Mac for any number of reasons.  I tend to lean toward the Mac but only when I fully understand the difference between a Mac and PC and am willing to live with the limitations if there are any such as.  Will there be software that they need to use?  Will the cost of the hardware be acceptable?  Will the need to learn something different be a factor.  After considering these few items, you can make a decision that you will be comfortable with.

If you choose Windows, you need to decide if Windows 8 is the right place to move.  Many people recommend staying with Windows 7 today.  Windows 8 has not seen the adoption that Microsoft would like particularly in business.  Windows 7 and Windows 8 machines are readily available.  My recommendation is that if you chose Windows 8, consider a touch screen display.  Windows 8 makes little sense to me with a mouse but with a touch screen, you finally understand where Microsoft was going.

Which ever way you choose, a computer professional can definitely get you files moved.  Documents, Music, Photos, and Videos are all in universal formats that either machine can read.  Don’t let concern for your files factor into your decision.

2264697Desktop or Laptop?

If you compute in a single place at home or your office, a desktop will be less expensive and faster.  But if you want to be able to move around, a laptop provides that easy mobility.  Some people are moving to laptops because of space concerns too. If you go with a laptop, get a screen size of at least 13″.  While many laptops are available with 17″ screens you need to ask yourself if mobility is an issue, do you want to lug that big screen around all the time.  If you need the screen space, look at a desktop where you can get 20″ to 24″ displays very inexpensively.  Or consider the 13″ laptop and an add on scree to get the screen space you need when you are at home or the office.  For many, this is the best solution to have it all. Ultrabooks are very popular today.  Where once thin notebooks were underpowered, today the performance can be the same as a bigger machine or even a desktop.  These are very nice if you use a machine while traveling but do increase the cost of the machine purchase.  Like they say, you cant be to small or too thin.

Processor, Ram, and Hard disk?

Fortunately, traditional computers all run Intel processors.  In face AMD processors that were available in the past are relegated to only the low end of computing these days.  Even the lowly Intel Atom processor can run a windows ultrabook well for simple computing tasks.  I recommend you stay away for standard Pentium machines.  These are fast becoming to slow for newer software. For most computer users, I would look at the Intel i series processors.  The i3, i5, and i7 are all fine processors and will do all basic computing needs.  There are significant performance gains in the i& that might make you want to go all the way but for most mainstream users, the i5 processor is the sweet spot of the market today.

As I described in part 1 of this series, more ram is usually better.  Look for a machine with 6GB ram minimum amd to future proof yourself, opt for 8GB.  Ram is cheep so don’t scrimp here.

Internal hard disks start at 500GB for spinning drives and can go to 2 to 3TB.  Be sure to give yourself room for expansion and keep in mind that your next phone will likely take larger photos than you can today.  Storage needs tend to increase over time.  If you are looking for maximum performance or a small form factor machine, Solid State Disks can’t be beat.  Remember that SSD’s will typically be smaller but much faster.  Unfortunately, they will also be much more expensive.  I recommend hitting the 1TB hard disk mark for a spinning disk or a 256GB disk if you are going SSD.  But check your existing space requirements before making a decision.

What else to consider?

There are many other things to consider.  What peripherals do you have now that you want to use with the new computer?  Are they compatible?  Do I have a display I could reuse?  These are all good questions to think about as you make your decisions.

As you can see there are lots of questions to answer when you make a purchase of a new computing device.  Don’t be afraid to ask for assistance.  Thinking about these things up front makes your new computing experience as seamless as possible and ensures you get a machine that fits your lifestyle.


Upgrades: How do I know when it is time? Hard disks

HarddiskIn this continuing series of articles on upgrading your computing experience, we will take a look at hard disk upgrades and their value to your computing experience.

Part 2: Hard disk Upgrades

A hard disk drive (HDD) is a data storage device used for storing and retrieving digital information. Traditional hard disks are made of spinning disks and a read head similar to older type phonographs but that can move the head to any addressable place on the disk very quickly. More modern hard disks are often solid state. Solid State Disks (SSD) are nonvolatile memory that stores your information. Because it does not require a spinning disk, there is no mechanical read head. This technology makes accessing data very fast but often leads to issues when you run short on storage.

The first thing to look at if your machine is running short on storage space is to find out what is taking that space. Ten years ago, documents were the primary space hog. Letters, spreadsheets, presentations and the odd PDF file made up the bulk of our storage needs. Today, the primary causes of running out of space are Music, Photos, and Video. Fortunately, both Windows and MacOS store your personal information is a specific location so checking where you disk is filling is not too difficult. On both operating systems, users have specific named folders. Within these named folders are also folders for these types of information. Look for folders named Music, Documents, My Documents, Videos, and Photos of My Photos. This is likely where you will find all your files. If your hard disk is getting full, deleting, or moving these files to an external drive will free up space of the drive running your machine. I recommend keeping about 20% of your drive empty to give the operating system room to write files without excessive fragmentation.

If moving or deleting is not a possibility, upgrading the hard disk to a larger capacity might be an option. Most computers, but almost no smartphone or tablets, allow you to replace the storage drive with a larger one. Some of today’s ultra light designs may require a very specific upgrade type to make this happen, but many are available on the market if you search. Checking your manufactures website to find out what kind of drive you have and if it can be upgraded is the first place to start.

Hard disk Upgrades

There are two basic types of upgrades for hard disks. Internal drives and external drives. Everyone should already have an external drive for backup but adding an additional one for extra storage might be the ticket if your need are very large. Most external drives today are connected with USB. I would recommend future-proofing yourself by purchasing a USB3 drive even if the machine you have today is only USB2. This way, a future machine with a faster port will make the drive run faster if you replace your computer.

Internal drives are a little different. These replacement require you to install the drive inside the machine, reload the operating system, migrate your files to the new drive and sometime reconfigure options. Regardless of the type of OS you use, replacing an internal drive may be something a computer professional should look at for you to ensure you do not lose any of your data.

If you are replacing your drive inside the machine, there are two things to look for. size and type. Lets address type first. As we discussed above, you can get a traditional spinning drive or a newer solid state drive. Below are some of the pluses and minuses:

[stextbox id=”info”]

Traditional Spinning Drives

  • Low cost
  • Large capacity
  • modest if any performance increase

Solid State Drives

  • More expensive
  • Limited size availability
  • Blinding fast performance

[/stextbox]

Either drive will work in most machines as long as you research the type you need.

Right now, the break point for SSD drives seems to beat about 256GB. If you need more than this amount of space, SSD disks are very expensive. If you need less than this, including some room to grow in the future, SSD prices are worth a look.

There are generally two reasons to replace the drive in your machine: Need for space and hard disk failure. First off, decide if you machine is old enough that a drive replacement does not make sense. If your computer runs Windows XP or Vista, or your Mac runs MacOS 10.5 or older, perhaps waiting till your able to replace the computer is a more cost effective solution. The cost of the drive, and any labor required to reload the operating system, move your files, and reconfigure everything will likely be cost prohibitive when compared with a replacement. After considering replacement, here are my recommendations for both SSD and HDD drives:

  1. If you need more than 256GB buy an HDD.
  2. If you need less than 256GB decide if the performance is worth the cost to you. SSD drives will likely cost at least twice the cost of an HDD
  3. If you need an HDD, always choose one bigger than you think you need. Additional space costs very little. Start looking at 1TB and check prices for larger drives before making a decision.
  4. Regardless of what you purchase, make sure you have external disk space to back it up. A bigger new drive can still fail so if you need a bigger backup drive, purchase it at the same time.

You can get some real gains from replacing you hard disk. As long as you keep the cost vs the value in mind, these upgrades while not as simple as ram upgrades can be very beneficial. Figure on a couple hours minimum bench time if you need to have a consultant perform the work for you and be sure to talk to them prior to purchasing the drive.

In part 3, I will deal with the final replacement decision and how to correctly prepare for your self for new computer.

Upgrades: How do I know when it is time? Memory

RamPart 1: Memory Upgrades

One question I often get is whether someone should upgrade or replace some piece of technology. In the past it was hard to decode if an investment was better made to upgrade hardware or to replace it. Lately it is getting easier to help people make an informed decision. This is the first in a series of post describing upgrades that make sense and when it might be time to replace the computer.

You can say what you want about Apple but there are times it leads the industry in establishing trends. One such example is when it comes to the use of non-upgradeable hardware. Apple was the first vendor to come out with computers that were for all intents and purposes not upgradeable. I am not talking about the addition or more ram or the change out of a harddisk, And most computers today support the addition of external peripherals for adding to your computing experience.  I am talking about the elimination of card slots and upgrade bays in its hardware. Years ago, Apple began the process of eliminating these and many in the industry cried foul. When computers cost thousands of dollars, it was hard to stomach the idea that a machine could not be enhanced to make it last longer. But Apple went forward with this philosophy and started a trend.

The majority of computers and devices sold today cannot be upgraded. Whether it is a smartphone, tablet, laptop, or even a new style computer all in one, these machines have few if any card slots and often have processors built into the computer so that they cannot he changed. Some will argue that this is such a waste but in the overall scheme of things being able to make these machines without upgrade potential has allowed vendors to provide smaller faster and cheaper products that we all appreciate. I am going to address a few types of upgrades in a series of posts and give you my broad stroke recommendations for value in your computing experience. There are situations that change this recommendation but this may give you an idea of if upgrading or replacing makes sense for you.

Memory Upgrades

Memory Upgrades, also called Ram upgrades have become cheep. Upgrading ram to improve system performance is a no brainer if this is a possibility in your system. If your computer seems sluggish particularly after you have been running a while, a ram upgrade may be what makes the difference.   It is important to understand the value of additional ram to you before jumping in.  If you have a machine running Windows 7 or MacOS with 2GB of ram or less, a memory upgrade may be the trick to adding longevity to that hardware.  In today’s computing environment, I would consider 4GB ram the magical point for these operating systems.  4GB gives the operating system room to work and allows room to run multiple applications at the same time. There are a couple of things to consider.

With any computer, there will be a maximum allowable ram configuration and there will be requirements for adding ram.  I recommend checking with Crucial.  You can easily use their configuration tool and determine the exact memory needed for the machine upgrade.  It may also alert you to the fact that your machine already has the maximum or cannot be upgraded due to chips being attached to the board.  Crucial often has very good memory prices so purchasing ram from them may be the best idea but once you know exactly what type and size you need, shopping around often will allow some additional savings.

With windows, there is one additional caveat.  If you are running a 32bit version of the operating system, you machine will only be able to address 4GB.  With older versions of Windows such as XP, if your machine has more than 3.2 GB of main memory installed, only 3.2 GB of it will be accessible to Windows. The remaining 0.8 GB of address space is reserved for memory-mapped devices.

Installing ram is usually very easy.  If you are uncomfortable inside your computer, getting some assistance is a good idea.

While adding ram is a good idea, adding large amounts is not necessary better. Right now, going much above 8gb of ram is not cost effective for an average user.  If you use high end photo editing software such as Photoshop, or video editing software such as Final Cut Pro or Premier, more ram is always better.  But if this is not your use, stop at 8GB.  Anything more, with todays operating systems is a waste of money.

I consider a computer with between 4GB and 8GB ram to be an optimal mix of performance and cost. If you already have sufficient ram, and your machine is still slow or unresponsive, its time to consider other options. On a windows machine, it is always a good idea to run virus and spyware scans to be sure something is not sapping your performance without you knowing it.

In part 2, I will talk about harddisk upgrades both internal and external.  Part 3 will deal with the final replacement decision and how to correctly prepare for your self for a new computer.

Should I Encrypt My External Drive on my Mac?

Screen Shot 2013-08-02 at 8.16.51 AMDeciding to encrypt your external hard disk on your Macintosh is a bigger decision than you might think. With Mountain Lion, Apple has made it very easy to encrypt an external drive. Encryption provides you the knowledge that someone will need the password for that drive to be able to have access to your files. In today’s world data loss and people getting their identity stolen, that seems to be a pretty good idea at least on the surface. But making the decision toI encrypt my drive needs to be done with some thought.

An encrypted disk works just like a regular disk image but requires a password to open and become available (“mount”). You can move files to or from an encrypted disk as easily as you can from a non-encrypted disk. You can certainly use keychain to store your password on your computer and keep you from having to type again each time you need to use the disk. But storing the password is just one more opening that reduces your level of security. If you truly believe you need your external this encrypted, storing the password for the encrypted disk on your computer is probably not a good idea. So this means each time you need to use the disk and you plug it into your computer, you will need to enter the password again. If security is your biggest concern, this is a small price to pay to know that your disk cannot be used by someone else if they get a hold of it.

But there’s another side of disk encryption. As we all know, hard disks fail. Disks fail for many different reasons. Sometimes the failure is related to the actual disk platter. Other times it could be the electronics on the drive itself. There are many utilities they give you the opportunity to be able to recover data off of the disc that is failed or near failing. There are also commercial services like Drive Savers that allow you to send the drive to them and have them recover for a hefty price. But one thing is very important to understand. While the odds of recovering data off of a failed or failing drive are certainly something less than 100%, the odds of not being able to recover your data from encrypted drive that begins to fail are closer to that 100%  level. It’s vitally important to back up any drive that you encrypt. You must begin with the understanding that a failing drive that has been encrypted is almost certainly a lost drive.

Encrypting the drive in Mac OS 10.8, Mountain lion, is fairly easy.

  1. Right click on the external disk on your desktop that you’d like to encrypt.
  2. Click on Encrypt ‘disk name’.
  3. You’ll now be asked to choose a password that you’ll need to gain access to encrypted content. Knowing this password is key to being able to access your drive. It is important for you to write it down and store it in a safe place or using an app like 1Password to keep it safe for you.
  4. After you’ve chosen your password and password hint, now click on Encrypt Disk.

Thats all it takes to encrypt your drive.

Screen Shot 2013-08-02 at 8.14.53 AM

Making the decision to encrypted drive is not one you want to make lightly. Give it some thought as to how important the data on your drive is and why it needs to be kept absolutely secure. Also think for a moment if you’re willing to deal with the multiple entries of that password each time you use the drive or connect it to a machine. If these issues don’t scare you off, Apples disk encryption is very secure. It certainly should keep your data safe in the long-term.

Backing Up your iOS Device

iPhone BackupHow important is your data? Most of us realize that a good backup is worth it’s weight in gold. Many of us have backup methods are we back up our computer data and even sometimes take that data offsite. But more and more we are finding our most important computing device these days to be our smart phone or tablet. These devices are with us all the time. We store information in them that’s extremely personal to us but critical for us to have available. Having a good method to backup your handheld device is extremely important. If you have an iOS device, there are typically two methods to choose for backup. 

Backing up to iCloud

A wireless backup in the cloud. How perfect could that be. Seems like a no-brainer to use this method for backing up our device. There are problems associated with a cloud-based backup strategy. The biggest problem is the limited amount of storage space Apple provides us on iCloud. Sure iCloud is a free service and you can add additional storage space for a cost. Unfortunately these costs are not trivial. Many of us have iPhones or iPads with a relatively large storage capacity.

iCloud Storage OptionsWhen you sign up for iCloud, you automatically get 5GB of free storage. That may be plenty of room, particularly if you only have one device, because of the way iCloud stores your content. Your purchased music, movies, apps, books, and TV shows — as well as your Photo Stream — don’t count against your free storage. That 5GB goes a long way for your mail, documents, account information, settings, and other app data. And if you need more storage you can easily purchase an upgrade right from your device. But many people have a single issue that causes them to run out of space very quickly.

Photos you take on your device go into the Camera Roll. All these photos get backed up to iCloud and DO use part of the storage that iCloud provides you. People who routinely keep hundreds of photos in the camera roll will quickly exhaust the 5GB of space Apple provides and not realize why they have done so. If you sync your photos to your computer, or be sure you have saved them there from your Photo Stream, you should be able to remove these photos from the Camera Roll.

Many people believe they need to leave them there to keep them on the phone. But, you have to keep in mind that if you have Photo Stream turned on, they will be copied to the stream and available from that selection on your device.

Another way to deal with this is to sync your photos to your computer. This is in my opinion a preferred method for ensuring those photos are backed up. In general, I recommend people keep no more than 100 photos in the Camera Roll. With that many photos, a standard iCloud account should provide enough storage for two iOS devices.

Backing up to your computer

In the early days of iOS backing up your computer was the only option. Your computer typically has larger amounts of storage has the ability to keep copies of the backup. But even this can cause a space problem in the attic. If you have a new machine with an SSD drive, you may have limited storage space available. Backing up your device to your computer will make a copy of everything on it so it’s much larger than the storage space that iCloud uses for it’s backups. Since iCloud storage eliminates the need to copy anything you’ve purchased from Apple, it is able to store more information in a smaller space. When backing up to your computer though all information gets copied and takes much more space.

If you have storage space on your computer, backing up to get may be a good solution for you. By plugging your device into your computer, you not only can back it up, but you can download those photos out of the camera roll too.

But just like backing up to iCloud, there are things you need to be aware of when backing up to your computer. When you back up your computer it keeps a full copy of the device. If you change devices often, you may have full copies of older devices you no longer own still stored on your computer.

iOS Backups If you want to delete a backup created by iTunes, follow these steps:

  1. Open iTunes Preferences:
    • Windows: Choose Edit > Preferences
    • Mac: Choose iTunes > Preferences
  2. Click Devices (the iOS device does not need to be connected).
  3. iTunes will show the phone number, IMEI, and serial number of the backed up iPhone when you position your mouse pointer over a backup (iTunes shows only the serial number for iPad and iPod touch). Use this to locate the backup for the iOS device you want to delete. Select the backup you want to remove and click Delete Backup.
  4. Confirm you wish to remove the selected backup by clicking Delete Backup.
  5. Click OK to close the iTunes Preferences Window.

Deleting extra copies of old devices can save significant storage on your computer.

George’s Recommendation

Because backing up is something that needs to be seamless, I recommend using iCloud is your main backup process. In doing this, you must keep in mind that you need to sync your photos once in a while to your computer to reduce the number of images that are stored in your camera roll. As long as you do that, iCloud storage is usually sufficient to be able to backup both your iPhone and your iPad if you have one.

[stextbox id=”info” caption=”Turning on iCloud for Backup”]

iCloud automatically backs up the most important data on your device using iOS 5 or later. After you have enabled Backup on your iPhone, iPad, or iPod touch in Settings > iCloud > Backup & Storage, it will run on a daily basis as long as your device is:

  • Connected to the Internet over Wi-Fi
  • Connected to a power source
  • Screen locked

You can also back up manually whenever your device is connected to the Internet over Wi-Fi by choosing Back Up Now from Settings > iCloud > Storage & Backup

[/stextbox]

Perfect Photo Suite Offers Low Cost Focused Tools for Photographers

PPS BoxesPhotoshop: the gold standard for photo work is a terrific piece of software.  People who know the ins and outs of Photoshop can do literally anything they want to enhance or fix a photo.  But that’s the problem for us mere mortals.  Photoshop is not simple to learn.  It requires years of experience to get good at.  That is part of the learning process for someone in the photography industry but many people like myself need something to give us some of those dramatic effects possible in Photoshop without the large time investment.  Even Adobe sees this in its Photoshop Elements program that adds recipes for a number of these photographic effects.

There are many people who end up in the middle.  They have mastered organization programs like iPhoto or Picasa and want to take that next step.  One good place to start  is with Lightroom, as I have written about before.  But even Lightroom has its limitations particularly if you want to make changes to a portion of an image rather than the entire image.  There are a lot of good tools to assist you in these next steps including a few plugins for Photoshop and Lightroom but OnOne Software has a tool set that not only gives you some needed enhancements, it integrates with the tool you may already use.

Perfect Photo Suite 7 includes modules that allow photographers to focus on specific needs with tools that are created specifically for that workflow.  These include, Perfect B&W to develop black and white images, Perfect Portrait for easy portrait retouching, Perfect Effects and FocalPoint for creative effects, Perfect Mask for replacing backgrounds and Perfect Resize for image enlargement. This toolset also allows for a layered workflow without Adobe® Photoshop®, so you can combine the best parts of multiple photos, create composites, and quickly retouch portraits and landscapes. All of the products in Perfect Photo Suite 7 work together seamlessly as integrated modules to assist you in creating the images you envision.

With Perfect B&W you can achieve classic black & white looks instantly with a library of expertly crafted effects or customize your own unique look using powerful, darkroom-inspired controls that replicate old processing techniques. Enhance tone and contrast by boosting shadow and highlight details or bring back a touch of selective color. and control the exact appearance of your image using a set of adjustment brushes.  With Perfect B&W, you’ll infuse the artistry of black and white photography and create your own masterpiece.

Perfect Portrait lets you improve skin texture and color, remove blemishes, and enhance eye, lips and teeth. You’ll find that it’s never been so easy to create terrific  portraits

Perfect Layers lets you enjoy all of the benefits and creative power of a layered workflow, allowing you to combine, composite, and blend images—all without Photoshop.

Perfect Effects provides an easy, fast and powerful way to create images with impact with Perfect Effects 4. Choose from a robust library of photographic effects to add professional looks to your photos instantly, including the popular HDR and retro looks. You can also recreate the look of film and darkroom techniques, add glows, vignettes, borders, and correct common photography problems. With the ability to stack, combine and blend effects, and paint in effects to specific areas, your creative options are endless.

Perfect Resize, formerly known as Genuine Fractals, increases image size faster and without the loss of sharpness or detail that you might normally expect. The same patented, fractal-based interpolation algorithms that were in Genuine Fractals are at the heart of Perfect Resize with several improvements. Faster processing speeds, new presets that optimize clarity and detail of different image types, built-in output presets, and the redesigned user interface add to the power of Perfect Resize.

With Perfect Mash you can create high quality masks quickly and easily with new automated functionality and powerful tools. Automatic Background Removal, Drop and Refine Brushes, and clean-up tools make selecting subjects and isolating backgrounds for removal extraordinarily accurate.  You can create some amazing effects using this tool that really make you subject pop.

FocalPoint can create realistic selective focus and depth-of-field effects you would think could only be done in camera. Choose from a selection of lens presets to produce a specific effect or adjust controls to adjust the amount and kind of blur you want. You can even paint in sharpness or blur exactly where you want. It has never been easier or faster to focus your viewer’s eye and minimize distractions. This is like choosing you lens for the shot from an infinite lens bag and doing it after you take the shot.  It is really very cool.

Many folks will say, I can do all that in Photoshop.  Sure you can if you know how and want to spend the cost of using (not owning) this tool on a monthly basis.  You can even do some of these effects in Photoshop Elements or Lightroom but I will say you can’t do them as easy as you can with this toolset.

PPS PlatformsPerfect Photo Suite 7 is designed to meet specific workflow and budget needs with three different editions. It may be used as a plug-in for Adobe Photoshop, Photoshop Elements, Lightroom, or Apple Aperture, and also works as a standalone. You simply choose the method that works best for the tools you already use.

Now for the best part.  These tools are truly inexpensive.  The complete professional suite for every workflow. Works with Photoshop, Lightroom, Aperture, and as a standalone is just $199.  The same toolset for your Lightroom or Aperture workflow and as a standalone is only $129.  If you don’t have Photoshop, Photoshop Elements, Lightroom, or Apple Aperture, a stand-alone only version runs just $79.  Perfect Photo Suite is available for Windows or MacOS and offers a 30 day free trial from the company’s website.

Pro Photographers will scoff at the need for tools like this but those of us with ambitions for some of those Pro looking effects  in our photos but without the time to dedicate to learning advanced Photoshop techniques will grow to love this toolset.  When you can produce the look you want from an image, photography takes on a new light for you.  These tools are a great bulb to help turn on that light.