Logitech Harmony Smart Control: The one to Purchase.

Harmony 1
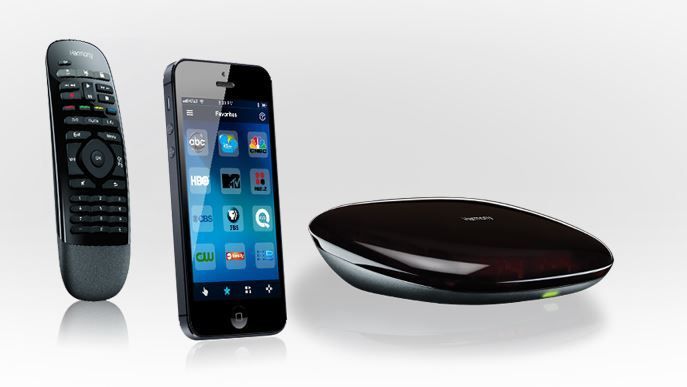
Universal Remotes.  I can personally remember 4 different ones I purchased over the years.  Some as simple as a universal Sony remote about the size of a hard backed book that did a good job with simple on off and channel commands.  Others as complex as a Harmony remote with a screen on it that was programmed by a USB cable.  All sort of worked.  None really worked well.  That all changed with my purchase of the Logitech Harmony Smart Control.  Finally. I have found a smart remote that I feel can put all my other remotes in a drawer.

What makes this one so special?

How many people sit on the couch to watch TV these days and have their iPhone or iPad right at their side.  Logitech takes advantage of this with this new remote product.  ALl programming of the remote is done through your iOS device.  And yes, Android is also supported.  Using the Harmony app (free from the Apple app store)you connect to the device and program it from the web.  You simply follow the prompts, make selections of the brand and model of devices you have, tell it what port the device connects to the TV on and it all gets programmed for you.  It even creates shortcuts to common activities like Watch a Movie that can turn on the TV, turn on the Blu-ray player, and set the correct connection port.  All of this happens from the push of a button.  This integration with iOS makes getting the remote to control all your devices very easy.

Not only will it control all your devises that use an infrared remote, but the unit has Bluetooth built in so it seamlessly addresses devices like the PS3 game console that uses Bluetooth.  Unfortunately for my aging Bose system, it does not do Radio Frequency (RF) devices.  In addition, this device handles the AppleTV very well.  Other units make it hard to access the menu button but this one maps it automatically for you.  Everything is seamless.

Harmony 2
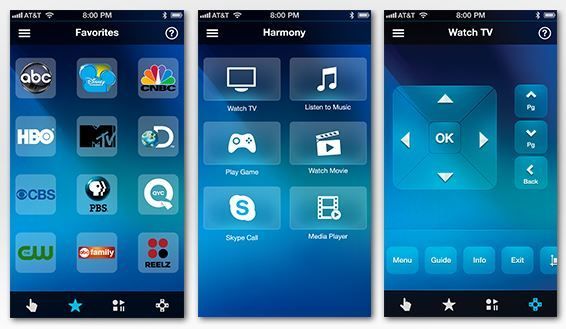
With this unit, you can easily control your home theater devices.   Anyone in the house can download the Harmony iPhone or Android app turn their mobile phone into a personal universal remote control, including 50 favorite channel icons and gesture control.  When your mobile phone is not available, you can use the included simple remote control. It lets anyone in the family change the channel and adjust the volume.   Simply press one button to switch to favorite activities, like watch TV or play a game.

It controls what you already own.

Logitech says you can consolidate 8 remote controls into one simple mobile app. Harmony is compatible with over 225,000 home theater devices. And unique to Harmony is their patented Smart State technology, which remembers your devices’ power and input settings and automatically adjusts them based on what you want to do.  If you are unsure if your device is supported, Logitech provides a great presale site to check.

Here is the best part of this product.  It’s reasonably priced for a smart remote.  Priced at just $129, it is a universal remote that I can finally recommend to people.

My Windows 8 Laptop makes no Sound

Q: My Windows 8 computer says it cannot find any Audio hardware on my Laptop.  It used to make sounds but now does not.  Is this a hardware issue or a software issue?

A:  It could be either but we should be able to easily tell.  To do this we need to look into Device Manager.  In windows 7, it was as easy as going to control panels but Windows 8 is a little different.

Before proceeding, I would first make sure the volume is turned up using the keyboard key on the machine.

Now, Follow these easy steps to open Device Manager in Windows 8 from the Control Panel:

1.From the Start screen, swipe up and tap the All apps icon.  If you have a mouse, right-click on the Start screen and then click All apps.

2.Once on the Apps screen, scroll or swipe to the right until you see the Windows System heading.

3.Tap or click on Control Panel, located under Windows System.  Windows 8 will bring up the Desktop and automatically open the Control Panel.

4.Tap or click on the Hardware and Sound link.

Sound Driver

Note: You won’t see Hardware and Sound if your Control Panel view is set to Large icons or Small icons. In your case, just tap or click on Device Manager and then move on to Step 6.

5.In the Hardware and Sound window, click or tap Device Manager, located under the Devices and Printers heading.

6. In Device Manger , you need to look for The Audio portion as shown in the image.  We are looking for any of those to show with an X, a yellow triangle, or a red mark.


If the Audio devices are completely missing from Device manager, it is likely a hardware issue with the laptop and you should call the manufacturer.  It the devices show up but have an X, a yellow triangle, or a red mark by them, it usually means it is a driver issue. To fix this you would double click on the device, choose the driver tab, and update the driver.  If this does not fix it, the next thing to try is to uninstall the driver from the same location and reboot the machine.  Windows should then reinstall the driver on the next boot.

Is this Spam?

Here is a little trick to help you determine if an email sent to you is real or a spam email.  Most of these emails that make you question whether they’re real, include a web link in them. The web link is usually written out so that you can see the entire link.  People sending out spam have realized that if you see the link, and it looks real, the odds of you clicking on it are much greater. Your mail program gives you the ability to help determine whether those links are really real. If you hover over the link with your pointer or cursor, a link will pop up showing where that link actually really takes you.

Take a look at the example below:

Screen Shot 2013-06-11 at 8.04.13 PMThe link in the above email looks like it goes to a page at Amazon.com. But when I hover over the mail you see that it’s actually going to a completely different place. By hovering over the link before you click it you have the opportunity to determine for yourself whether that email is probably spam, or a real email that you need to address.


Why an iPhoto user should consider Adobe Lightroom

LR LogoiPhoto is a terrific image catalog.  It stores your photos automatically and you don’t even need to think about where they are going or what format they are in.  Apple does a terrific job of making iPhoto easy to use for the novice.  But once you are past the novice stage, iPhoto trails off in its features to other image software.  Some may say that Aperture from Apple is your next option but Apple has not revised it in years and it is getting quite long in the tooth these days.

Many people who have come to this place in their electronic photo life ask me if they need to get Photoshop to be able to move forward with making changes and manipulations to their images.  Photoshop is a terrific professional image editor that certainly could be in their future.  Unfortunately the high cost of Photoshop and the subscription use plan they have put in place makes going this direction too expensive for the hobbyist photographer.

Ok, so those people should get Photoshop Elements, right?  Elements is the consumer version of Photoshop that will do 99% of what a non-professional photographer need to do.  In fact, I expect many pros to revisit the elements tent now that it costs nearly $360 per year just to use Photoshop.  That may be a reasonable direction to go.  But I believe there is another option, Adobe Lightroom.

LR ScreenshotLightroom is a image catalog program similar to iPhoto.  It allows you to import images and store them, and then make manipulations to them in a non-destructive way.  Lightroom can also do much more to take you to the next step in your photo editing experience.

First off, Lightroom lets you store your images anywhere on disk you want.  You create the storage structure and you control what happens to those images.  The storage location does not need to be on your main harddisk like it does in iPhoto and it can even be on multiple drives on your computer or network.  Not only that, you can import your photos to Lightroom and then remove the drive the photos are on.  Lightroom 5, the latest revision, lets you still do edits to those images that get applied to the master the next time you plug in that drive.  How cool is that for a user with a smaller SSD harddisk!

Here are a few of my favorite features in Lightroom that make it superior to iPhoto for advanced image editing work:

Advanced Healing Brush

Do you have photos with dust spots, splotches, or other distractions and flaws that get in the way of a great image?  We all do.  With the Advanced Healing Brush in Lightroom 5, you can not only change the brush size but also move it in precise paths. Unwanted scene elements — even those with irregular shapes such as threads — just disappear.

Upright Tool

I thought the camera was straight!  Straighten tilted images with a single click. The new Upright tool analyzes images and detects skewed horizontal and vertical lines, even straightening shots where the horizon is hidden.

Smart Previews

As I mentioned above you can even work with images without bringing your entire library with you. Just generate smaller stand-in files of your full-size images. Any adjustments or metadata additions you make to these files will automatically be applied to the originals.

Location-based organization

You can find, group, and tag images by location, or plot a photo journey. It even automatically displays location data from GPS-enabled cameras and camera phones.

Highlight and shadow recovery

If you shoot in camera raw format, or even if you don’t, you can bring out all the detail that your camera captures in dark shadows and bright highlights.

Fast cross-platform performance

Perhaps you edit photos on a PC at work.  You can speed up day-to-day imaging tasks and process images faster with cross-platform 64-bit support for the latest Mac OS and Windows operating systems.

Selective adjustment brushes

Expand your creative control with flexible brushes that let you adjust targeted areas of your photo for just the look you want. That detail in editing is tough in iPhoto.  Then you can selectively adjust brightness, contrast, white balance, sharpness, noise reduction, and moiré removal.  That’s nearly impossible with the limited edit tools in iPhoto.

These are just a few of the newer tools in Lightroom that make it a great addition to your photo edit tools.  The next thing is getting your images out of iPhoto.  Apple makes that possible, but not too easy.  The best method is to export your images, with adjustments you made in iPhoto to your disk.  I recommend setting up a structure for this.  Many people like their images in folders by date.  This is the common standard if you are coming from a PC and have photos.  I usually create a folder called Images and then have dated folders under it.  Lightroom can do the organizing for you if you just export the photos.  There are other ways of opening the iPhoto Library package and bringing out the images that way but this is a little detailed for this forum.  Here is a great New York Times article describing some of the issues.

There is also a great site with videos about Lightroom from Scott Kelby’s group that might want to take a look at to get a better feel for Lightroom before making a move.

Once your photos are out of iPhoto, you need to also be sure they are being backed up since this is the location that changes also get stored.

iPhoto is a great tool for people to manage their personal photos and for novice photo editors.  Adobe Lightroom is the logical next step for those that want to do more with photos.  Lightroom is available from Adobe as a part of its Creative Cloud subscription or as a standalone $149 product for Mac or PC.  Adobe offers a 30 day free trial and I highly recommend trying before you buy to see if the workflow matches your needs.

Chromebooks: Not for everyone but possibly for you


ChromebookA recent help call from a friend of mine caused me to rethink my thoughts related to Google’s Chromebook notebooks.  I had an opportunity to look at a chrome book when they first came out, and really wasn’t too impressed. The hardware was a little funky, and the functionality of Google’s chrome operating system was certainly lacking.  But as with many things time chores all and Google’s chrome operating system is beginning to mature.

Today there are basically four chrome book models available. Three very low-cost ones, and one relatively expensive one. Samsung, HP, and Acer have a chrome book notebook. The Acer runs about $200, the HP about $330, and the Samsung runs about $250. For that cost you get a relatively small screen, 11 inch on the Acer and Samsung and 14” on the HP, notebook with some interesting features.  The Acer features a spinning hard drive while the Samsung and HP feature 16 GB solid-state drive.  Interestingly enough, the Samsung looks very much like a MacBook air!   The forth model of chrome book, it’s actually done by Google itself. The chrome book pixel is a very nice laptop featuring a touchscreen hiring processor more storage space and a very elegant case and feature set. It also costs as much as a MacBook Air!  Google also has a Chromebox for those that want desktop capability rather than a laptop for $330.

Many people may ask how you can offer a computer at that price?  Basically, it has to do with the chrome operating system. Chrome is a web-based operating system. You have a Chrome kernel on your machine that is basically nothing more than the chrome web browser. With this browser, you connected all the Google services that are available along with any other service that’s available on the web.  If your computer needs our web centric, basically consisting of web browsing, email, and the occasional note or document, the chrome operating system could be perfect for you.

Early versions of chrome required a network connection at all times to be functional. But Google has made changes to the operating system allowing more and more functionality to be useful even when you do not have an Internet connection. Yeah,  don’t get me wrong, if you don’t have Wi-Fi, these notebooks won’t be very satisfying, but with a fast Wi-Fi connection, and those are available and more and more places, this notebook can do pretty much anything you’ll need to do on a daily basis.

ChromeUsing chrome could require you to make changes to the way to work. If you store documents in the cloud, particularly using Google Drive, it should be no problem for you. These notebooks also have the ability to store documents locally, but some have relatively limited space.  With more and more of the Google services being put together to allow you to do more work in the cloud, a Chromebook becomes more of an interesting possibility.  My limited experience with these tells me that the performance of these devices is very good. They typically have a lower end  processor, but if you keep in mind that all they really do is provide a browser view to the web where everything runs in that browser view, you can see how that would take less processing power.

So someone then may ask who would be a good candidate for one of these Chromebook laptops?  In my consulting service, I run into a lot of people that do nothing more than browse the web get email and deal with an occasional photograph.  Many of these people have high-end Windows or Mac machines to do this small level of task.  They also tend to have difficulties in working with the operating system, because they don’t really get into the operating system often enough to become proficient.  For these users, a Chromebook could be the perfect solution.    Other people are looking for a small device to use when traveling or at the coffee shop and have considered a iPad or tablet but really feel they need a keyboard.  These needs fit right into the Chromebook demographic.

I would certainly not say these devices are for everyone, but if your needs are limited, are normally web-based, and you’re interested to try something a little different, a Chromebook could be a easy and low-cost solution for you. Consider it the next time you making a purchasing decision.

But it’s Not Spam!

spamA question I often hear from people has to do with why their emails often end up being marked as spam by the person they send it to. Determining spam is a difficult situation these days. It’s very hard to determine if an email is truly informational or is intended as marketing spam.  There are many software solutions that help make these determinations for people, and often times these solutions are outside of the control of the individual user.  Sometimes email sent to you is going to be marked as  spam even though you normally would want to see them. You are even absolutely sure you never marked them as spam, but they continue to fall there anyway. This can be a result of a server being used for your mail account trying to determine spam from a blacklist compiled by others or even from others in your own company marking the sender as a spammer.

Here is a great article I found on how this happens.  It’s important to understand that once this occurs, it is often difficult to reverse.  This is why I always advocate using a separate email address for any marketing correspondence you send.  This protects your primary email address from ending up caught in the quagmire of spam and junk mail filters.

You should also understand you email clients spam or junk mail features so you know how to unmark an email as spam that is incorrectly filtered.  This process is different for every mail client but basically consists of going to the spam or junk mail box on your computer and selecting a command in the mail client menus that tells the software the email is not spam.

For example, in Microsoft Outlook, you would do the following:

To mark a particular message as not junk, follow these steps:

  1. Screen Shot 2013-06-05 at 5.09.42 PM
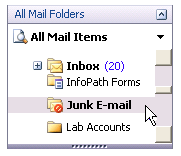
In Mail, click the Junk E-mail folder in the Navigation Pane (Navigation Pane: The column on the left side of the Outlook window that includes panes such as Shortcuts or Mail and the shortcuts or folders within each pane. Click a folder to show the items in the folder.).
  1. Right-click any message that you want to mark as not junk.
  2. On the shortcut menu, point to Junk E-mail, and then click Mark as Not Junk.

The process is quite similar in Apple Mail.  For Outlook express.  Take a look at this article from Microsoft for more details.

[stextbox id=”alert” caption=”A couple other comments about spam”]

If your looking for an email address to use that has a great spam filter associated with it, try a gmail address.  Google has great spam filters that are very accurate and a gmail address is available for free.

If you are a Mac user overwhelmed by spam, consider a program called Spamsieve.  Spamsieve runs in conjunction with Apple Mail and provides a great deal of configuration ability in determining spam.  With a few days of training it can eliminate 90% of the spam from your mailbox automatically.

[/stextbox]

The Google TV Experience: Not bad at a Good Price

VizioI have long been, and still consider myself an advocate for the Apple TV.  It is a terrific little box that does many things for a reasonable price.  But sometimes I find myself wishing the Apple TV did things that it does not do today.  Wouldn’t it be great to have access to apps or custom channels of content from the web.  How about the integration of real TV programming into the same interface as the web content. Well, that is doable today.  It is not a solution for everyone but it is definitely something that works well and is well thought out.

Enter the Google TV.  Sony has been producing televisions with Google TV inside them for the last few years.  But purchasing a new screen to get this experience is a long way to go.  Sony also has a $249 Google TV add-on box complete with a Blu-ray drive available but I have a Blu-ray player. But now, Vizio has introduced the CoStar , a new Google TV add on box that competes very well with the Apple TV.  In fact it is the exact same $99 price as an Apple TV but the feature set is completely different.

Most of you are aware that Android Phones are very popular in the marketplace.  The phones have an application catalog comparable to that of iOS.  Google TV uses the base Android operating system to start with so application developers have an easier time creating apps for the device than having to start from scratch.  Apple could take a lesson from this.  By having a development platform similar to phone development, Google TV has made it easy to have an application catalog for these devices. Now don’t get me wrong.  Not all Android apps can run on the Google TV but there is at least a starting point to entice development that has resulted in hundreds of titles.

But let be digress and describe the unit itself.  This little box is about the size of an Apple TV except it is a little taller.  It has two HDMI ports on the back.  One port is the input from your cable or satellite box and one is the output to your TV.  This incorporation of the TV stream allows the device to control the entire experience without having to switch HDMI ports.  It is all controlled with the included remote.  The box also contains an Ethernet port and Wi-Fi so that it can connect to the internet for content.  Also included is a fat but powerful remote with a trackpad and standard remote functions on the front and a small QWERTY keyboard on the back.  The remote is Bluetooth so there are no line of sight issues with using it as there are with Apple TV.  It really should have had a backlight to illuminate the keys but that is a truly minor complaint at this price.

Vizio BackAfter connecting the unit the software leads you through an extensive series of settings to dial in you cable or satellite system, control the TV itself with the Vizio remote, and get connected to the Internet.  The unit then updates its software to the current release.  All this prep takes about an hour.  Once it is complete, you have the ability to watch TV just like you did before in addition to using the features of the box.  When you press the button to go into the interface of the box, a menu slides in from the side allowing you to pick an application.  Virtually all of the features of an Apple TV are included with the exception of AirPlay for putting iOS or MacOS device content on the big screen.  But there is an app for that in the Google Play store.  The interface also allows you to use picture in a picture where the TV content shows in a small box in the corner of the screen and the app content fills the rest of the screen.  Very nice control.

remoteThe interface, by virtue of its higher functionality, is more difficult to use than that of an Apple TV so this solution may not be for everyone but it sure works nice and really adds a lot of function to your TV.  Some of the applications that it ships with include a music player, Netflix, Vudu, Amazon Prime Video, and even the Chrome browser.  The keyboard on the back of the remote allows easy use of the browser.  Other apps such as Pandora are available on the Google lay store as free downloads.

The extendibility of this unit is what is really great. Apps can be downloaded that give web content right on the TV screen.  I particularly like the included YouTube app and one from Motor Trend TV that I downloaded from the store.

Is this add-on box better than Apple TV?  For people not firmly entrenched in the Apple ecosystem, I would say it is.  Interestingly enough, even if you use all Apple devices, it still may be something you want to try.  The ability to do so much more from the TV is really a nice feature.  It is not without it’s little quirks but in general, for a $99 device, it is a good value and something I would recommend you consider for a fuller media entertainment experience that integrates TV with Web content.

Need more Solid State Storage on your Macbook Air? OWC can Fix You Up

Aura Pro DriveOne of the problems I saw when Apple introduced the Macbook Air was the lack of expandability.  Not only can you not upgrade the RAM in these machines, but you also cannot upgrade the solid state hard disk space.  Or so Apple claims…..

I use my Macbook Air when I travel.  It is a terrific companion that is light weight and powerful.  I have a 2011 model with a 120gb solid state drive.  For most of the time since I purchased it, I have been fighting the space issues on the solid state drive and wishing I had purchased one size bigger.  A couple of months ago, I had the need to run PC software on it so I installed VMWare Fusion and Windows 7 on it.  To do this I had put my disk on a serious diet.  I deleted enough to put the virtual machine disk onit but rather than having a machine that was close on harddisk space, I ended up with a machine completely out of space.  One of my thoughts was to replace it with a newer model with a larger SSD but that is expensive and the machine was still plenty fast for the work I do while on the road.

I ran across an ad for Other World Computing that claimed to have an upgrade for my 2011 MacBook Air’s SSD  to a larger size with greater 6G speeds so I had to check it out.  OWC has upgrades to 240gb and 480gb that are plug in compatible with the MacBook Air.  In addition they have a case where I can reuse the original SSD as a sleek new external drive.  With pricing for the 240gb version at $319 it was much cheaper than a new computer so I decided I needed to give it a try.

KitThe installation kit includes the upgraded drive, a tapered aluminum Envoy storage solution case, Torx T-5 screwdriver, and a Pentalobe compatible driver.  This was everything I needed to install this in my Macbook Air.  OWC even has detailed videos on their website describing the process.  With all the parts and my Macbook Air laying on a soft cloth, I setup my iPad and began the video.  Fifteen minutes and a dozen or so screws and I had the upgrade complete.  I then installed my old drive in the external case and began the data migration process.

EnclosureThe external case is USB3 but my 2011 Air is just USB 2 so it took about an hour and a half to migrate my data from my old drive in the external case to the new drive in my machine.  I did the migration using the restore utility inside Disk Utility.  It all went without a hitch.

It really feels good to have 110gb of breathing room on my hard drive.  It gave me the opportunity to put some of the applications back on that I was forced to delete to get VMWare fusion enough space back on the machine.  It also allowed me to move more of my data files I want for travel onto the machine and still have plenty of free space.

In the end, I spent about the same had I purchased the larger SSD in the beginning but I also now have a very fast, small and lightweight 120gb SSD drive in an external case.  Taking that into account, this was a much less expensive solution.

The question of it being faster with this new drive still remains. My Air was very fast to begin with so it is a little hard to tell if the drive is much faster.  The documentation leads me to believe it could be as much as twice as fast for disk reads.  Let me just say it is fast enough for the work I need it to do.

I would definitely recommend this solution for anyone with a Macbook Air and not enough free space.  OWC also has upgraded SSD drives for other macs that I believe are just as easy to install.  Overall, I am very happy with this upgrade.  Check out all the possibilities at the Other World Computing website.

Selecting a Good Printer

Icon-Printer02-BlackPerhaps one day we’ll all be at the point where we no longer need to depend upon printed documents. That day make come along soon but it certainly isn’t today.  I’m often asked what kind of a printer should I have to use with my computer. That depends a lot on what you intend to use the printer for.  There are a number printer categories available today on the market. Each one depends a little bit on what you intend to use the printer for as its primary use. I’m going to cover some things to look for in a printer regardless of type of printer you want.

First off let’s talk about some things it’s very important to look for printer regardless of which category you are interested in.

Network Connections

Regardless of what type you choose, it needs to be network compatible. That typically means either a Wi-Fi connection on the printer or at least an Ethernet cable connection.  Wi-Fi connected printers are very handy because you can put them literally any place you need them. Ethernet connected printers are often more stable to be able to keep connected.  If your printer is going to be located close to an Ethernet port, always use the Ethernet connection. If not, Wi-Fi will have to do.  Even if you intend on plugging the USB cable into the printer from your computer, look for a printer that contains networking. Things change and it’s very easy to move the printer if it’s network compatible. If it’s not compatible with network connections it’s almost impossible to move easily and without additional cost.  Have a networking on a printer is usually a very small additional cost.

 AirPrint

If you own any type of an Apple iOS device, having a printer that supports airplay is a great idea. AirPrint gives you the ability to be able to print from your iOS device directly to the printer. The printer needs to be connected on your network but other than that it’s all automatic.

Color vs Black and White

If your main printing needs to print business documents choosing a black-and-white only printer will save you money. Black-and-white only printers today are typically laser printers. Toner cartridges are less expensive per print than the liquid inkjet cartridges.  Color printers on the other hand are available in either inkjet or toner-based laser varieties.  Laser color printers will typically be less expensive if you print a lot of color pages. But laser color printers are typically only used for business color documents. If color matching, or photography printing is important to you you probably need to go with inkjet.

 Separate Color Ink Cartridges

Some color printers have three colors that are all included in the same ink cartridge. Purchasing color ink this way means that if any one color runs out you’ll need to replace the entire cartridge. I highly recommend if you’re looking for a color printer to find one that uses separate color ink cartridges for each color. These printers typically cost a little bit more upfront, but you will end up paying less in ink down the line.

Photo Printers

It’s generally acknowledged that for printing photographs, the more colors the printer supports the better off the print will be. I typically recommend looking at a printer that has independent ink cartridges of multiple colors if I want to print photographs. The more colors the better.

 Printer Types

Now that we’ve covered some of these general areas of things to look for, let’s look in a little bit more detail a different printer types.  As I said above, today’s printers come in typically either laser or inkjet style.  Laser printers used toner and inkjet printers use liquid ink.  Each of these different printer types come in many different styles.  Printers today can be available in a printer only variety, or what’s typically call an all-in-one device.  All in one devices usually combine a printer and copier and a scanner.  Sometimes they also include a fax machine but this is not always the case so if a fax machine is important make sure that you find a printer that includes that is a feature.

Most consumer printers today are available as all-in-one devices.  People typically want to have a single device that can do all of these referral functions for them.  This method often saves money and gives you the ability to be able to do these things that are not often done without having to have a special device to do them.  Today, scanning is not used as often as it had been in the past.  More and more documents are available in digital format and as a result of having to scan in a paper copy is not used.  Some of these consumer all-in-one devices have the ability to scan photographs very well also.  If that’s important to you be sure to look for a scanner that can handle a high enough resolution to ensure your photos are captured with high fidelity.

There are many different brands of printers available on the market today and I am often asked which type or brand is best.  I think I can say that I’ve seen good printers from nearly every manufacturer and I’ve seen bad printers from nearly every manufacture too.  If you make your printer selection based upon the functions you want to perform, most manufactures printers will do a fairly good job.

I will say, if you’re looking to print higher-quality photographs. I would recommend looking at an Epson printer or Canon printer.  Both of these manufactures doing much better job of color matching than other companies.

With all that said, here are couple of my favorite printers on the market today.

 Screen Shot 2013-05-21 at 4.33.36 PMBrother® MFC-J4510DW Inkjet Color All-in-One Printer

I recommend this printer as a general work horse home printer.  It has a ton of features and it doesn’t cost a fortune.  It is also one of the only printers on the market it prints the paper sideways.  This makes it possible to print up to 11 x 17 sizes with ease.  The color on this device is good but not the best but for general printing this is a good one. 

Screen Shot 2013-05-21 at 4.35.38 PMCanon® imageCLASS® MF4880dw Mono Laser Multifunction Printer

I really like the Canon ImageCLASS printers for black and white only printing.  This one is a multifunction laser device that is quite fast and has great quality.  If your primarily print documents for business, you can’t beet the quality of a good laser printer.


Screen Shot 2013-05-21 at 4.37.40 PMEpson® Artisan® 1430 Wide-Format Printer

This is a color wide format printer that produces great photo quality images.  It is only a printer (as most higher end photo printers are) but it makes up for features in the great quality you get for photos.

There are many great printers on the market today.  I usually till people to take a look at the weekly ads from Staples and Best Buy and see what’s on sale. Just because of printers she doesn’t make it great, but very often great printers are sold at a discount price through these ads on Sunday.

Hopefully this gives you a few ideas of what to look for in a new printer. Printers are not things we need to buy too often, because they typically last longer than the computers that we used to print from.  But when the time comes, be sure to get the features are your really interested in.


I Just can’t keep track of my Mac’s Cursor….

Screen Shot 2013-05-17 at 12.06.56 PMDo you ever lose your curser on your big screen Mac? Perhaps it is hard to follow it on your new retna display laptop. There is an easy fix for this that allows you to make your Mac curser get larger.

It’s easy to make your cursor bigger and it’s built into your Macs’s operating system. Open your System Preferences and select Accessibility. This system preference lets you choose from many accessibility options, including enabling access for assistive devices. The Display selection lets you change the size of the mouse pointer and adjust the contrast of your display.  The VoiceOver selection lets you toggle VoiceOver off and on and open the VoiceOver Utility. There are other options to let you turn on and configure display zooming and other display enhancement settings such as grayscale, enhanced contrast, and Black on White/White on Black. The Audio selection lets you control whether the screen will flash when an alert sound occurs. The Keyboard selection lets you turn Sticky Keys off and on and configure them, and also can set a delay to ignore accidental keystrokes. The Mouse & Trackpad selection lets you use the numeric keypad in place of the mouse, add a delay or maximum speed to the mouse pointer.

Once Accessibility is opened, you want to select the Display selection from the menu on the left. Under this option you see a slider to adjust the Cursor Size from Normal to Large. One nice thing about this slider is that the cursor grows as you slide so it is easy to see just how much larger you are making it.

While you are in this System Preference, you may want to try some of the many other options that are included there.

So if your big screen causes you to misplace the cursor, or your high resoloution Rgetna display cursor is just too small, you can easily fix it without having to install anythin on your Mac.