Mac Utopia for Printing from your iOS Device

b5384659-e759-4b52-8fe2-114f8aa2f887One question I get asked often is how do I print from my iPhone or iPad to my printer. This sounds like a simple request but in fact, the ability for these small for factor devices to send a print is a little more difficult than for a computer to do the same task.

Apple created these small devices with the intent for them to be fast and agile. As a result, it tended to design functions like printing so that it off loaded some of the computer processing power to the printer rather than requiring the device to do it. When Apple prepares a print job from an iOS device, it creates it in a single universal format. Unlike computers, where drivers for specific printers need to be loaded to allow them to print, Apple uses only one generic universal format for its print output file. When a print job is created on one of these devices, the file is quickly prepared in this universal format and then sent to the printer to have it process into the native format the printer expects to see. So that ends up being the problem for printers. If they do not know how to handle and process the file into the format they need, they cannot print from these devices.

When Apple introduced printing they designed a device standard called AirPrint. AirPrint designates a printing device that has the ability to do this conversion and thereby is supported for printing from any iOS device. If you are looking to purchase a printer today, looking for a printer that supports AirPrint is a great idea. This way, these newer printers support iOS printing right out of the box. But what if you already have a printer and don’t want to replace it at this time?

This is where third party products come in to play. If you have a Mac, the one I would recommend is called Printopia by ecamm.

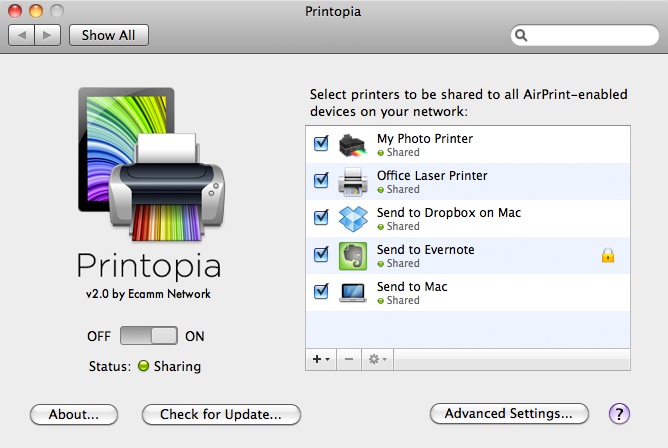
Printopia acts as that middle man between your iOS device and a printer. It does this conversion from Apples universal format to the native format for the printer. Printopia is a small piece of software that runs on your desktop Mac and processed these print jobs into a format the printer wants to see. It is simply installed on your Mac that already has access to the printers you want to use. Every printer that is installed on the Mac is made available to iOS through Printopia.

Once you install the software, it senses the printer drivers already installed and creates a connection to serve iOS devices. It really is that simple to install.

The only requirements are for this to work are that your Mac needs to be on so it can process these print jobs and it needs to be on the same network that your iPhone or iPad are connected to.

You can also save Paper With A Printopia Virtual Printer. This lets you “print” a file directly to your Mac or even send files directly to a Mac app such as iPhoto and Evernote. No need to waste paper next time you need to print a confirmation page. You can even send the file Print the file directly To Your Mac’s Dropbox Folder.

Printopia works With Leopard and even works on PowerPC Macs so that Mac OS X 10.5 and PowerPC Mac users won’t get left out in the cold. s. Purchase only if you like what you see. Have questions? Send us a message, and we’ll write back as fast as we can.

Printopia costs only $20 and is a great way to easily enable iOS printing in a Mac environment.

Microsoft Office 365: Is it time to lease your office space?

office1Microsoft Office is still the standard for word processing, spreadsheets, and presentations. Many people will argue that there are better application alternatives than these products and to some extent that may be true, but if you have a need to share files in an office environment, Microsoft Office is the place you need to be.

Cross platform users know this because Office is available, in one version or the other, for both Windows and Mac operating systems. For the most part, Office files are interchangeable between platforms as long as you run the current version of the product. But Microsoft see the future of it’s cash cow applications a little different that we have looked at it in the past. Microsoft wants to lease you your office.

Microsoft’s latest release of office is called Office 365. Office 365 includes the familiar Office applications such as Word, Excel, and PowerPoint with many new features that help you create, communicate and work even more efficiently from virtually anywhere. In addition to updating the traditional Office suites, we’ve developed brand new subscription versions of Office for home and school, specifically designed for the way you use Office today. Each of these subscriptions include the latest versions of Office applications like Word, Excel and PowerPoint, for PC or Mac plus offerings such as Skype world minutes and online storage with SkyDrive. This new version of office is a subscription service rather than an outright purchase. Microsoft still allow you to purchase your copy of Office if you like but the pricing of Office 365, particularly if you have more than one machine in the family makes it a much better deal in the long term.

For example, a year of Office 365 costs a home user just $99. For that cost, they can load office on 5 PC’s or Macs. If you purchase the lowest version of office for Mac or PC, it costs $139 for just one machine. But for the yearly fee, you get more than just 5 copies of office.

Subscribers will also receive future rights to version upgrades as well as per-use rights office 2across multiple PCs or Macs and select mobile devices . The Office applications you can use across PCs, Macs and other devices varies by platform just as they do for the purchased versions. If you have an active Office 365 Home Premium subscription, and available installs, you can install Office applications including Word, Excel, PowerPoint and Outlook on your Mac. And you can load Office on your PC that includes Word, Excel, PowerPoint, Access, Publisher,and Outlook. Not only that, you can load it on a total of 5 machines.
Current Office application versions for Office 365 are Office 2013 for Windows and Office 2011 for Mac. Customers with an active subscription will be entitled to the newest versions when available.

Each active Office 365 Home Premium subscription is also entitled to 60 Skype world minutes per month, which can be used to make Skype calls to phones in over 60 countries /regions and 20gb of space on Microsoft Skydrive, their cloud based dropbox alternative.

[stextbox id=”info” caption=”Does It Make Sense for Me?” color=”000000″ ccolor=”ffffff” bgcolor=”e3e3e3″ cbgcolor=”000000″ bcolor=”b7b7b7″]
credit-card_moneyLet’s say you have one Mac and two PC’s. On one of the PC’s you need Office Professional for Access.

Office Professional – $399
Office Home – $139
Office Mac – $139
Total investment in Office – $677

If there are new office versions every three years –the trend recently– in three you will have invested $677 by purchasing Office. But in year 4, when the versions update, you invest another $677 to stay up to date. For that same $677 you can stay completely up to date with Office 365 for those three years for just $297![/stextbox]

You don’t have to use a spreadsheet to realize that if you want to keep up to date with Office, and you have more than a couple machines in your household, $99 per year becomes a bargain very fast. Many people will balk at the thought of leasing this software but it you take a few minutes to chart your needs versus what the costs will be, you mat just find out that Office 365 is a real deal for your family.  Read more about Office 365 on Microsoft’s Website.

Home Automation Made Easy with WeMo

wemo1WeMo is a family of simple, easy to use products that allow you to control home electronics from anywhere. Turn them on or off, trigger them with motion, even put them on a schedule.  WeMo lives on your smartphone and uses your home WiFi and mobile internet. Setting up and using it is a snap. In fact, all the setup happens from your smartphone.

So, what can WeMo do?

Almost anything. WeMo can make your house a more convenient, easy place to be. When you return home, your lights are on. Leave the room, and the TV turns off. Turn off a light downstairs after you’ve already turned in.  Put your house on a schedule-bedroom and living room lights go on in the evening, the kids’ playroom gadgets go off at bedtime.  With WeMo you run your home right from your iPhone. The free WeMo app lets you control individual or multiple devices. Turn off a lamp from the other side of the house. Turn on the lights in the living room, from the other side of town.

Schedules are easy to set up too.  You can put multiple WeMos together in your wemo2scheduled events with ease. The beauty of the way these devices work is that the unit itself is able to trigger the control.  Rather than having a home automation server, each device learns its program and can independently act or perform functions with other devices.  An example would be having a WeMo Switch + Motion that detects the garage door opening and then instructs other WeMo devices to turn on lighting in the house.

There are two types of units available now: WeMo Switch and WeMo Switch + Motion.

If it plugs in, you can turn it on or off with WeMo Switch. Just plug your lamp, or fan, or stereo (almost anything) into the WeMo Switch, and you’re ready to control it with the WeMo app. And WeMo is completely modular. With multiple WeMo Switches, you can control as much or as little of your home as you like.

WeMo Switch + Motion is a great way to trigger it with motion. Just place the WeMo Motion sensor wherever you like, connect it to a WeMo Switch controlling a light, and that light goes on whenever you pass by. With WeMo Motion, appliances wake up and perform their tasks when you get near them, and go to sleep when you leave. Just like they should! Learn more

These units are not inexpensive but they provide great functionality for the money.  The WeMo Switch runs $49 and the WeMo Switch + Motion costs $99.  The iPhone app is free and available now.  AN Android application is also available for free but is still in Beta and only works with newer android operating systems.  It is available on Google’s Play Store.

There are videos on how these units work on Belkin’s website.

New Logitech Keyboards can Light Up Your Life

LK MacKeyboards are a matter of taste and preference. I still run in to a few people, usually older now, that pine on about the teriffic IBM keyboards of the early PC era. But keyboard technology has moved on to provide a much better yet different experience.

I have tried many keyboards over the years. Some better than others and had basically settled on using an Apple wireless keyboard with my Mac and a Dell wired keyboard on my PC. All of that has changed with a new entry in the keyboard space from Logitech.

The Logitech Bluetooth Easy-Switch Keyboard and the Logitech Bluetooth® Illuminated Keyboard K810 are nearly twins. THe feature set is exactly the same for both units with the major difference bring the keyboard layout. The Logitech Bluetooth Easy-Switch Keyboard has a keyboard layout for the Mac with Mac control and command keys in the correct locations while the Logitech Bluetooth Illuminated Keyboard K810 has a keyboard layout for a PC with a windows key in the correct location. The other differences between the two are color with the Mac version sporting a bright color and the PC version a smoked aluminum color.

With the differences described above, the rest of the functionality is common to both keyboards. One of the best features of these units is the ability to press one button to switch in an instant between your Bluetooth devices. Logitech allows you to quickly toggle between typing an email on your Mac or PC, to taking notes on your iPad, to replying to a text on your Phone. Thats right, the keyboard can be paired to 3 different devices at the same time and switch between the devices with a simple press of a key on the keyboard. Think of the possibilities.

With a single keyboard you can move from your PC to your ipad and then to your AppleTV all without any repairing or making any setting changes. If you travel with your spouse, each of you could have your phone paired to the keyboard and trade the keyboard back and forth as needed throughout the trip. Or better yet, the keyboard could also be paired to your computer at home so that you just pick it up and bring it along when you travel. How cool is that!

These keyboards have another feature that I really like. Being an Apple laptop user for years, I have grown accustom to the lighted MacBook keyboards. I love to get that additional light from the keys to assist me in typing in a darkened room. Well Logitech has provided that same keyboard, behind the key, lighting in this keyboard. Now weather at home in a dark room, or on a darkend flight, you can get that lighted keyboard experience for your iPad or Android tablet. The illumination automatically adjusts to suit the light conditions in the room. You can also manually adjust the brightness of the illumination using the F5 and F6 keys. A motion sensor detects your hands as they approach the keyboard and turns the backlight on/off to help you save power when you are not typing.

You charge these units with the included USB cable and you’ll enjoy between 10 days and up to a year of power, depending on the intensity of illumination and time spent typing. As a plus, particularry when you travel, there is an On/Off switch to ensure the keyboard does not come on in your travel bag.

Both keyboards are priced at $99 so it is definitely not the least expensive keyboard you can find, but if it is used for 3 devices, the cost doesn’t seem too bad.

There is lots more to like about these keyboards. Check out Logitech’s website to read more about the Mac version or the PC version

How to Migrate to a New Mac Quickly

imagesMoving large amounts of data requires a dedicated connection.  Firewire or Thunderbolt target disk mode is the answer for this.

Important: Unplug all other Thunderbolt or FireWire devices from both computers prior to using FireWire target disk mode. Do not plug in any FireWire devices until after you have disconnected the two computers from each other, or have stopped using target disk mode. If using Thunderbolt, it is ok to leave your Thunderbolt display plugged in.

To use FireWire target disk mode

  1. Make sure that the target computer is turned off. If you are using a MacBook or MacBook Pro as the target computer, you should also plug in its AC power adapter.
  2. Use a FireWire cable (6-pin to 6-pin) to connect the target computer to a host computer. The host computer does not need to be turned off.  If you do not have a firewire port on your new computer, Apple makes a Thunderbolt to firewire adaptor.
  3. Start up the target computer and immediately press and hold down the T key until the FireWire icon appears. The hard disk of the target computer should become available to the host computer and will likely appear on desktop. (If the target computer is running Mac OS X 10.4 Tiger or newer , you can also open System Preferences, choose Startup Disk, and click Target Disk Mode. Then restart the computer and it will start up in Target Disk Mode.)
  4. When you are finished copying files, drag the target computer’s hard disk icon to the Trash or Eject from the File menu (Mac OS X).
  5. Press the target computer’s power button to turn it off.
  6. Unplug the Thunderbolt FireWire cable.

The process of making this connection is exactly the same if you are using the migration wizard that runs on a new mac or using the Migration Assistant application in the Utilities folder.

D-Link DCS-930L – Wireless N Network Camera: Camera & Photo

Stay connected to everything that you love 24/7 with the D-Link DCS-930L Wireless-N network camera, which is compatible with the mydlink portal (mydlink.com)–allowing you to easily and securely view and manage the camera from virtually anywhere over the Internet. With its small size and easy installation, the DCS-930L is a discreet and flexible way to check on your home, children, or pets in real time–even on an iPhone, iPad, or iPod touch.

D-Link DCS-930L setup
The DCS-930L is ready to be viewed over the Internet in just three simple steps (larger image). Simply connect the cables, plug in the camera, run the short installation wizard and setup is complete. To view what the camera is seeing, simply log on to mydlink.com, choose your device, and start viewing–there is no need to configure your router to open up ports or remember hard-to-memorize Internet addresses.
D-Link DCS-930L

The D-Link DCS-930L Wireless-N network camera.

D-Link DCS-930L

The image above is the mydlink.com portal. Unlike a traditional USB-connected Webcam, the DCS-930L is a complete system with a built-in CPU and Web server that transmits high quality video images for security and surveillance directly to the network without the need for a PC. Simple installation and an intuitive Web-based interface offer easy integration with your Ethernet or Wireless-N (802.11n) wireless network.

Convenient Access, Anywhere, Anytime

As a mydlink-enabled device, you can access the DCS-930L anytime, anywhere you have Internet access. Get peace of mind by keeping an eye on your kids, pets, home or office from almost anywhere by simply logging on to the mydlink Website and selecting your camera. Since the DCS-930L comes with a built-in microphone, you can see and hear for yourself that everything is well at home.

Here ia a new camera I am taking a look at to see if it makes setting up a remote webcam easier. So far, it has allot of promice.

Change screenshot format on your Mac

Ever thought you would like the built in Mac screenshots to be in pdf format? Here is an easy way to do it.

First off, open the Utilities folder inside Applications and double click on Terminal. Now, don’t get to concerned about the command line. You are only going to type one command. At the prompt, type:

defaults write com.apple.screencapture type pdf

Don’t want pdf?  I tested tiff, jpg and png is the default. You’ll then have to logout/login to make the change take effect.