Which iPad is for me?

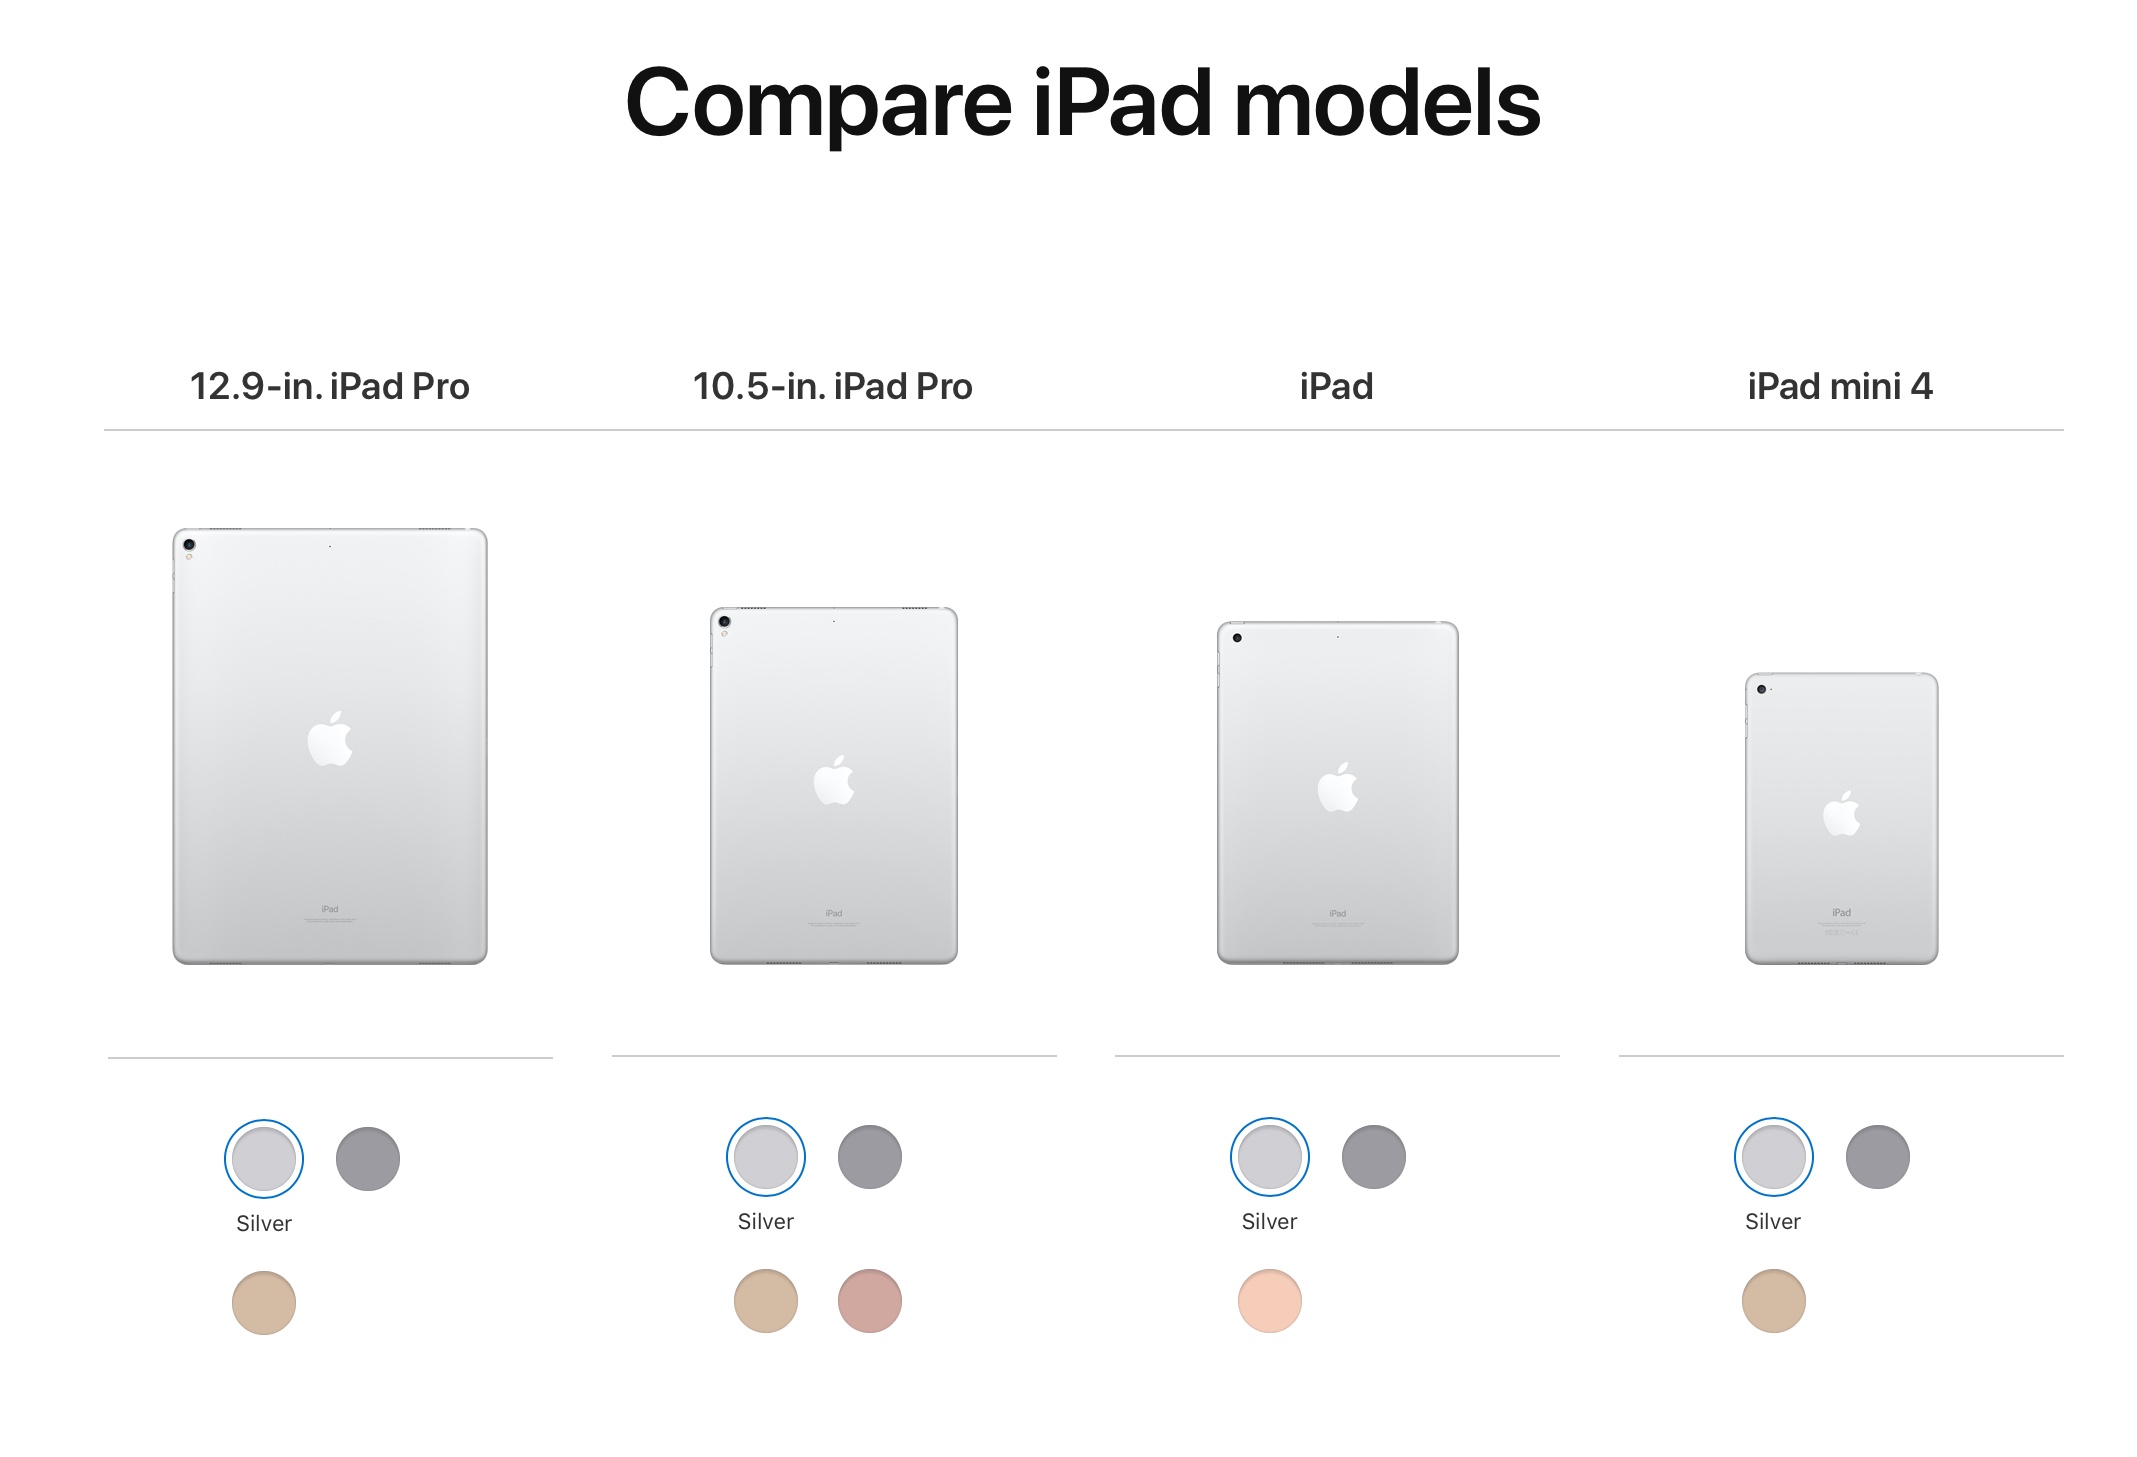
In the past couple weeks I’ve probably had four or five different folks asked me which iPad they should get. Apple provides a number of choices in iPads but a major part of the decision is based upon the size of the screen. The first thing I usually tell people to consider is the screen size. 

Originally, the iPad was a 9.7 inch device.  Apple has continued that size in its major consumer market device the six generation iPad. For most people that size is perfect. It’s larger than a phone but not so large that it’s hard to carry around with you.  But if 9.7 is not for you, Apple has other choices. 

The iPad mini with a 7.9 inch display is still available. I often caution people but the iPad mini has not been updated in quite a while so it’s performance is not the best. It also only comes in a 128 GB configuration. There are plenty of uses for devices that size, particularly in Home control. This iPad can be popular with women who want to be able to carry their iPad in their purse. 

If you’re interested in a larger screen size, you need to look to the iPad Pro models. iPad pros are available in 10.5 inch displays and in 12.9 inch displays. One interesting thing is that the 10.5 inch model is really not much larger than the 9.7 inch six generation. So size for carrying really doesn’t make much difference there. The largest iPad Pro is a mammoth. The display is it as large as many computer displays so an iPad of that size is sometimes a little hard to carry around.

Once you get an idea of what size screen you’re interested in the next thing to look at is the features of the device. Memory is one of the major things that differentiates cost in many of the iPads. A minimal amount of memory is 32 GB and that’s what Apple provides and it’s entry-level devices. The next step these days tends to be 128 GB and typically adds about $100 to the cost.  You can’t even get 256 GB in an iPad Pro if you have the need. For most people, 32 GB is plenty.  If you are a content creator or take a lot of pictures with your iPad, you probably should consider a larger size. But basically when looking at Apple’s lineup, the entry-level devices in each model typically provide a enough memory for the average user.

In addition to screen size differences, the iPad Pro models also provide extra functionality. They have the ability to add apples keyboard, which by the way doesn’t require batteries or Bluetooth pairing.  Until recently, the ability use an Apple Pencil with the iPad was one of the features the pro had that you could not get in a standard iPad. But Apple recently introduced it six generation that has Apple Pencil support so that’s really not a consideration any longer.

The iPad Pro models also have better displays. The displays are not just higher resolution. They also definitely have better color tone and less reflectivity. An iPad Pro Is significantly more expensive than the six generation iPad. While there are people who need this additional functionality and can make great use the device,  the average user is probably not in that category.

There also performance differences between the iPad Pro and six generation model but in my opinion these are pretty minor. Functionality within the operating system is just about the same between the two devices. Both of these devices are very fast. Unless you’re looking for the absolute top-of-the-line performance, I don’t think that performance differences make much of a difference in your choice.

For more information about the differences between these iPads, check out Apple‘s website to see a feature by feature comparison.

I typically use a 10.5” iPad Pro. With the advent of the six generation iPad the differentiation between the iPad Pro in the iPad is much less, at least for now. That being said, my recommendation is that most people seriously consider an entry-level six generation iPad for $329. 

The new six generation iPad is a great blend between performance, size, and functionality. Fortunately for all of us, because Apple is trying to get this device used in the education market, Apple has priced it at a reasonable cost.

But Apple never stops.  You can count on Apple revising the iPad Pro soon to better differentiate it from the sixth generation model.

If you’re really not sure about the differences between the devices, head out to a Best Buy where you can see them both side-by-side. But now that you know a little bit more about the differences, don’t let the Best Buy salesman upsell you to an iPad Pro if you really don’t need it.

Local Apple user group hosts Q&A at May Meeting

Mark your Calendars!  appleJAC users group in Jefferson City is hosting a Question and Answer meeting at 7pm on May 1st at Immaculate Conception Church, Kennedy Hall.  This is a golden opportunity to get your nagging questions answered on Macintosh, iPhone, iPad, or anything Apple related.  This group, that meets monthly, has a wealth of knowledge relating to all things Apple.  It it was made by Apple, or connects to an apple device, we will do our best to answer you question.

Feel free to bring you computer, phone or tablet along and get those questions you have answered.  Since many people will have questions, you will likely learn about many things you were afraid to ask about. You can ask questions from the floor or write them down and submit them.  There are no dumb questions!

You don’t have to be a member to attend so mark May 1 on your callender and plan to learn more about your Mac, iPhone to iPad..

For more information on appleJAC or the upcoming meeting, check out their website.

Getting Ready for iOS 11!

With Apple already in beta testing iOS 11, it’s always good to go back through the list of things that you need to do to prepare before updating your phone with a major operating system update. If you follow these simple steps, the odds of your update going well are greatly increased. Over the years Apple has made installing new updates pretty simple. When the update is ready it will show you on the device by showing you a small red number on top of General icon in the Settings application.  But many times if you go into system updates and check for an update it will show you it’s available before the icon shows. If you’re in a hurry to update, you might give this a try.

1.) Check to see if your device is iOS 11 capable

The iOS 11 update is officially coming to the iPhone 5s and later, all iPad Air and iPad Pro models, iPad 5th generation, iPad mini 2 and later and iPod touch 6th generation. This means popular devices like the iPhone 5 and iPad 4 are staying put on iOS 10.  If Apple releases any new devices, iOS 11 will be standard on them.

2.) Make sure you have enough space for the update

iOS 10 required as much as 2GB of space and while its unknown how much its successor will require, you can be sure its going to be similarly large amount. Apple will prompt you before downloading if you do not have enough space, so either way you will either have to get rid of some unnecessary apps, photos, music/TV shows/movies or other data you might not need right on your device .  One place that I see space often used on iOS device is in the camera roll. If you sync your photos over to your computer and delete them from your phone that will free up that space. You can always put photos back on the phone using iTunes at the time of sync.  In previous releases, Apple has offloaded applications to automatically free up space but it is always a good idea to do the cleanup yourself, just to be sure.

You can check how much space you have by going into settings and then general.  Select about and then it will tell you in the list how much free space you have on your device. iOS updates often have additional applications updated too. Apple generally updates many of their apps at the time of the system update so you’ll need additional space for those. Don’t cut your space to close.

3.) Is your device running iOS 10.x.x?

You’ll likely be able to update from any version of iOS 10 version and quite likely any version of iOS 9.  If your device is running a version older than iOS 9, you may have to update that far first and then move to iOS 11.  We will have to wait and see to be sure.

4.) Do you have the latest version of your apps?

If you don’t want to lose your app or its data, make sure they are up to date. This will also ensure you get the most out your apps in iOS 11, as they will have been tinkered with for iOS 11 integration. Just check for updates, and apply all updated applications that you find prior to the operating system install.  Apple usually announces the release date of a new iOS version about a week before it is available.  That is a great time to update your apps.

5.) Back up your device!

This is the most important step you need to take before updating. While everything is done to ensure the transition to iOS 11 goes smoothly, major updates can go awry. To back up, simply follow these steps:

  • Connect your iPhone or iPad into your Mac or PC and open iTunes.
  • Select your device under Source and select “Summary.”
  • Under “Backups” select “This Computer” and then “Back Up Now.”

I also recommend encrypt in your back up. If you encrypt your back up, and give it a password that you have to enter when you restore it, all of your passwords that you stored on your device will remain. This keeps you from having to go back in and reenter passwords in applications, or mail, before you can use the new OS.

So here is my final bit of advise…..

For most general users, it is often good to wait a about a week after the new OS is available to make sure there are no issues with it.

That’s about it. You’re ready to go. Enjoy the new OS. All the new features will be great fun to play with.

Posted in iOS

Application Specific Passwords for your iCloud Account

App-specific passwords allow you to sign in to your account securely when you use apps that don’t natively support two-step verification or two-factor authentication. There has been quite a bit of conjecture on the internet that very soon, any non Apple application that access iCloud data, like Microsoft Outlook, and specifically Windows machines accessing iCloud information will be required to use an application specific password.

Before creating app-specific passwords, two-factor authentication must be enabled for your Apple ID. As of iOS 10.3 and later, two-factor authentication is automatically setup for new Apple ID accounts. iOS 10.3 also auto-prompts existing accounts to upgrade. This makes sense as apple has been pushing people to use two-factor authentication now in many ways.

To make an app-specific password, do the following:

  1. Sign in to your Apple ID account page at https://appleid.apple.com
  2. In the Security section, click Generate Password below App-Specific Passwords.

  3. Fill in a name for the password you are creating so you can remove it if you desire later
  4. A dialog will come up and show you the password that was generated

  5. After you generate your app-specific password, enter or paste it into the password field of the app as you would normally.

You can have up to 25 active app-specific passwords at any given time. If you need to, you can revoke passwords individually or all at once.

If you want to revoke one of these application specific passwords, in the security section of your applied management page, click on edit.  Then under App specific passwords, click View History.  You will be shown a list of all the application specific passwords you have used.  Click on the one you want to remove and click to remove it.

Get used to this because tighter security is coming to an iCloud account near you very soon.

Saving a PDF from your iPhone or iPad and storing it to Cloud Storage

In the current release of iOS it’s easy to print to an airprint enabled printer by simply selecting the print command, choosing your printer, and telling it to print.  But what if you don’t have an airprint enabled printer or you just would rather save the file to a PDF?


It’s actually pretty simple to create the PDF from the print routine in iOS want you know the secret. First deal with your document the way you would if you were going to print it. Bring it up on the screen and select the print command, Once the print command is running, simply use two fingers to pinch outwardly from the center of the print preview that showing on the screen. This will launch preview and bring the document you had selected into it.

From there you can select the share command, the little square with the up arrow, and save it to iCloud Drive, Dropbox, or even Google Drive. The file gets saved as a PDF of the document you started with. This gives you the ability to create and store to your cloud-based storage, a PDF from any document you can bring onto the iOS screen of your iPhone or iPad .
Give it a try. Actually might come in handy one day.

Posted in iOS

Computer Scams can really Ruin your day…

Having a bad day today?  Well it could be a lot worse.  What it you were surfing the web on Facebook and suddenly saw this?

IMG_1137 (1)

Many people have seen messages such as this, particularly by clicking a link on Facebook.  Don’t fall for this scam.  The real infection here is to get you to call the phone number, let them connect to your computer to “Fix” it, and then have them install real spyware.  Then they show you how the machine is “infected” and tell you they can fix it for $190 only to steel your credit card info and make charges to your card.

Don’t make an errant click into a terrible mistake.  Force quit your browser to get rid of the message and ignore it. NEVER call a phone number for a computer problem that pops up on your screen and NEVER let someone you do not know make a connection remotely to your PC or Mac.

This can happen anywhere on the web but lately, many people see this from clicking a link from Facebook.

iBooks Enhancements in MacOS 10.11.4

Screen Shot 2016-03-25 at 3.51.21 PMIn the last update of MacOS and iOS, Apple quietly added a huge new feature to iBooks.  iBooks has been a great way to store PDF documents on your Mac and on iOS devices to be able to reference them when you have the need.  One feature lacking has been the ability to store these PDF’s and have them sync with all your iOS and MacOS devices.  In the latest version updates there was the following update statement:

“Adds the ability for iBooks to store PDFs in iCloud, making them available across all your devices”

Finally, your PDF files transfer to iCloud and can be installed on other devices you own.  Unfortunately, Apple really did not talk about how this works.  In both the MacOS and iOS, a dialog box asked if I wanted my iBooks PDF’s stored in iCloud.  Upon agreeing, the PDF documents began to sync….slowly….

Apples help on iBooks added this section to describe these new features:

Sync and save PDFs
The first time that you open iBooks after you update to iOS 9.3 or OS X 10.11.4, you’ll be prompted to use iCloud. Learn more about syncing your books and PDFs using iCloud.

You can also add PDFs to your iTunes library on your computer by dragging and dropping the PDF into your iTunes Book library. The files will appear when you are preparing your device to sync. If you’re using OS X Mavericks or later, drag and drop your PDFs into your iBooks library using iBooks for Mac. All PDF or iBook files in your iBooks library are available to sync to your iOS device via iTunes.

To sync a PDF from your computer to iBooks on your iPhone, iPad, or iPod touch:

  1. Select your iOS device. (Learn how to sync your data with iTunes.)
  2. Under Settings, click Books.
  3. Select Sync Books.
    If iTunes is set to sync only selected books, make sure that there’s a check in the checkbox next to the PDF you want to sync.
  4. Click Sync.

    You can also use iTunes to back up your PDF files. To transfer PDFs to your computer and back them up, transfer purchases from your iOS device to your computer. These files are not in an iTunes Backup. Learn more about what’s contained in iTunes and iCloud backups.

But there are still a few questions:

  • Where in iCloud are they stored?
  • How much space is allocated to iBooks
  • Can I remove a book from any single device without deleting it?

I have searched the web extensively and no one is answering these questions so stay tuned to see if someone steps up and addresses the particulars of this new application feature.

How to Backup your Critical iCloud Information

icloud-experiencing-issuesIn the early days of iCloud, it was very common for something to go drastically wrong and iCloud and delete or scramble your data. After seeing this happen many times, I had gotten into a routine where I would back up my critical information by hand from iCloud.  For the last few years I haven’t seen this problem and have become quite complacent about it. Unfortunately, complacency generally feeds disaster, and in my case that almost happened.

The great thing about iCloud is that you can change something one time and it synchronizes around to all of your devices keeping them all up-to-date. Unfortunately that’s also the Achilles’ heel. If something goes wrong on anyone device or if you accidentally delete something from one device it synchronizes to all your devices and the information that you had before may be permanently lost. Such was my recent case with iCloud.

Somewhere along the line in updating to iOS 9.0 or 9.1, and updating my Mac to El Capitan, I came to notice that my Safari bookmarks or not the same as they used to be. Looking at them closely I saw that many of my bookmark categories had been duplicated, others had been rearranged, and if you were missing entirely. It seems that one of those upgrades did something nasty to my bookmarks. And since I had gotten out of the habit of backing up my critical information by hand, my only choice was to go back and fix them all by hand and let them sync again. So that’s exactly what I had to do. I set down at my Mac and made all my changes to get my bookmarks back as nearly as they had looked before the problem.

While investing a couple hours and cleaning up my bookmarks was probably not devastating, it did point out to me that continuing the routine of backing up your critical iCloud information makes good sense.

So what information do you consider critical? For me, that would be my contacts, calendars, Safari bookmarks, and my notes. Apple provides a method to back up by hand the first three but unfortunately the new notes application lacks that ability. So here’s how to handle a back up of the first three pieces of critical information that iCloud stores:

Contacts
Open the contacts application on a mac and go to the file menu and select export. Next select export archive from the menu. Pick a location to store your back up, and name it something that has the date included. This way you’ll be able to tell the newest one if you need to recover.

Calendars
Again on a Mac, open your calendars application go to the file menu, select export, and export a calendar archive. If you’ve been keeping track of calendars for a long time this may take a few minutes. It will again ask a location and I typically use the same naming convention I did with my contacts.

Safari bookmarks
Open Safari on your Mac, and select File and then Export Bookmarks. Pick the same location to store your back up, and name it something that has the date included.

Notes
When it comes to notes that’s another story. You can export individual notes as a PDF file but backing up hundreds of notes that way would be difficult.  If you want to dig down into the bowels of your computer, your notes file is actually stored in…

~/Users/<username>/Library/Group Containers/group.com.apple.notes

Once you selected that folder, you can simply go to the edit menu and say copy. Then paste that file into your backup location. If you can’t find it from the path you probably don’t need to be down in these folders in the first place.

Next I set a calendar alarm to remind me to do this once a month. By doing this monthly I am sure myself but for some reason iCloud has a hiccup, my information will be easily recoverable and reloadable.

iOS9: How about some tips and tricks

Screen Shot 2015-10-23 at 3.45.27 PMHere are some of the best iOS 9 tips and tricks that I have found since it’s introduction.

  • Proactive Assistant – New search feature accessed by swiping right from the home screen. You can turn it off in Settings> General> Spotlight searching
  • Keyboard – Many folks complained about the inability to tell whether the “caps” key was engaged or not. So, Apple gave us a keyboard with lower case letters by default. When you tap the “up arrow” on the left, the keys change to upper case.  You can change the keyboard back to display upper case keys all the time by going to Settings > General > Accessibility. Scroll down to “Keyboard” and tap there. Under Software Keyboards it shows a button next to “Show Lowercase Keys. Tap it off to return to all caps all the time.
  • Button Shapes – Go to Settings > General > Accessibility. Scroll down to “Button Shapes” and click on the button there. If you look at the top of the screen as you tap it, you will see a grayed area appear behind the text “General.” The grayed area will now appear behind many of the text buttons throughout your OS. For instance in Calendar app the text buttons on the bottom of the screen “ Today”, “Calendars,” “Inbox” will now show that grey background behind them making them standout from the white background.
  • Larger Text – Just tweaking up the size of the text displayed on the iPhone can really make a big difference when taking a quick glance at Contacts, Mail or Messages or overall system text. On your iPhone or iPad, go to Settings > General > Accessibility. In the Accessibility screen scroll down to Larger Text and tap there. A new screen appears with a sliding button that scales up or down for size of text. It is set in the middle by default, but you can actually see the text on the screen above the slider grow larger as you move it to the right. I set mine just one “tick” to the right of middle. If you click on the Larger Accessibility Sizes, you’ll see even larger text settings.
  • New notes – The Notes app has always been great for jotting down your thoughts. And now it’s great for so much more. Want an easy way to make a checklist of to-dos? Consider it done. Or add a photo, map, or web link to a note. You can even draw a sketch with your finger. And thanks to iCloud, changes to your notes will be updated across all your devices and on iCloud.com.
  • Public transit in maps – Now you can use public transportation with Maps as your guide. In select cities around the world, a new Transit view shows you lines and stations for subways, buses, trains, and ferries right on the map. When you plan a route, every step of your trip is laid out from point A to point B.  Not yet available in Missouri.
  • Shortcuts in maps search to nearby places – with the Nearby feature, it’s easier to see what’s around you and decide on places to shop, eat, and more.
  • Low-power mode – Across the entire operating system, apps and key technologies have been made more efficient to trim battery usage wherever possible — so you get more battery life for the things you do every day. Thanks to ambient light and proximity sensors, your iPhone knows if it’s facedown on the table and prevents the screen from turning on, even when you receive a notification. The new Low Power mode lets you extend your battery life even further.settings battery – also see what apps are using your battery
  • News app – iOS 9 adds a new app to your Home screen. News puts all the stories you’re interested in, all in one place — so you don’t have to hunt through different apps and websites to make sure you’re not missing the next big story. Articles are pulled from a wide range of sources, from top news organizations to indie publications. Stories are chosen for you based on what you like to read, and the more you use News, the better it gets at picking out just what you’ll want to see
  • Wallet app replaces passbook – Use Apple Pay to securely and easily make purchases with your credit cards, now including Discover. You can even access Wallet by double-clicking the Home button when your iPhone is locked. Soon you’ll be able to use store credit cards, like Kohl’s Charge or JCPenney Credit Card. And you’ll be able to add rewards cards, like Dunkin’ Donuts DD Perks, Walgreens Balance Rewards, and MyPanera, to your Wallet app and receive and redeem rewards
  • New Wallet Features – Double-click from off to pay with wallet or choose a different card
  • New App navigation – Link back to where you came from with “back to”
  • iCloud drive application – The new iCloud Drive app built into iOS 9 allows you to access any file you save to iCloud from just one place — right on your Home screen. Easily search within the app and find the file you’re looking for. Browse all your files by date, name, or any tags you added on your Mac. You can also preview and organize your files without leaving the app.
  • Find my phone and find friends preinstalled
  • Set a reminder about what’s on the screen – Say remind me about this to Siri
  • New Siri preferences – Turn on hey Siri, Silence Siri, and have it learn your voice
  • Slide Over – Now you can open a second app without leaving the one you’re in. So you can quickly browse the web, respond to a text message, or jot something down in a note, then slide that app away and get back to the one you were using before. (iPad only)
  • Split View – With Split View, you can go a step further and have two apps open and active at the same time. Work on a sketch with the reference photo beside it. Or write a paper while copying citations from a book in iBooks. When everything you need is right in front of you, it’s easier to focusSearch inside settings (iPad 2, iPad Mini 4, and iPad Pro only)
  • Picture in Picture – While using FaceTime or watching a video, press the Home button and your video screen scales down to a corner of your display. Tap to open a second app, and your video continues to play — even while you use the other app. So keep watching your favorite TV show while you reply to the email that just came in. (iPad only)
  • Wi-Fi assist in settings cellular – Allows you to use Celular for data when Wi-Fi fails (Uses data from your celular plan)
  • Six digit passcode -Keeping your devices and Apple ID secure is essential to protecting your personal information — like photos, documents, messages, email, and so much more. iOS 9 advances security by strengthening the passcode that protects your devices
  • Quickly trash all mail – hit edit button to trash all
  • Add attachments in mail – Press and hold to add attachments from iCloud Drive.
  • Better upgrading process – iOS 9 does even more to efficiently stream new updates to your device without having to first download and unpack them — which means you don’t need as much free space to update
  • Disable shake to undo – in accessibility
  • Check Your battery in Notifications and Widgets – Pull down from the top of the screen
  • Pinch to zoom in video – When watching some supported video, you can now pinch to zoom in
  • New smart albums in Photos for selfies and screenshots
  • Directly select photos by gliding over with your finger
  • Hide photos in your photo library – Hide tyhose photos in your library you dont want others to see when they look at your device
  • Request safari desktop site and turn off content blockers on the fly – by pressing the reload icon.
  • Quicktype – Shape up your text in no time with an all-new Shortcut Bar, convenient editing tools, and a handy new way to select text with Multi-Touch gestures. And now when you use a wireless keyboard with your iPad, you can enjoy even more keyboard shortcuts. You can even use your on screen iPad keyboard as a mouse!
  • Safari Content Blockers – Safari content blocking extensions don’t automagically identify ads and prevent them from loading. Instead, they identify elements and resources on a web page and can, optionally, hide those elements and prevent those resources from loading. The goal is to show how fast the modern web—read: Safari—really is when you remove all the extraneous code that’s been dumped on top of it.
  • Find on the page in Safari – Safari has a Find in Page feature, although it’s a bit hidden. To perform a search for words on the current page, tap the address bar and type your search. Tap the Find option under On This Page at the bottom of the list to search the current page
  • Safari Reader Enhancements – Customize safari reader mode with color and font and Background

iOS9: Viewing the Desktop Site or turning off Content Blockers

imageWhen browsing on the iPhone or iPad, many times the site you see is different from the normal website.  You may be seeing the mobile version of the site.  This is often a better view because the dite gets formatted for a small screen.  But sometimes, the mobile site does not give you everything you need to see.

Another issue you may see is that now that we have the ability to instasll content blockers, these blockers may get in the way of seeing the full view ofthe site.

In iOS9 it is easier to view the desktop site or temporally disable content blockers. All you need to do is it press and hold the reload site icon in the URL bar to get two options to releave these problems.  Once you press and hold the reload icon you get the options to reload the full desktop site or to load the site without the content blockers you have installed.

This allows you to easily get all the information you would normally get from a full web browser on a computer,