MacOS Sierra: Optimize Disk Storage

Do you ever run out of this space on your computer? This is a very common thing to happen particularly in these days with many of us are using laptops with smaller solid-state hard drive. Whenever you run out of space, you have to search your hard drive for things that you can delete. Sometimes it’s pretty obvious to look in places like your downloads folder but other times some of the large files to get put on your hard drive are stored in on hidden locations.

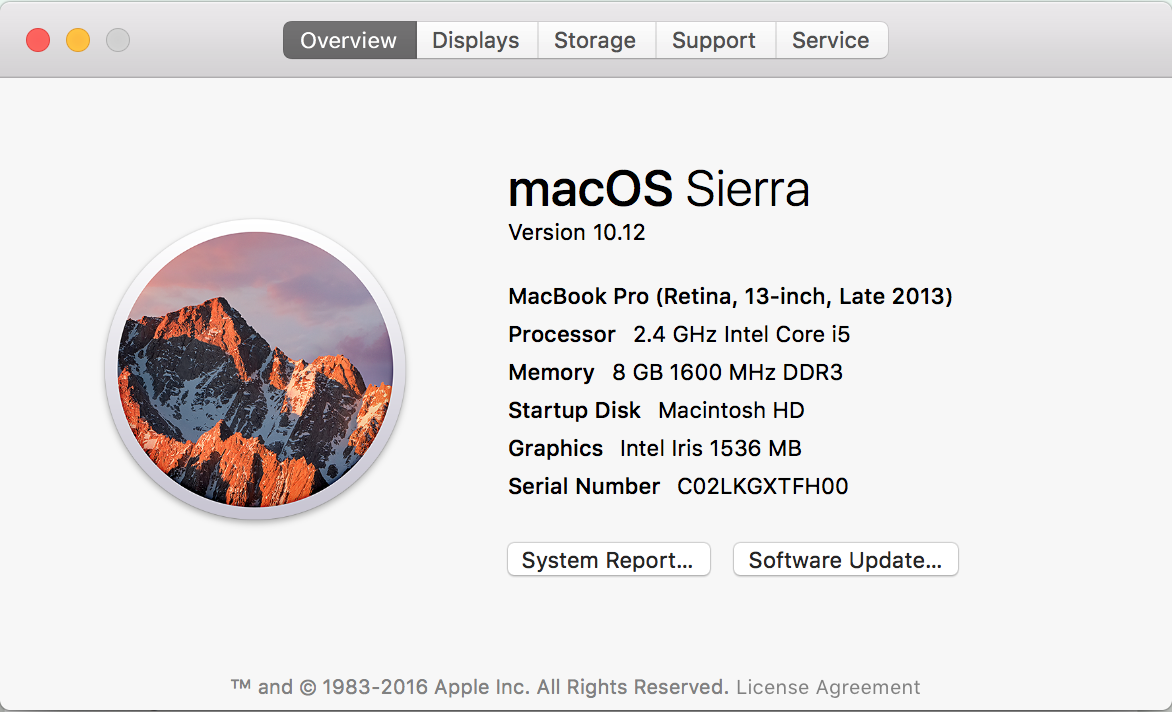
In MacOS Sierra Apple thought of this problem and provided us some tools to help her move some of these extraneous files. Define these tools you should start by going to the apple menu and selecting about this Macintosh.

screen-shot-2016-09-21-at-1-45-46-pm
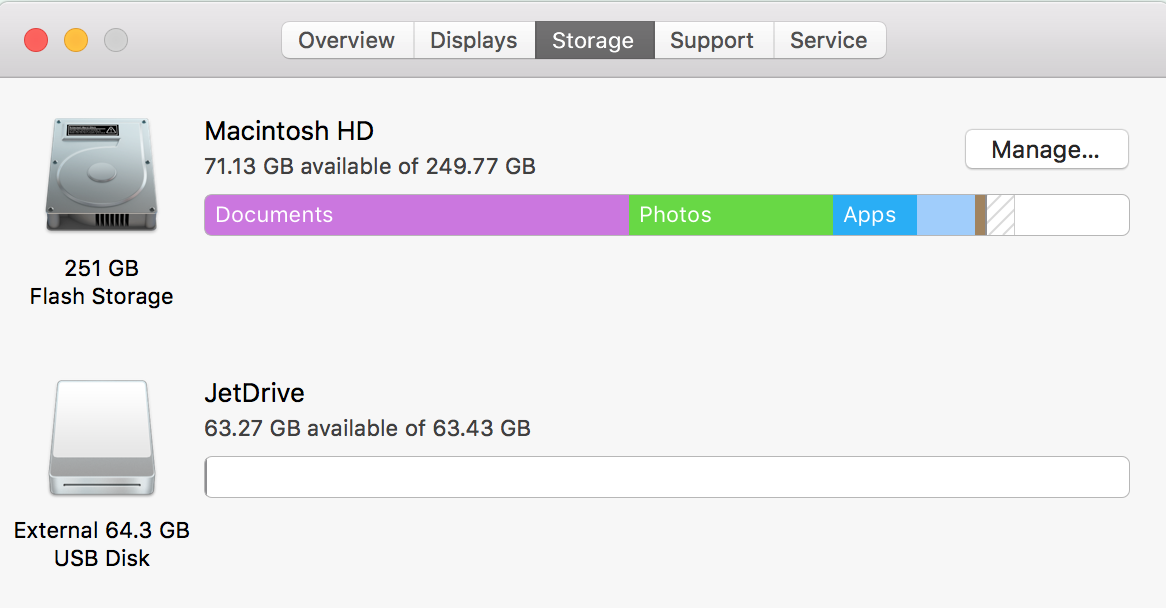
Across the top of the dialogue there are a number of taps. Select storage. Your Mac will now study the files on your hard drive and organize them in the bar graph shown for the disk.

screen-shot-2016-09-21-at-1-46-00-pm

New in this version of the operating system is the button that says manage. Click manage and you’ll see the screen below.

screen-shot-2016-09-21-at-1-47-18-pm

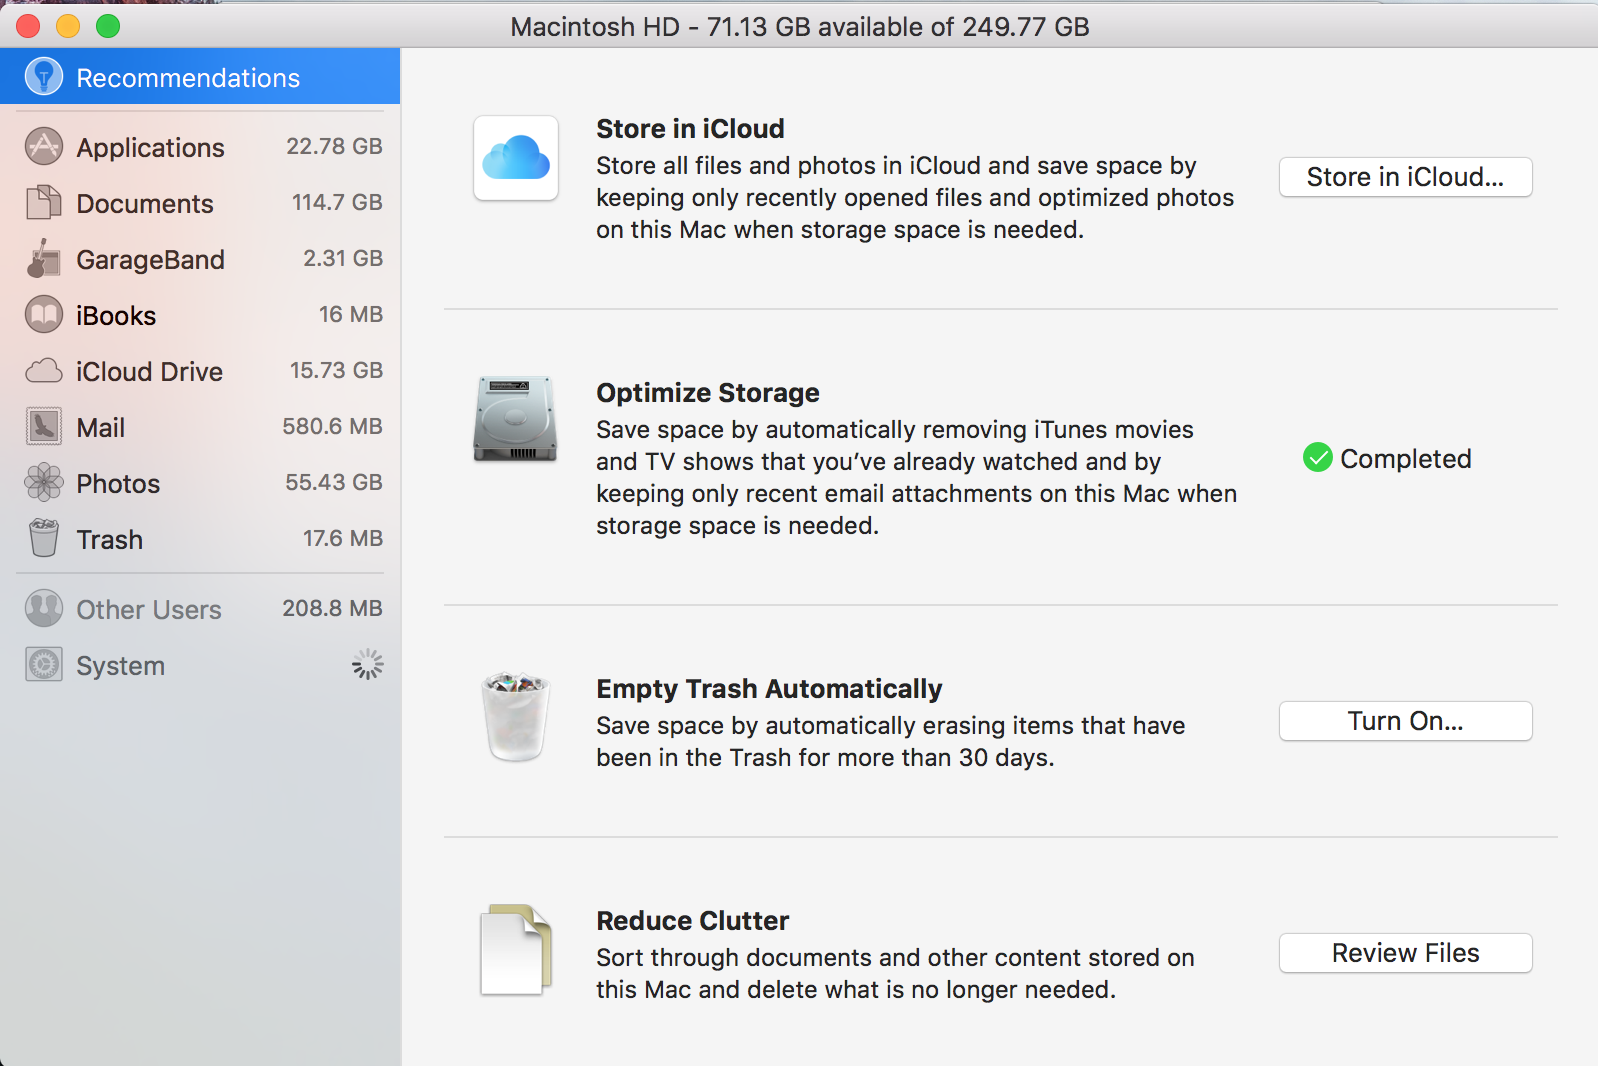
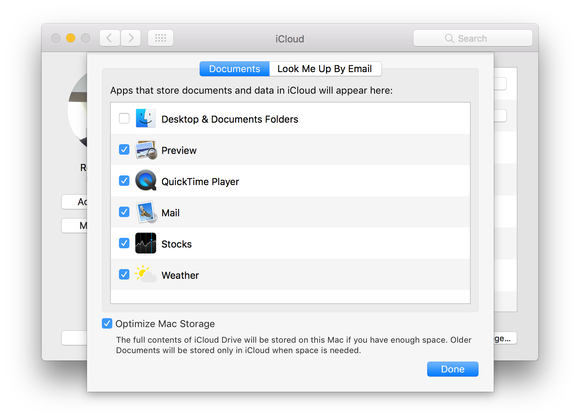
You want to wait until the spinning wheel finishes counting all of the different types of files on your computer. This utility provides for ways that you can optimize storage. First off you could store files in iCloud. That may be a good solution for you but you’ll need to make sure you have purchased enough iCloud storage space to allow this to happen.

The second item called optimize storage will delete iTunes movies and TV shows that you’ve already watched and also delete older email attachments that are stored on your computer whenever storage space is needed.

The third item is a new toggle that allows you to automatically empty the trash. This way you know longer have to purposely empty the trash because the Mac to do it for you. Keep in mind if you’ve ever had to recover a file from the trash this may not be something you want to turn on.

The final item on the list is where the real assistance comes. Apple calls this reduce clutter but basically it allows you to look at files on your machine and make a conscious decision whether you need to still have them on the computer. It will not present files to you that would cause your Mac to not run, but it may present files for applications you use that if you delete will no longer work.

screen-shot-2016-09-21-at-1-48-23-pm

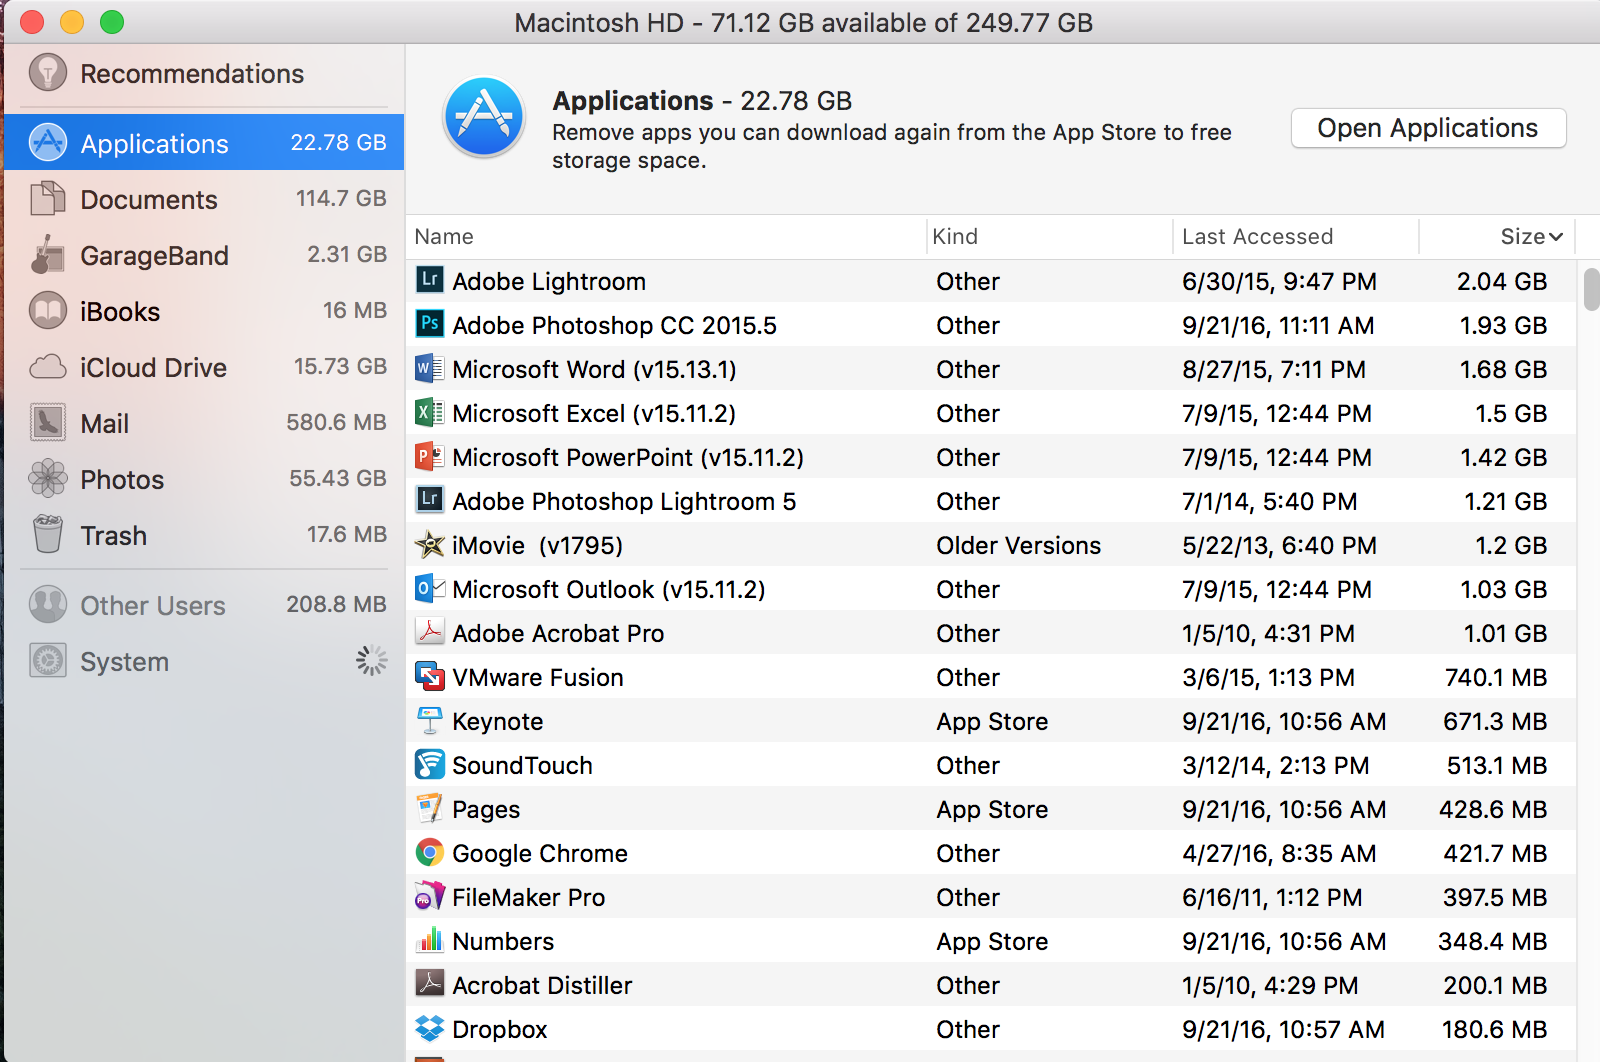
As you click on each one of the items in the left column, you’re presented with a list of those file types. For instance, applications, lists all the applications in your applications folder. Apple has been thoughtful enough to sort this list by size so concentrating at the ones on the top allows you to recover more space on the computer.  This dialog box is just a finder window so if you click on the file name for an application and hit the delete key you will delete that application. You can then do the same for the other types of files such as documents and garageband compositions.

Like many things we’ve seen added into MacOS over the last few years, there were third-party utilities that would do a pretty good job of doing the same thing. But for Apple to provide this built into the operating system is very positive for it’s users. First off you don’t have to research which deletion utility might be the best from the App Store, but moreover you can be fairly confident that when files are delayed they won’t cause the operating system to fail.

As with any file deletion that you do on your computer, it makes good sense to verify you have a backup before you do any of these functions.


Posted in Mac

Installing MacOS Sierra

macos-sierraIt’s that time again! Apple has released a new version of Mac OS called Sierra.  As with any new release there are going to be some minor issues. There are couple of things I want to point out about the install before you do it.

Sierra was released just yesterday and Apple servers are completely overwhelmed. Downloading the update might be quite slow but if you let go it will typically finish. The update process itself is similar to what has been done in previous years. The updater runs after completing the download and you have to approve the install.  After you’ve done this, expect about 45 minutes to an hour for the operating system to do the basic install. But that’s just the beginning.

After the install is complete a number of things have to happen on your computer. First off, all of the computer indexing that the computer uses must be rebuilt.  This index is used to find files on the machine in spotlight.   If you have a large number of files, this can take hours and can slow the machine to a crawl.

In addition, during the install, you will be asked about using iCloud to store the files on your computers desktop and its documents folder. Uploading these files could take a very long time if you have many stored.  It could also run over your internet service providers data cap.  While this seems like a very handy thing to do, consider it carefully because all those files take space.  That means you could easily run out of iCloud space and be required to purchase more storage.  Using this only makes sense if you have two machines or want all your computers files available from your phone or iPad.

sierra-icloud-drive-desktop-documents-option-100673616-large

But there is more….. The first time you open the updated photos app, it will have to completely rebuild your photo library,  This took 30 min on one of my machines with 15,000 photos but once rebuilt, all the thumbnails of the photos were gone.  I finally realized it was rebuilding them.  But this rebuild process took over night to complete.

So far, I have not found any reason to say don’t install this update.  But just keep in mind that when you do, be prepared for an unresponsive machine for a while while Sierra performs all these background processes.  Perhaps doing the update in the evening so you can let your machine run all night is the best advise.  If you do the install, authenticate iCloud and then open photos, you could let the machine do all this indexing during the night and hopefully you will have a responsive machine in the morning.

Posted in Mac

Changing the name of an Apple Bluetooth device


Bluetooth accessories like Magic Keyboard, Magic Mouse 2, Magic Trackpad 2, and third-party input devices come with a default name that appears in the Bluetooth menu of your Mac. You can give each device a name you’ll recognize.
The question came up at a recent appleJAC meeting about how you go about changing this name. Here’s what Apple has to say about it:

To rename a Bluetooth device, follow these steps on your Mac:

  1. From the Apple menu, choose System Preferences.
  2. Click the Bluetooth preference icon.
  3. Control-click or right-click on the device’s name to see a shortcut menu.
  4. Click Rename in the shortcut menu, then type a new name for the device.
  5. Click the Rename button to save your changes.

The custom name you give your device now appears in the Bluetooth menu of your Mac and in the Bluetooth section of System Preferences.

Note: When you rename an Apple wireless device, it remembers the name you give it. So if you pair the device with a different Mac, the device will appear as you named it. But with third-party devices, the custom name is often stored on the computer. Because of this, the device might return to its default name if you pair it with a different Mac.

Computer Scams can really Ruin your day…

Having a bad day today?  Well it could be a lot worse.  What it you were surfing the web on Facebook and suddenly saw this?

IMG_1137 (1)

Many people have seen messages such as this, particularly by clicking a link on Facebook.  Don’t fall for this scam.  The real infection here is to get you to call the phone number, let them connect to your computer to “Fix” it, and then have them install real spyware.  Then they show you how the machine is “infected” and tell you they can fix it for $190 only to steel your credit card info and make charges to your card.

Don’t make an errant click into a terrible mistake.  Force quit your browser to get rid of the message and ignore it. NEVER call a phone number for a computer problem that pops up on your screen and NEVER let someone you do not know make a connection remotely to your PC or Mac.

This can happen anywhere on the web but lately, many people see this from clicking a link from Facebook.

Q: How do I print labels from Apples Pages Program?

A:  I am making the assumption that you have labels purchased that go into your printer.  If that is not the case, let me know.

First you need to get a template for the label material you have.

Here is a page with lots of these templates.
Screen Shot 2016-04-27 at 8.09.23 AM
If your labels are Avery, the ones at the bottom correspond to Avery label numbers

After you download the template go to the top of the Safari window and click the downloads button.

Screen Shot 2016-04-27 at 7.56.54 AM
Once you click on it, double click on the document template you download.

Screen Shot 2016-04-27 at 7.57.15 AM
This brings up this dialog:

Screen Shot 2016-04-27 at 7.58.31 AM
Select Add to Template Browser.

Now the template is loaded in Pages and you can start your new labels.

Now pages should start and put you in the new document mode.  On the left is the My Templates dialog.  Select the template you just downloaded.

Screen Shot 2016-04-27 at 8.01.06 AM
Double click the templet to get started. This will open a new label sheet in pages and have all the labels created.

Now you can type the label into the document and when done print the page.

Screen Shot 2016-04-27 at 8.08.00 AM

Google Makes NIK Photo enhancement tools FREE

Screen Shot 2016-03-25 at 4.57.23 PMIf you are a user of Photoshop, Photoshop Elements, Lightroom, or Aperture you owe it to yourself to download these plug-in tools from Google.  These are true high end enhancements for all these products and now, Google has made them free.

the Nik collection It includes Analog Efex Pro, Color Efex Pro, Silver Efex Pro, Viveza, HDR Efex Pro, Sharpener Pro, and Dfine.  Each of these are fine additions to the adobe products but together and for free they add a major enhancement to the ability of these products, particularly for Lightroom users.

  • Analog Efex Pro – Explore the look and feel of classic cameras, films, and lenses.
  • Color Efex Pro – A comprehensive set of filters for color correction, retouching, and creative effects.
  • Silver Efex Pro – Master the art of black-and-white photography with darkroom-inspired controls.
  • Viveca – Selectively adjust the color and tonality of your images without complicated masks or selections.
  • HDR Efex Pro – From natural to artistic, explore the full potential of HDR photography.
  • Sharpener Pro – Bring out hidden details consistently with the professional’s choice for image sharpening.
  • Dfine – Improve your images with noise reduction tailored to your camera.

Start by looking at Define and Sharpener Pro.  These are the best noise reduction and sharpening tools I have ever used.

iBooks Enhancements in MacOS 10.11.4

Screen Shot 2016-03-25 at 3.51.21 PMIn the last update of MacOS and iOS, Apple quietly added a huge new feature to iBooks.  iBooks has been a great way to store PDF documents on your Mac and on iOS devices to be able to reference them when you have the need.  One feature lacking has been the ability to store these PDF’s and have them sync with all your iOS and MacOS devices.  In the latest version updates there was the following update statement:

“Adds the ability for iBooks to store PDFs in iCloud, making them available across all your devices”

Finally, your PDF files transfer to iCloud and can be installed on other devices you own.  Unfortunately, Apple really did not talk about how this works.  In both the MacOS and iOS, a dialog box asked if I wanted my iBooks PDF’s stored in iCloud.  Upon agreeing, the PDF documents began to sync….slowly….

Apples help on iBooks added this section to describe these new features:

Sync and save PDFs
The first time that you open iBooks after you update to iOS 9.3 or OS X 10.11.4, you’ll be prompted to use iCloud. Learn more about syncing your books and PDFs using iCloud.

You can also add PDFs to your iTunes library on your computer by dragging and dropping the PDF into your iTunes Book library. The files will appear when you are preparing your device to sync. If you’re using OS X Mavericks or later, drag and drop your PDFs into your iBooks library using iBooks for Mac. All PDF or iBook files in your iBooks library are available to sync to your iOS device via iTunes.

To sync a PDF from your computer to iBooks on your iPhone, iPad, or iPod touch:

  1. Select your iOS device. (Learn how to sync your data with iTunes.)
  2. Under Settings, click Books.
  3. Select Sync Books.
    If iTunes is set to sync only selected books, make sure that there’s a check in the checkbox next to the PDF you want to sync.
  4. Click Sync.

    You can also use iTunes to back up your PDF files. To transfer PDFs to your computer and back them up, transfer purchases from your iOS device to your computer. These files are not in an iTunes Backup. Learn more about what’s contained in iTunes and iCloud backups.

But there are still a few questions:

  • Where in iCloud are they stored?
  • How much space is allocated to iBooks
  • Can I remove a book from any single device without deleting it?

I have searched the web extensively and no one is answering these questions so stay tuned to see if someone steps up and addresses the particulars of this new application feature.

Mac Ransomware found in the wild…… Don’t panic!

AttachmentUpdate:  With the help of security researchers, Apple over the weekend quickly blocked a cyberattack aimed at infecting Mac users with file-encrypting malware known as ransomware.

Facebook, Twitter, and the headlines on all the computer new sites this morning are counting the first occurrence of Mac ransomware found in an application distributed to users computers.  In fact, I’ve already had emails from people I provide support for worried that they may be infected. Here are a couple of things that are important to understand about Malware such as this.

Here is the description of the malware that was found from Appleinsider’s website:

“Users who downloaded the Transmission BitTorrent client on Friday or Saturday are being warned to update to the latest 2.92 version to avoid being targeted by a ransomware that infiltrated an earlier version of the open source software…… The malware then “demands that victims pay one bitcoin (about $400) to a specific address to retrieve their files.” Researchers say the malicious code is “under active development” and seems to be trying to also encrypt users’ Time Machine backups to also prevent them from being able to recover their backed up data.”

So basically, unless you downloaded the transmission bit torrent client recently, you have nothing to worry about this particular instance.

Some of you may ask what is a bit torrent client? Wikipedia says, “BitTorrent is a communications protocol for the practice of peer-to-peer file sharing that is used to distribute large amounts of data over the Internet. BitTorrent is one of the most common protocols for transferring large files, and peer-to-peer networks have been estimated to collectively account for approximately 43% to 70% of all Internet traffic”

Basically, bit torent clients are used to download large files, typically large files such as pirated movies, still in applications, and other things that you can’t make generally available on the Internet.

So again, unless you’re downloading files of this type using this particular software you don’t need to worry about this particular infection.

The big concern about this particular malware is that it’s only the beginning of others that we may see.   Only time will tell, but I fully expect to see more of these in the near future. These types of infections are very prevalent on the Windows side and I have seen a number of computer users lose all their data as a result.

So what’s a person to do?

Back up your data. Not just once, but twice, and keep one copy of the back up not connected to your computer. I typically back up with time machine is my every day back up and then use carbon copy cloner as a secondary back up on a drive it is not mounted to my computer. This way if I were to get infected with something like this, and it were to infect my back up that’s connected, I still have an additional copy of my data to recover from.

People think that’s a little paranoid, but believe me if you ever need to recover files having a second copy certainly makes you feel better. With external hard drive’s running about $60, there’s really no excuse, get a second Drive, purchase Carbon Copy Cloner, and set up a back up routine for yourself. If there are any problems in the future, you’ll be happy you did.


Restore your Chrome bookmarks from Time Machine

Have you ever really messed up your chrome bookmarks on your mac and wanted to restore them from your Time Machine Backup?  Here are the steps to accomplish it.

1) Your Time Machine backup drive needs to be plugged in.

2) Start off by closing all the windows better open on your computer so that you’re only looking at the desktop.

3) From a finder, select the go menu and choose go to folder:  Enter this in the box that has opened:

~/Library/Application Support/Google/Chrome/Default/

Screen Shot 2016-01-27 at 9.01.04 PM

4) Single click on the file in the window named Bookmarks

Screen Shot 2016-01-27 at 9.02.28 PM

5) Now you should have one single finder window open. Next you’re going to want to go to the Time Machine icon. It may be in your dock or it is in the applications folder. Double-click on it to run it

Screen Shot 2016-01-27 at 9.00.46 PM

6) On the right, Select a date that is before the date you deleted the bookmarks.

Screen Shot 2016-01-27 at 9.03.19 PM

7) Once you have selected the date on the right, click the restore button.

8) When it asks if it can replace the one you have now, tell it that is OK.

That should restore the bookmarks to that date.  Run Chrome and check if the folder is back.

The above steps should also be similar to restore any file you need from the Time Machine backup.

How to Backup your Critical iCloud Information

icloud-experiencing-issuesIn the early days of iCloud, it was very common for something to go drastically wrong and iCloud and delete or scramble your data. After seeing this happen many times, I had gotten into a routine where I would back up my critical information by hand from iCloud.  For the last few years I haven’t seen this problem and have become quite complacent about it. Unfortunately, complacency generally feeds disaster, and in my case that almost happened.

The great thing about iCloud is that you can change something one time and it synchronizes around to all of your devices keeping them all up-to-date. Unfortunately that’s also the Achilles’ heel. If something goes wrong on anyone device or if you accidentally delete something from one device it synchronizes to all your devices and the information that you had before may be permanently lost. Such was my recent case with iCloud.

Somewhere along the line in updating to iOS 9.0 or 9.1, and updating my Mac to El Capitan, I came to notice that my Safari bookmarks or not the same as they used to be. Looking at them closely I saw that many of my bookmark categories had been duplicated, others had been rearranged, and if you were missing entirely. It seems that one of those upgrades did something nasty to my bookmarks. And since I had gotten out of the habit of backing up my critical information by hand, my only choice was to go back and fix them all by hand and let them sync again. So that’s exactly what I had to do. I set down at my Mac and made all my changes to get my bookmarks back as nearly as they had looked before the problem.

While investing a couple hours and cleaning up my bookmarks was probably not devastating, it did point out to me that continuing the routine of backing up your critical iCloud information makes good sense.

So what information do you consider critical? For me, that would be my contacts, calendars, Safari bookmarks, and my notes. Apple provides a method to back up by hand the first three but unfortunately the new notes application lacks that ability. So here’s how to handle a back up of the first three pieces of critical information that iCloud stores:

Contacts
Open the contacts application on a mac and go to the file menu and select export. Next select export archive from the menu. Pick a location to store your back up, and name it something that has the date included. This way you’ll be able to tell the newest one if you need to recover.

Calendars
Again on a Mac, open your calendars application go to the file menu, select export, and export a calendar archive. If you’ve been keeping track of calendars for a long time this may take a few minutes. It will again ask a location and I typically use the same naming convention I did with my contacts.

Safari bookmarks
Open Safari on your Mac, and select File and then Export Bookmarks. Pick the same location to store your back up, and name it something that has the date included.

Notes
When it comes to notes that’s another story. You can export individual notes as a PDF file but backing up hundreds of notes that way would be difficult.  If you want to dig down into the bowels of your computer, your notes file is actually stored in…

~/Users/<username>/Library/Group Containers/group.com.apple.notes

Once you selected that folder, you can simply go to the edit menu and say copy. Then paste that file into your backup location. If you can’t find it from the path you probably don’t need to be down in these folders in the first place.

Next I set a calendar alarm to remind me to do this once a month. By doing this monthly I am sure myself but for some reason iCloud has a hiccup, my information will be easily recoverable and reloadable.