My iCloud doesn’t seem to be syncing any more…

imgresHere’s a problem that a number of people have seen since upgrading their Mac or iOS device.

Have you ever wondered if your iCloud information is truly syncing? Sometimes you add a new contact, or a new bookmark, and can’t seem to get it to move to your other devices. ICloud is supposed to sync automatically and normally it does. But once in a while, particularly after an update, I find that parts of iCloud seem to stop syncing. So what’s a person to do.

The easiest way to get iCloud to sync again is to simply toggle off the offending item, such as contacts or bookmarks in the iCloud settings on either your phone or computer. By simply turning it off, and then turning it back on, often times the sync resumes normally. Generally, when you turn the sync back on for the particular item such as bookmarks, iCloud will ask if it’s okay to merge the information from your device with the information in the cloud. Since most of the information is the same, merging will accomplish the sync that you’re looking for and put all of the information on your device. So when asked, Tell it that it’s okay to merge.

While we all realize, we shouldn’t have to go through this process, this is certainly a simple method to get all of your information in iCloud back in sync on all your devices.

AdwareMedic Mac Malware Remover is now Malwarebytes

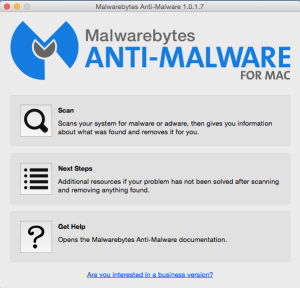
Screen Shot 2015-07-31 at 3.25.33 PMI have talked a number of times before about how Malwarebytes was the primary tool I used to remove  malware on a PC.  It is always been a great tool and always had a free version that allows me to use it on clients computers.  I’ve also mentioned that malware, or more accurately, Adware,  is now becoming a problem on the Mac and that I use a tool called Adwaremedic to remove malware on it.

Today, I updated Adwaremedic and found that Adwaremedic is now called Malwarebytes Mac.  I think this is a terrific change!  Malwarebytes on the PC has been dependable for years and is really the go to product for PC malware.  To have this company now cleaning malware on the Mac will be a good think.  They definitely have the expertise to do malware removal and Mac users should be able to depend on them too.

The next time you have Adware or popups on the mac, go to Malwarebytes to get your malware cleaner on yourMac.  You can’t go wrong with them.


Migrate or Clean load your Mac: The Digital Cleanse

Screen Shot 2015-07-09 at 1.05.46 PMMacs are not Windows computers. With Windows machines, after about 24 months of use, if you can go that long without a virus, the computer just seems to slow down and often the only solution is to reload fresh. A Macintosh can go much longer before starting to feel slow and lethargic.  Performance degradation on a Mac is often times related to how much software you install on the computer. If you’re one of those people that tries out new software often, a digital cleanse will sometimes make a big difference in the performance of your machine.

By and large the best time to make the decision is when you change computers. Built into the Mac operating system is the ability to migrate from one computer to another. That migration process brings along all of your settings and configuration making the new machine look and feel just like the old one. Typically, a new computer is going to be faster and may mask the fact that there’s lots of leftover software and settings from old applications you no longer use. So often times making the decision to clean reload the computer rather than migrate will provide much better performance in the end.

Screen Shot 2014-05-12 at 1.24.18 PMSo let’s say you made that decision that it’s time to do a clean reload. What are some of the things that you need to be aware of and prepare for when you begin that process. I’ve decided to compile the top 10 list of things to think about as you prepare to do a clean Macintosh reload.

10.  Before you start make sure you have two backups. Every Mac User should have a single back up at least. Most users will use Time Machine to back up your computer and I highly recommend that. But if you’re going to do a clean reload or migrate your computer by hand, you need to have a second backup. Time Machine is great for recovering individual files or recovering your entire computer. What you need in this case is a backup that you can go in and look at the files. I recommend using Carbon Copy Cloner for this purpose. You could also use Superduper or even the restore functionality of disk utility if you choose. You’ll also need an additional hard drive to make an exact copy of your main hard disk before you begin any process of doing the reload. This becomes very important when you’re copying files back to your new cleanly loaded machine. If you have to pull files out of a Time Machine backup the odds of missing something or inadvertently copying things that are going to again slow your machine down is very high.

9.  Make a list of your applications.  You want to make sure you don’t miss anything. Look in your applications folder and make a list of all the applications that you use. This is a great opportunity to decide what applications you don’t use and not install them on the new machine or reload.

8.  Round up all your software install disks, or identify where you’re going to get your software from.  Don’t forget license keys. You’ll also need the license keys for any software you reinstall that has a key. One benefit of downloading your software from Apple’s App Store is that you can easily reinstall it back on your computer at any time without having to remember license keys. But not all software is available that way.

If you use Adobe applications such as Creative Cloud, you need to be sure that you deactivate them on the old computer before beginning the process. Otherwise you’ll have difficulty activating them on the new machine.

7.  Passwords. Make absolutely sure you have passwords written down, or better yet stored in a password manager such as 1Password so that you can  re-login to websites, re-authenticate your mail, and have access to all of your files in cloud-based file services.

6.  Clean reloads take time. Be sure you allow yourself enough time to be able to complete this. It’s always best to do it in one setting so that you don’t miss anything. If you reinstall the operating system, from the recovery partition, you’ll need to be prepared for the long download that could take as much as three or four hours.

5.  Don’t forget to apply all the updates. Overtime your software applications have been updated. If you reinstall them from the original disk that you purchased them on, be prepared for updating those applications too. A product like Microsoft Office Will sometimes have to be updated four or five times so continue to run the updater until it tells you no more updates are available.

4.  Install up-to-date software versions were possible. Sometimes an application may need to be updated to run on the latest operating system. We often see this happen when you’re moving from an older computer to a newer computer. Some of your most important software that you use every day may not be run on the  new version of the operating system causing you to have to purchase an update. Do your research first after you make your application list to see what you might have to purchase to run on the new operating system.

7ae57ab93.  Use iCloud to your advantage. iCloud has the ability to store contacts calendars bookmarks etc. Be sure iCloud is turned on and is syncing those items on your computer before you start. More  importantly, be sure you log into the same Apple ID on the new computer to get that information pulled back out of the cloud easily.

2.  Don’t run the included Apple applications until you copy your data back. Many of Apples applications use data files such as an iTunes library, or a photos library. If you run these applications before you copy your data back it will create a new blank library causing you problems when you finally move your stuff back. Avoid running any of these until all your data files have been copied back and be sure to test those applications and verify your photos, music, movies, etc. are all still there.

And finally, the most important thing to verify…….

1. Since you’ll be copying all your files back from the carbon copy cloner disk by hand, make absolutely sure everything copies correctly. If your are storing your files correctly, they will be within your user folder on the backup and can be copied a folder at a time to the new or reloaded machine.  Sometimes if you’re copying lots of files at one time the file copy may crash and not finish. In those cases, it leaves some of the files off of the new machine. Check folder by folder to make sure you have everything back on your newly loaded computer.
if you follow all of these tips, doing a clean reload or a digital cleanse maybe able to improve your performance of your existing computer or make your new computer run even better.


Newer Technology Mini Stack Drive – A Nice addition to a Mac Mini

Screen Shot 2015-07-02 at 2.24.11 PMWhen I purchased my Mac Mini, I was excited about the fact that I was going to have much more space on my desk. And for a time, I was able to do that. But, over time when I needed additional disk space, I needed to add external hard drives to give me that space. I’ve always been one to purchase external hard drives based upon price.

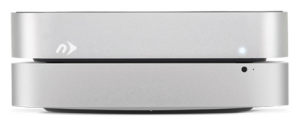
I typically buy whatever is on sale locally. Unfortunately, that has allowed me to have a number of dissimilar drives that all take up space on my desk. I was excited to see NewerTech’s miniStack drive because the form factor of this drive was the exact size of the current Mac Mini. This allows me to place the drive under my Mac Mini and an additional space without using up more disk space.

I was fortunate enough to be able to tryout one of these units with a 1 TB hard drive built-in to see how it performs and how looked when set up with my system.

NewerTech’s miniStack has a number of ports on the back that allow you to be able toScreen Shot 2015-07-02 at 2.24.19 PM connected with either FireWire 800, eSATA (which doesn’t make a lot of sense in the Mac world), or by the common USB3 port that comes on the current model Mac Mini. Since USB3 is faster than Firewire 800, I chose to make the connection with the included USB3 cable.

If you were using Firewire 800, NewerTechnologies was thoughtful enough to include an additional passthrough port for other Firewire devices. Unfortunately, to get additional USB3 ports you need to move up to NewerTechnology’s miniStack Max unit that provides additional USB3 ports and an SD card reader. This unit also allows for a DVD or Blue-ray drive to be included inside.

After placing the drive unit under my Mac Mini, I plugged in the power adapter and the included USB3 cable. Unfortunately, the power adapter included was a large brick type of adapter that required a wide plug to be plugged in. It would’ve been slightly better had a power adapter been built-in internally so the plug-in would only require a standard spaced plug.

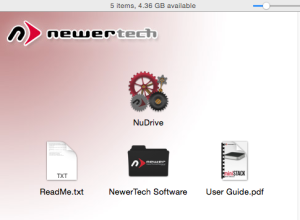
After the initial setup, I was presented with an icon for the new drive software to be installed. I ran the installer and selected the recommended easy-setup option. Having to run software to install a drive was somewhat foreign to me, but running the utility, I accepted the defaults and was presented with an icon for the drive on my desktop. For users who do not install a drive very often, this method of setup is quick and easy. Other options in the process would allow for multiple partitions to be setup if the user wants them.

On the drive was a bundled package of Speedtools OEM version and Prosofts Data Screen Shot 2015-07-02 at 3.06.05 PMBackup 3. In general, these utilities are a little dated. but still functional if you’re using the correct operating system. Windows utilities were also included. For my use, I chose to use Carbon Copy Cloner to do my backup since I already owned it and was familiar with it.

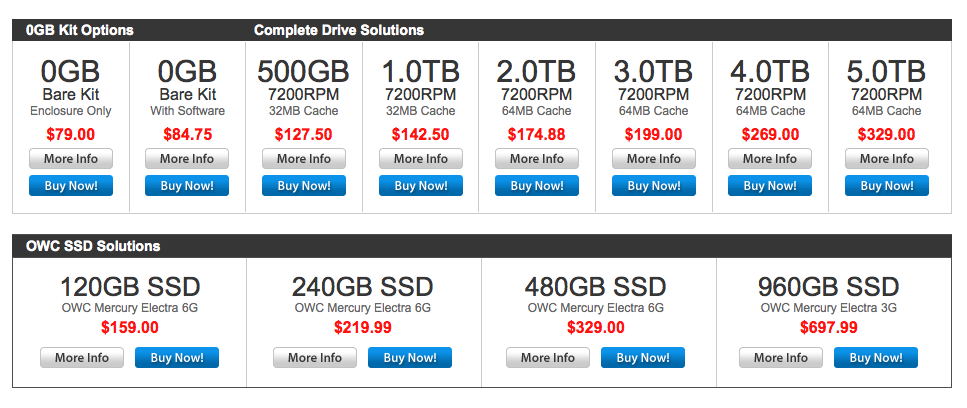
The miniStack drive is available in drive sizes up to 5TB or as a bare unit without a drive. If you really want fast storage, you can also get it with a Solid State Drive SSD in 120GB to 960GB sizes.

Screen Shot 2015-07-02 at 2.25.16 PMOnce the drive was setup and formatted, it was easiest to use just as any other drive on a Macintosh. I set up a Carbon Copy Clone task and copied my main drive due this new drive as a backup. That all without a hitch. Speed was as good as any USB3 drive that I’ve used before. The fan in the drive proved to be very quiet. It did not add much noise to my working environment. While there is a switch on the back of the drive, I doubt that I will use it as I will allow the Mac to continue to run almost all the time.

If you’re looking for a small footprint drive for your Mac Mini, NewerTechnologies many stack is a great solution. The footprint is exactly the same as the Mac Mini and by having a USB3 port it complements the drive internal to the Mac Mini. If you have an older Mac with a FireWire 800 port, and you’re looking for a drive to be able to use it with, the miniStack is also a good choice.

Price varies from $79 to $693 depending on Drive size and type.
For more information check out the Other World Computing website.

Google photos: the photos service that Apple should have developed

imageThe world of photos storage and manipulation, for the average user, has been turned on its head this spring with Apple releasing its new photos app to replace iPhoto, and now google introducing its own photos service that replaces Google+ photos and Picassa. Also the spring, Yahoo has greatly enhanced it’s Flickr service as a competitor to both the big dogs. With all these options for photo storage and manipulation, how does a person make a choice?

So let me start off by being perfectly clear. If you’re a Photoshop user these are not competitive products to you. If you use Lightroom to store your photos, then these are probably not services you’re going to have interest in either. If you were an Aperture user and Apple abandoned you, you’ve probably already looked into lightroom and likely selected it as your new system. But if you were in iPhoto user, someone who uses Windows Photo Gallery or still a Picassa user, the time is right to look at your other options.

I’ve written about Apple photos before and described how it was a good start at a new photo application for Apple. If you’re a Mac User this may be all you need. But if you’re a Windows user, or you’d like to get your photos into the cloud for storage without paying an arm and a leg, the other options are quite compelling.
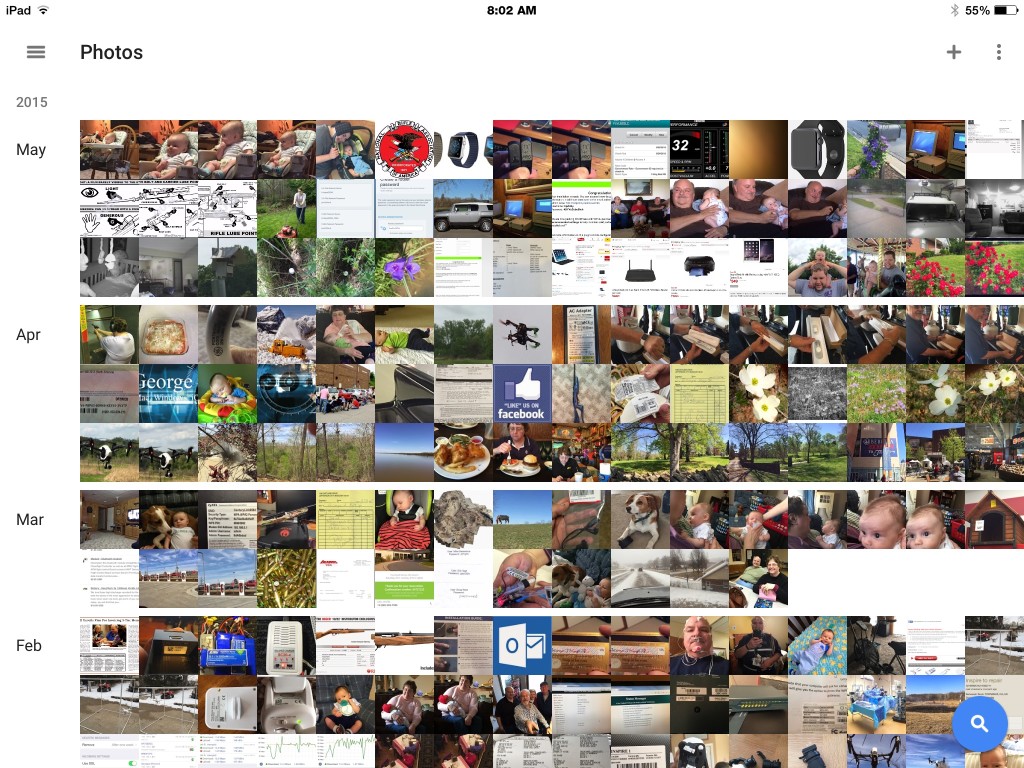
imageNow I like Flickr. Flickr is very well developed and with its new release has many features that people will find very useful for dealing with their photos.  If your a Flickr user and have already worked out a workflow for putting your photos up at Flickr, then I see no reason to make a change. But if you have photos on your computer, that are haphazardly stored in folders, Google photos maybe just the ticket for you.

Like most Google services, Google photos is available as a web service in your web browser. First off you have to have a Google account to use the service. If you have a Gmail address you already have the account set up.  Once you connect to Google photos you have the ability to be able to put photos into the service and have them backed up. One of the benefits of Google photos is that they allow you to store up to 16 megapixel images uncompressed for free. If you’re using a camera that takes larger images, photos will down sample the image to that size or you can choose to pay for storage space to store full size images. For most users using the free unlimited storage is good enough.

So what makes Google photo special? Google photos has a lot of intelligence built-in similar to what iPhoto users had been used to with faces and places. Google photos gives you the ability to put photos up and then Google uses their algorithms to scan those photos to help organize them in a very simple way.

imageGoogle has made available a small application for both Macintosh and Windows users that allows you to automatically upload any photos on your computer. This application runs in the background and will send any new photos up to Google photos as soon as they’re on your computer. This makes using Google Photos extremely easy. You basically continue to work with photographs the way you always have and Google Photos sends copies of those photos up to their web service and stores them for you as a backup. If you’re in computer user that has photos stored on your computer and is not religious about backing them up I see no reason to not use Google photos just for that service. Even if you do nothing with the photos you put up in Google photos, just allowing Google to back them up for you at no cost is a big win. To do this you don’t even have to go to the website, you can just download the small application, run it, and let the backups begin.

But some of the real power of Google photos begins once your photos are stored with Google. As your photos are put online in an area that is secure and only accessible to you, Google analyzes these photos both by reading the metadata and also by analyzing the image itself. From this Google automatically creates things called stories that are basically short booklets of images that are related often by time or location. You really have to see this in action to understand it. I’ll tell you upfront I was pretty amazed. In addition Google organizes photos by peoples faces, locations, and generic terms such as lakes, mountains, flowers, and helicopters. I am certainly not very good at tagging my photos but the way Google analyze them and puts them into groups was amazing.

imageHere are some of the things googles literature says that it does.

• VISUAL SEARCH: Your photos are now searchable by the people, places and things that appear in your photos. Looking for that fish taco you ate in Hawaii? Just search “Hawaii” or “food” to find it even if it doesn’t have a description. Note: Face grouping is not available in all countries.
• AUTO BACKUP: Keep all your photos and videos safe and accessible from any device. Choose free, unlimited cloud storage available at high quality, or store up to 15GB original size for free (shared across your Google account).
• SAVE SPACE ON YOUR DEVICE: Google Photos can help you clear safely backed up photos and videos from your device so you never have to worry about deleting a photo to make space.
• BRING PHOTOS TO LIFE: Automatically create montage movies, interactive stories, collages, animations, and more.
• EDITING: Transform photos with the tap of a finger. Use simple, yet powerful, photo and video editing tools to apply filters, adjust colors, and more.
• SHARING: Share hundreds of photos instantly with shareable links and use whichever apps you’d like to share.
You can read more about some of the amazing things Google photos can do on Google’s website at http://www.google.com/photos/about/

Google currently has applications for photos on the iPhone, iPad, and android devices. And for first releases, they are very good.  They also promise native apps for Macintosh and Windows coming soon.

So if you don’t have a photo storage strategy, or your strategy has been blown apart with the discontinuing of iPhoto, or even if you just want to try a good way to back up your photos automatically, I highly recommend Google photos as your new photo storage service. I’m not completely counting out Apple photos at this point, but Google photos is the app Apple should have released. So I’ll continue to use the Apple photos app in addition to Adobe lightroom to manage my imagery, but I’m going to let Google backup my photos because I can see the amazing potential of what they released this week.

New Mediacom Mail Server allow for IMAP mail

PLEASE NOTE:  Since the article was written, the Mediacom server settings have changed.  The setup instructions still work but the outgoing server settings need to be changed.  Use  Outgoing:  smtp.mediacombb.net, Using SSL, Port 587, Authentication required

If you are a subscriber to Mediacom, you may have gotten an email telling you that your mail account has been moved to their new server. Typically they send an email about a week before they’re going to do it and then again I’ll follow-up email telling you they’ve completed it. The email that you get for completion may look like this.
Screen Shot 2015-05-01 at 10.59.47 AM

One of the features provided in Mediacom’s new mail service is the ability to use IMAP mail.   These days most of us look at mail on more than one device. IMAP email allows you to leave your mailbox on the server rather than downloading all your mail to each device. This way if you delete one message from any device it gets removed from all devices.

You can set this up on your iPhone or iPad but it does require a little bit of trickery to get it to work. Setting it up on a Mac needs to be done in the same way.

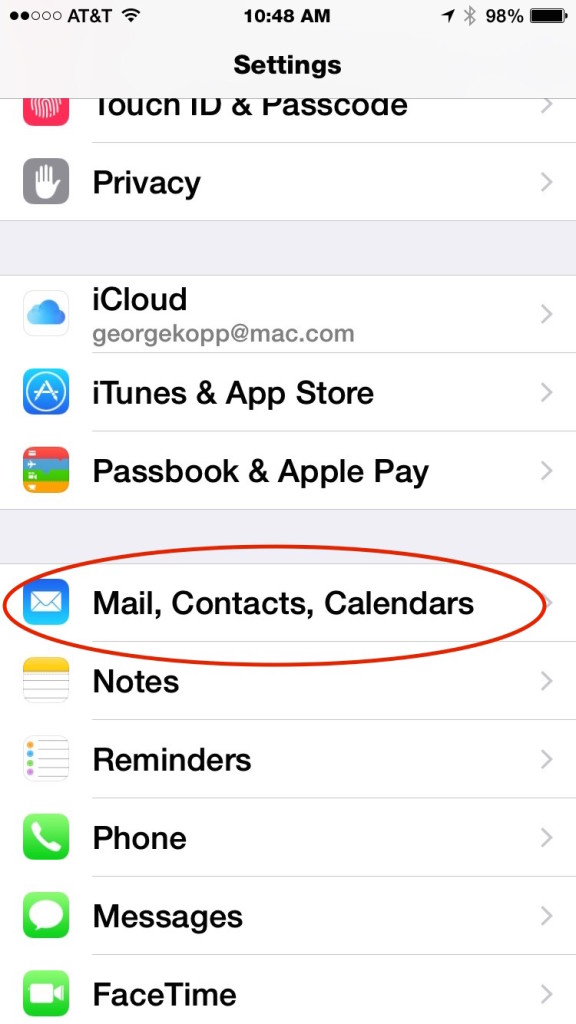
The first step in the process is to go into settings: Mail contacts and calendars: and remove your existing Mediacom account from your device. Any mail you have left on the server Will come back down when you readd the IMAP account.  But if you have mail that’s fairly old it may have been deleted from the server so be sure you’re willing to do without that if you delete your account.

IMG_1715

With your account deleted you’ll need to go through the process of setting up a new mail account on your iOS device.

IMG_1716

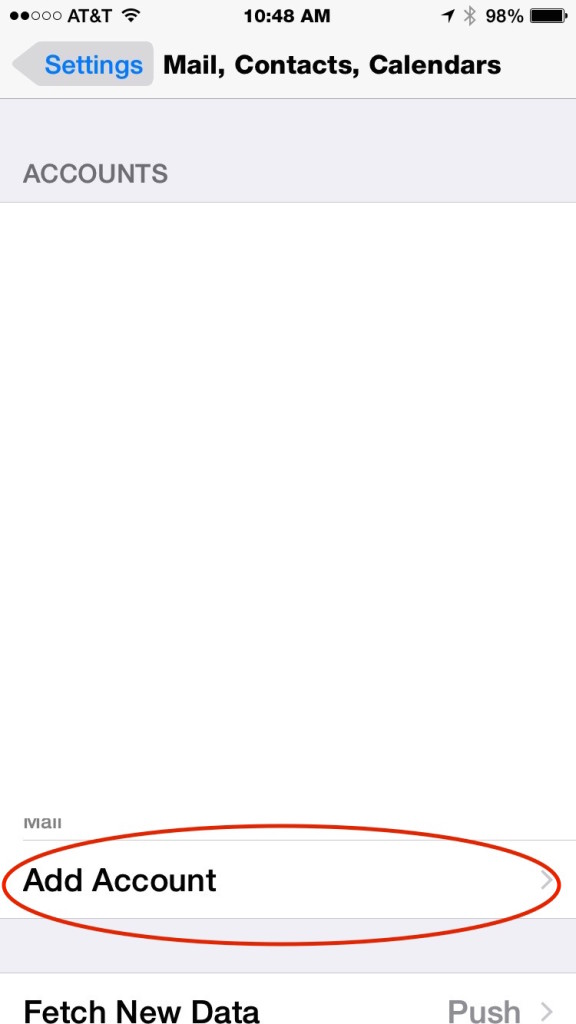
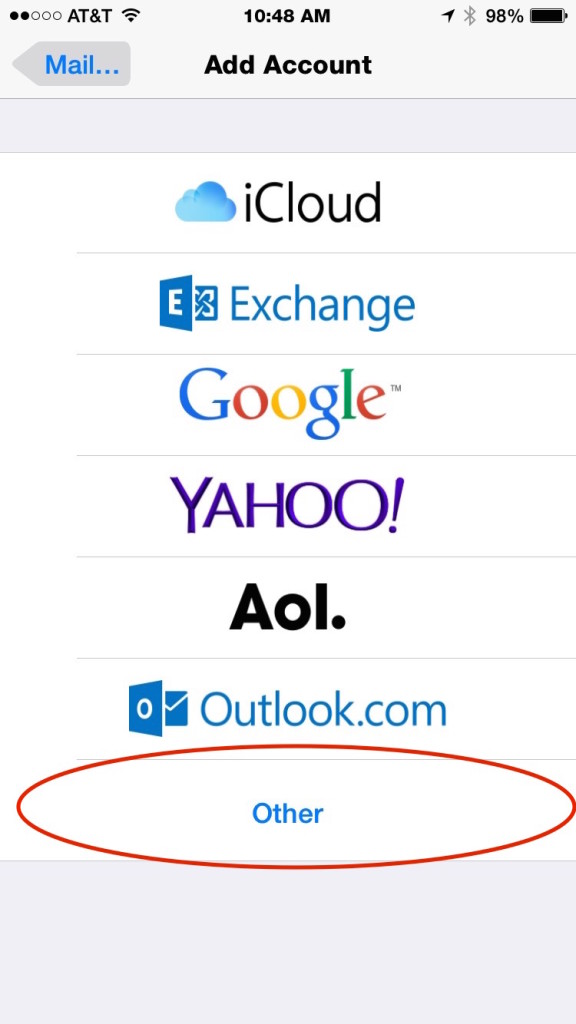
Go to Settings: Mail Contacts and Calendars and select Add Account.

IMG_1717Select Other for the account type

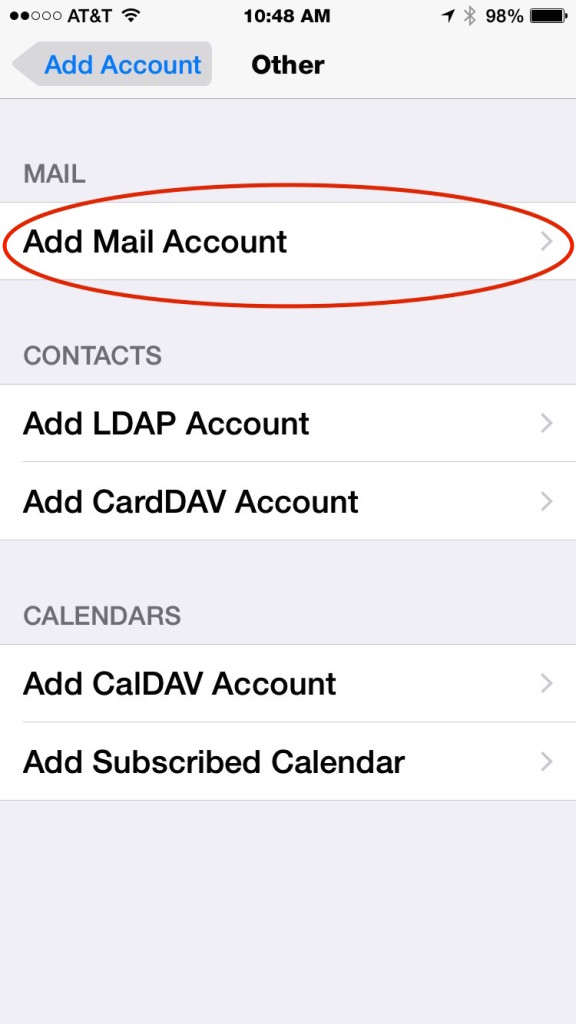
IMG_1718

Select Add Mail Account

IMG_1719

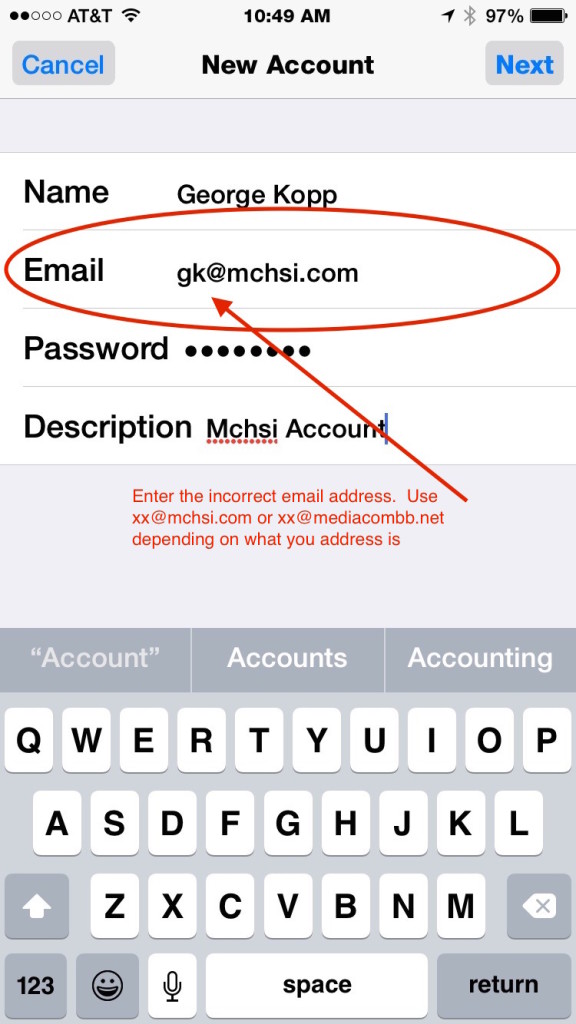
Now here is where you need to trick the iOS mail setup application.  Apple’s auto mail setup goes out to look for the correct settings and unfortunately defaults to setting up the email as a POP account again.  So we will use a fictitious email address to trick it.

Enter your name and then enter an email address where the first part of the address is incorrect.  Be sure to use the correct portion of the address that comes after the @.  For instance, I entered gk@mchsi.com but you could also use something generic like xx@mchsi.com too.  Enter your password correctly and give the account a descriptive name.

IMG_1720


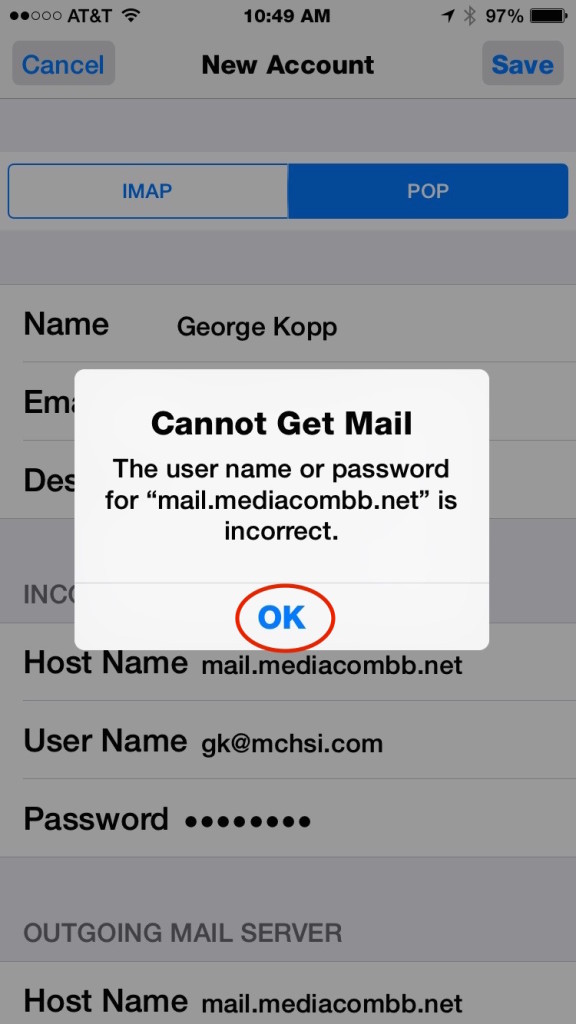
after a few seconds of looking out the server information, you will see the cannot get mail dialog popup.  This error is correct since you used an incorrect email address. Press OK.

IMG_1721

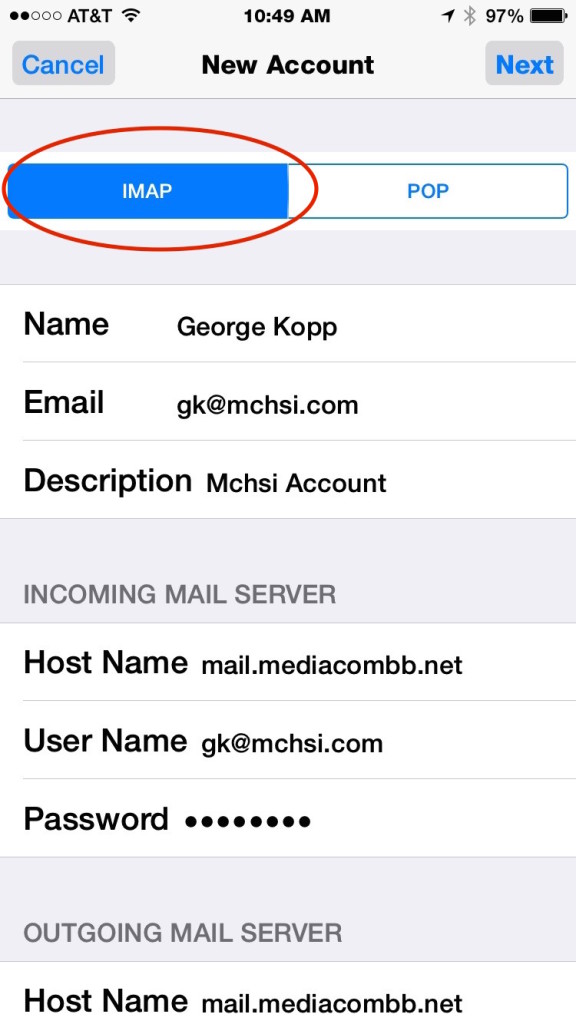
Next change the toggle at the top from POP to IMAP.

IMG_1722

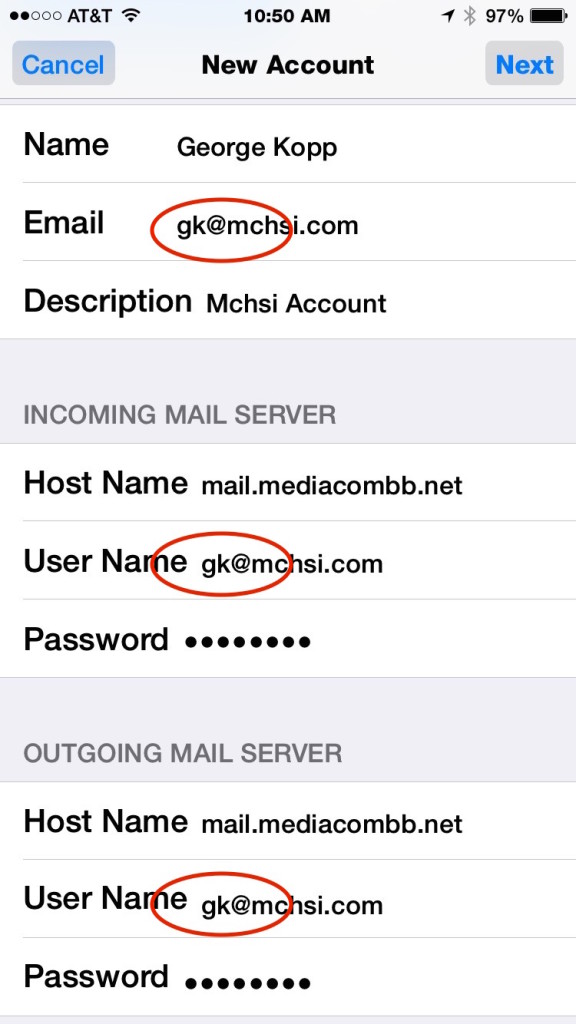
Finally the last step is to correct the fictitious email address you used.  In each of the three locations, edit your email address to the correct one. Press Next in the upper right corner.

You should see blue checkmarks next to the user name and password fields to verify you got them correct.

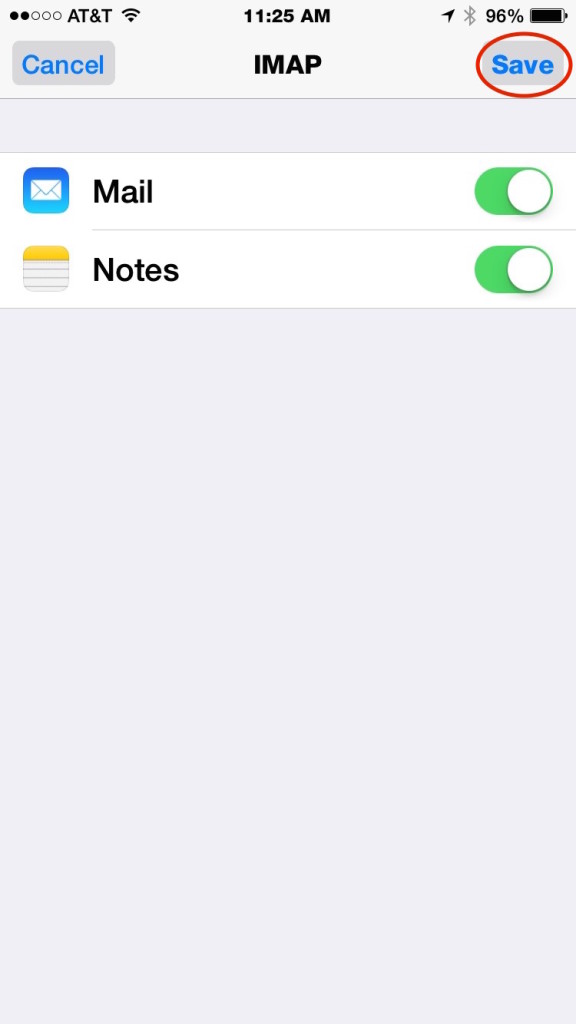
IMG_1723You will see that the account is setup for mail and notes.  Notes will allow you to share notes using the mediacom server between all your devices.  You can choose to leave it on or turn it off but if left on the notes show up in the Notes application on your devices.  Press Done and you are finished.

I have also tested this process for adding the account to my Mac and it works basically the same.  I suspect Windows will work similarly also.

With an IMAP account now you only have to look at your mail in one place and delete it one time and it will be kept up to date on all your devices.

AOL Users: Beware of Phishing Attempts

Recently, I have been dealing with a number of clients who use AOL and have had their AOL account compromised. Some of those report having recently received an email from AOL that their mailbox was full. They went to the link logged in and took care the problem themselves. But in fact, what they really did was give their AOL password away to someone with the intent of locking their account. Many of them had their entire address book deleted but only after emails were sent to everyone they know telling that they had been abducted and needed money to get away or that they were in jail and needed money for bail.

This is a very common phishing attempt that has been going around for long time. Some of my clients that continue to use AOL have their accounts for a very long time and don’t want to have to change their email address.  Even though many times I have recommended that they should get a different email address and leave AOL they continue to stick with it because they don’t want to deal with the effort of change.

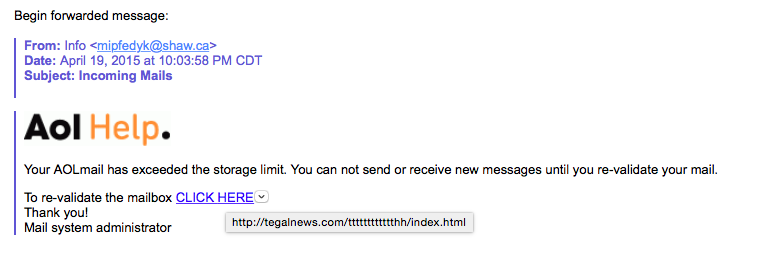
AOL remains one of the greatest risks for phishing in the email industry. People sending these phishing efforts realize that AOL users have used the system for a long time and as a result they realize they’ll do anything to continue to be able to use it. So these hackers send out emails similar to this:

Screen Shot 2015-04-20 at 10.09.23 AM

So let’s dissect this message. First look at where the email came from. That email address is not an AOL email address. But more importantly hover over the click here before you click.

Screen Shot 2015-04-20 at 9.43.10 AM


As you can see, it’s quite obvious it’s not taking you to an AOL server. But people in a hurry, forget these easy to use rules for staying safe. So let’s say it just one more time:

Never, Never click on any email link without seeing where the link takes you.  But then make a conscious decision that the link is going to someplace that makes common sense in the context of what it is supposed to do.  If it doesn’t, don’t click.  If your not sure, forward it to someone that can assist you in determining if it is something you need to do.

Using this common sense approach will keep you from having to deal with all the issues related to an email account being compromised.  Take the time to look forgot clicking.


Apple updates Mac OS and introduces new Photos Application

Screen Shot 2015-04-08 at 4.22.56 PMThe much anticipated update to Mac OS, Version 10.10.3, was released today and includes the often discussed new Photos application. I am been beta testing this application for quite a while and I’m happy to say that the release version is even better than the versions I’ve been testing.

Initially I have quite a bit of concern on the buggy state I had been seeing in the photos app but with the release today Apple seems to have truly cleaned it up and make it ready for the public. After converting my iPhoto library I find that much more of my information is now in photos than was there during the beta. My albums and slideshows all transfered without any problem.  The actual conversion took over an hour and a half but I have a very large photoScreen Shot 2015-04-08 at 4.15.42 PM library. I was also pleasantly surprised to see Apple added automatically created albums for panoramas, videos, Slo-mo, and bursts.  To be able to see these, you must go to the view menu and turn on the sidebar.

A couple of things that deserve being mentioned. During the first time you run Photos, Photos will ask you if you want turn on iCloud Photo Library. I would recommend not doing this until you assess what you’re photo space need would because you will likely have to purchase additional iCloud space for this to work.  Also during the initial run, Photos will automatically convert your iPhoto library. There are ways to go back and still use your iPhoto library in iPhoto but just the act of running Photos is going to run a conversion.

Screen Shot 2015-04-08 at 4.15.26 PMI’ve come to the conclusion that photos is a pretty good upgrade iPhoto after all. I would recommend if you update your operating system to move forward and give it a try.

Apple has some good information on the web about the features in the new Photos Application.  There is also a great article on The Verge that goes into detail about Photos and also the differences between iPhoto and Photos.

Apple needs to deal with phishing and junk mail on its iCloud servers

Phishing scams through email continue to be one of the biggest problems related to email today.  My email account sees dozens of these and quite often are able to deal with them as junk mail and get rid of them. But a real growing problem I see, is related to Apples iCloud email and pfishing.

imageiCloud email has never been very good at dealing with junk mail. Unlike Google who has extensive junk mail filtering enabled on their servers, at times Apples email system seems to just send everything through. You certainly have the ability, if you’re on a computer, to mark email as junk and hope that matching emails get put into the junk folder when they come in. Unfortunately, if you’re on one of apples premier iOS devices, you have little to help you because junk mail filters don’t exist. But more and more it seems like Apple with his iCloud email services are doing nothing at the server level to stop you from getting this junk mail and phishing scams. Email that is sent to a third-party provider may be difficult to filter  because that provider cannot determine if the email in legitimate but email that looks like it comes from Apple should be simple for Apple to filter out at the server level and save its customers the risk of mistakenly believing Apple is in contact with them. Here’s a glaring example.

Nearly every day I get at least one email that looks very similar to this. The people sending the email obviously want to make it look like it’s from Apple. But if you look closely, you can easily determine that it’s a scam. My real question for Apple is why they can’t determine these are scams and delete them before sending them to me. I am a savvy enough user to realize that this email is fake. But many users may not realize it that easily.

If you look at the email closely, the look and feel of it looks very similar to the minimalistic email formatting thatimage Apple commonly uses. It’s only when you look at the link that the scammer is attempting to get you to click on that you see that it’s actually fake.  If you actually click that link it takes you to a page that looks just like the Apple account sign in page. I always check these links before I click on them by holding my finger down on the link if on an iPad or iPhone until it shows me where it’s taking me. You can also click and hold with a mouse on the link and see the same thing if you’re on a computer. These kind of emails come from all different companies and always look as if they’re real. But here’s my real issue with Apple.

I can see no reason why a mail provider, that is hosting email itself such as Apple, can’t determine these phishing scams are being sent out in its own name. It would seem to me that Apple would want to stop these at the server level rather than subject users to the risk of accidentally clicking. But that certainly doesn’t seem to be the case.

So it bears recommending one more time for users to be extremely careful of the email that comes to them. It only takes one casual click, and the entering of your ID information, to allow someone access to your credit cards, your stored identity information, and cause you all kinds of problems that you’ll then have to deal with.

Remember, think before you click and make email safer. But I still believe, email providers need to step up and deal with this problem. It makes perfect sense to me that Apple does so little filtering at the server level when they can’t even filter out email that looks like it’s coming from them.