Having a problem with Your Mac? Start it up in Safe Mode to attempt a Fix

imagesStarting up in “safe mode” may help you diagnose problems you’re having with your Mac. In safe mode, the operating system does not load any application or process other than the base system functions.

Safe Mode is a way to start up your Mac that performs certain checks and prevents certain software from automatically loading or opening.

Starting up in Safe Mode does several things:

  • It forces a check of the startup volume, just like the First Aid feature of Disk Utility. You may see a progress bar on the screen during this check, and the computer takes longer than usual to complete its startup.
  • It loads only required kernel extensions.
  • It disables all fonts installed by the user.
  • It moves font caches to the Trash that are stored in /Library/Caches/com.apple.ATS/(uid)/  – where (uid) is a user ID number such as 501 (Mac OS X v10.4 or later).
  • It disables all startup items and login items in Mac OS X v10.4 or later.
  • In Mac OS X v10.3.9 or earlier, Safe Mode opens only Apple-installed startup items (such items may be installed either in /Library/StartupItems or in /System/Library/StartupItems). These items are different from user-selected account login items.

Taken together, these changes can help resolve or isolate certain issues that exist on the startup volume.

Here’s how to do it.

1. Shut down your Mac and wait 10 seconds.
2. Press the power button.
3. Immediately after you hear the startup tone, hold down the Shift key.
You should press the Shift key as soon as possible after you hear the startup tone, but not before.
4. Release the Shift key when you see the gray Apple logo and progress indicator (spinning gear).
To leave safe mode, restart your Mac normally without holding down any keys during startup.

Safe mode will often allow you to delete or remove something that continues to restart every time you restart the computer. It also allows you to run diagnostics or look to see if an extension to the operating system could be causing your problem. It’s not something you do every day, but it certainly can be helpful.

Get ready for your Trip to Yosemite

Screen Shot 2014-09-07 at 11.06.37 AMOS X Yosemite is the newest major operating system release for Mac users, versioned as OS X 10.10, and it’s due to be released soon. This release includes many new feature enhancements and refinements. I have been working with the Beta release and it looks to be a great release of OS X and all users that can update their Macs should do so.  But before you run the updater to install it on your Mac, there are a few things you should do just to ensure that your upgrade goes well.

Yosemite is super easy to install, and it’s similar enough to Mavericks and Mountain Lion that it’s unlikely most users will encounter any trouble with the update regarding app compatibility or system support. But any major new operating system releases offer a good time to run through some simple maintenance  to insure compatibility of the Mac itself, your apps, and also to do some general clean up and, the most important thing of all, back up.

So here are a few things you might want to consider before upgrading your computer to Yosemite

1: Check Mac System Compatibility

At it’s core, updating to OS X Yosemite requires the following:

  • 64-bit Intel CPU
  • 8GB of free disk space
  • OS X Lion or OS X Mountain Lion, or Mavericks
  • Internet connection so that it can be downloaded from the Mac App Store

If some of that sounds like jargon gibberish, but basically, if your machine runs Mavericks, it will run Yosemite. Apple is not published a list of machines but Yosemite will run on, but here’s the list for Mavericks.

  • iMac (Mid-2007 or later)
  • MacBook (13-inch Aluminum, Late 2008), (13-inch, Early 2009 or later)
  • MacBook Pro (13-inch, Mid-2009 or later), (15-inch, Mid/Late 2007 or later), (17-inch, Late 2007 or later)
  • MacBook Air (Late 2008 or later)
  • Mac Mini (Early 2009 or later)
  • Mac Pro (Early 2008 or later)
  • Xserve (Early 2009)

Perhaps the biggest requirement for many users will be having at least 8GB free on the Mac hard disk.  Don’t skimp here. Make sure you have enough free space for the updates before you start. Running the installer puts all of the new software on your computer and then removes the old. So additional free space is needed at the time of install to make it work well. Running out of space would not be a good thing.

2: Install General System Updates & Update Mac Apps

Keeping system updates and apps up to date is good policy for stability and security, but you’ll often get new features too. This can be particularly true when apps have been updated to support new major OS X releases, where a potential new feature built into the operating system may need to be independently included within the apps themselves.

Updating OS X and your apps through the Mac App Store is remarkably simple:

  • Launch the “App Store” from the Applications folder
  • Go to the “Updates” tab and choose “Update All”

3: Do Some General System Clean Up

Major OS X updates are a great time to perform some general system maintenance and clean up to help insure things are running well. Much of this is optional, but if you have the time it’s a good idea to perform some cleaning on the Mac:

  • Delete old apps you no longer use, usually tossing them into the Trash is enough but you can do a more thorough uninstall if desired
  • Trash useless old files from the ~/Downloads/ folder
  • Delete unnecessary caches from user folders and old apps
  • Clean up files from the desktop, either throw them all into a ‘cleanup’ folder or individually into their appropriate places in your home directory – this is an easy task that helps to speed up older Macs

Now go to the utilities folder inside the applications folder and run Disk Utility.  Select the Macintosh HD in the left pane and press the Repair Disk Permissions button.  Apple doesn’t say this is necessary, but I’ve seen far too many times but not doing this causes you problems down the line.

4: Back Up with Time Machine

Last but certainly not least, back up the Mac. Having back ups of your important data and files is very important, and Apple’s Time Machine makes it so easy to backup everything that there is little reason not to do it. Always, always, back up your Mac before installing a major system update. It’s unlikely something will go wrong, but if something does go haywire you can quickly recover if you have a fresh backup handy.

[stextbox id=”info”]For most general users, it is often good to wait a few days after the new OS is available to make sure there are no issues with it.[/stextbox]

That’s about it,  Now go ahead and download and enjoy OS X Yosemite, free is a great price for a great operating system update!

Once the install is complete I typically run the system updates again. This ensures that if Apple has patched the system beyond the release version you get those updates too. It also ensures that any Apple applications or vendor applications that have been updated for the new operating system get installed on your computer


Beware of the “tech support pass off”

imageRecently, I installed a new computer for an individual. I migrated all of the files over to their new computer from their old one and they were up and running. Unfortunately, their old computer had been around for a long time and so had the printer that was being used with it. While I was able to get the printer installed, it certainly was not very compatible with the new version of Windows, Windows 8.  I recommended that they purchase a new printer and give me a call if they needed help installing it.

Fast forward about two weeks. I get a call from the individual telling me that they are having more computer problems. They told me they installed the new printer, and had a few questions about its operation. The main question has to do with being able to print black print only rather than  color print on every print out. Since this was a seemingly minor question, they called the printer vendor for assistance. Once the printer vendor determined that this was not a functional problem with the printer, the vendor forwarded their call to a third-party support firm that could “help them with all their computer issues. ” Up to this point the owner did everything correctly. But the next step was a big mistake.

Somehow in the process of asking a question, the third-party company asked to connect to their computer. They made the connection, downloaded some software to do some testing, looked around on the machine, did some installs, and finally told them they were infected and full of viruses. Keep in mind, this is a brand-new computer installation and it would be very unlikely to have viruses infected already. But nonetheless, they showed the owner things on the computer that they said were problems and needed to be fixed. Then they told them that it would cost them $225 for some special software to be downloaded that would take care of all their problems. Keep in mind here, the initial question had to do with printing in black instead of color. Unfortunately, this unscrupulous third-party, never got around to that problem. They told them that the viruses were preventing the computer from printing in black.

Some of you may think this sounds ridiculous, but this is what we deal with in today’s world. Calling hardware technical support is certainly a reasonable thing to do. But allowing any technical support to pass you off to a third-party company that wants to connect and install software on your computer is a big mistake. My experience tells me that I’ve seen this much more often from printer vendors than any other.  Obviously, if there are viruses or spyware on this machine, it was this third-party companies software that installed them.

I know some of you will find this hard to believe, but the Internet is full of unscrupulous people trying to make a buck off of you.  How sad it is that this printer vendor is hooked up with one of these, but it’s easy to find many instances of the exact same issue.

One time when I was in a fun loving mood, I went to one of these websites that tells you they can scan your computer for problems and tell you whether you have any.  I ran their web-based software on my machine and it came back with hundreds of viruses and spyware issues on my computer. They then offered for $29, to sell me software that would fix all the problems. The funny thing about this was, the computer I ran the scan on the Macintosh.  Many of the viruses they told me I had, or PC only viruses.  Now obviously, I wouldn’t pay for their software, but this just goes to show there’s a sucker born every minute.  In an attempt to save a little money from hiring a reputable hardware and software support individual, people do this every day.

Unless you are an enterprise user Microsoft does not provide support for windows. The vendor you purchase the computer from must provide support for the windows software,  I have also seen other situations when people have searched the web looking for Microsoft support.  The links you find will all be these third-party support companies.  Never use any of these as often times they will get you into the same situation

The moral of the story is fairly simple. If someone you don’t know wants to connect to your computer and install or run any program, back away and hang up. I can  tell you that there are times when reputable vendors need to do this process, but in today’s world, more times than not, the problems only begin when you let these vendors work on your machine.

It is entirely reasonable to call a hardware or software vendor about their product. It is completely unreasonable to accept a handoff to a new third-party company, that has nothing to do with the original vendor, in these situations.  Contact someone you know. Someone you trust. Someone who can look at your computer and determine if there really are problems before you spend money on an Internet solution.

It is much easier, and less expensive for you to have a professional look at your machine, or answer your question, than it is to try to fix problems after the fact that are caused by one of these Internet solution providers.

Set Windows 8 to always launch desktop Internet Explorer

Screen Shot 2014-05-12 at 4.38.12 PMOne of the minor annoyances in Windows 8 is the fact that Microsoft is chosen to provide two versions of Internet Explorer. The windows 8 tile version of Internet Explorer is launched from the tile on the windows 8 start screen, While the desktop version of Internet Explorer is launched whenever you’re in the desktop. This is quite confusing for a lot of people. But there is a way to set Internet Explorer to always launch the desktop version regardless of whether you click on the tile on the start menu or run it from the desktop.

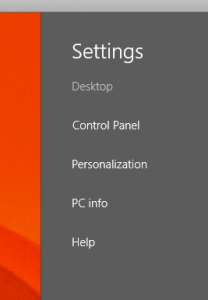
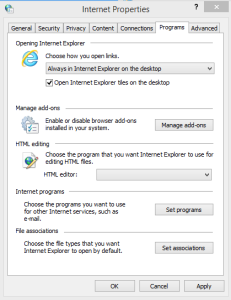
From the windows start screen open desktop. Now open the charms menu on the right side and click settings. Select control panels. This brings up the normal Windows Control Panel display. From the control panel change the view to large icons so that you can see the individual panels. Select Internet options. Next select the programs tab and change the opening Internet Explorer settings.Screen Shot 2014-05-12 at 4.42.07 PM

The settings I use are for choose how to open links is set to always in Internet Explorer on the desktop. I also checked the box that says open Internet Explorer tile on the desktop version. Now click apply and then ok.

Now, no matter how you open a link, or run Internet Explorer, it always opens the desktop version that you’re more familiar with.

When I try to eject my USB drive, why does my Mac think files are in use?

Screen Shot 2014-05-01 at 1.42.26 PMHere’s one that I bet has happened to most of us. You insert a USB thumb drive in your Mac to copy some files off. You copy those files off to the Mac and then immediately try to eject your USB drive.  Your Mac tries to reject the drive but finally comes back and tells you that the drive and use or some files on the drive are in use.

The situation has driven me crazy for years. But the reasoning behind what’s happening perfect sense. One of the great features of a Mac is that all your data is indexed to give you the ability to find things quickly. The software on the Mac that does this index is called Spotlight. Spotlight, being very efficient, immediately begins to index any new drive it finds plugged into your computer. USB drives, particularly solid-state drives like thumb drives are often very slow.  It takes a while to read and write files to these drives. What often happens is that Spotlight has begun indexing that drive and when you try to eject it the Mac sees files on the drive in use and refuses to eject the USB drive.

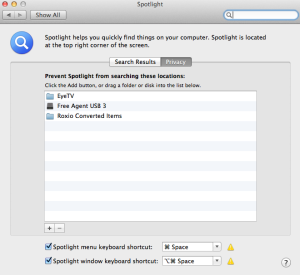
The solution to this is actually fairly simple particularly on a machine that you often Screen Shot 2014-05-01 at 1.42.12 PMplug the same drive into. All you need to do is go to system preferences and select spotlight. At the top of the Spotlight dialog is a privacy tab. Click on the privacy tab. Now you can press the plus icon near the bottom of the dialog and add your USB drive to the list of drives you don’t want spotlight to index. Even easier, you can simply drag the drive over-the-top of the Spotlight privacy tab and drop it. This adds your drive to the do not index list.

Now when you insert the USB drive, you can just drive copy files and then eject it.  Spotlight will not have started trying to index it and the drive will eject quickly and easily.

How do you know so many answers to tech questions?

Screen Shot 2014-03-06 at 4.14.17 PMMany people ask me how I know so many answers to tech questions.  Part of what I know is how to perform a good Google search.  Here are some tips from the Google Support site on how to do a good Google search.

Tip 1: Keep it simple

No matter what you’re looking for, try to start with a simple search like [where’s the closest airport?]. You can always add a few descriptive words if necessary.

If you’re looking for a place or product in a specific location, add the location. For example, [bakery seattle].

 Tip 2: Search using your voice

Tired of typing? Click the microphone icon in Chrome’s search box to search by voice.

Tip 3: Use web friendly words

Use words that are most likely to appear on websites. For example, instead of saying [my head hurts], say [headache], because that’s the word a medical site would use.

 Tip 4: Don’t worry about the little things

Spelling. Google’s spell checker automatically uses the most common spelling of a given word, whether or not you spell it correctly.

Capitalization. A search for [New York Times] is the same as a search for [new york times].

Punctuation. Most punctuation, like ?!,.%^*()[]\, is ignored when you search.

Tip 5: Find quick answers

For many searches, Google will do the work for you and show an answer to your question on the search results. Some features, like information about sports teams, aren’t available in all regions.

Weather. Search [weather] to see the weather in your location or add a city name after Weatherweather to find weather for a certain place.

Dictionary. Put [define] in front of any word to see its definition.

Calculations. Enter a math equation like [3*9123], or solve complex graphing equations.

Unit conversions. Enter any conversion, like [3 dollars in euros].

Sports. Search for the name of your team to see a schedule, game scores and more.

Quick facts. Search for the name of a celebrity, location, movie, or song to find important information.

Adding Security to Documents

Sometimes you create document that you want to provide some security that other people cannot see what’s in the file. Perhaps it’s a list of passwords or security information or it may be something like your Christmas list that you want to make sure your kids don’t have access to. Many applications give you the ability to add a password to an individual file and require that passwords use for the file open.  Some of these applications make it very simple to add a password while others work just as well but are a little more difficult to get it set up.

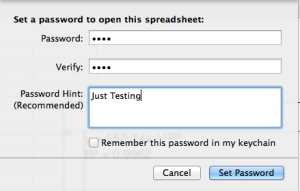
Let’s look at the process for adding a password to an Apple Pages, Numbers, or keynote file. Apple tends to make this process very easy.   They even add a pulldown menu item that allows you to provide a password for the file. You can save these files either and iCloud or on your hard drive but you must remember the password to be able to have access to open them.

Apple iWork

For this example also some screenshots from Numbers. The other two applications making up Apple’s office trilogy suite work exactly the same.

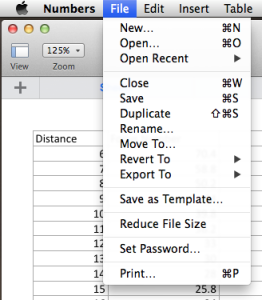
Screen Shot 2013-12-06 at 7.25.59 AMBegin the process by opening your document.  We are ready to add the password to the document simply select set password from the file menu. A drop down properties tab will open and give you the ability to enter the password, verify the password, and provide a password hint.

There is also a checkbox that allows this password to be saved your  Keychain file. If you check this box your computer will automatically open this file without requiring unit in the password. If the intended this is to continue to use the file on the same computer, it probably doesn’t make much sense to save the password any keychain. If you do anyone will be able to open the file on your computer. This still provides the ability to send this file to someone else and require them to know the password.

Screen Shot 2013-12-06 at 7.26.32 AM

Removing the password is simply as easy as repeating the process, keying in the password, and choosing the remove password button.


Microsoft Office

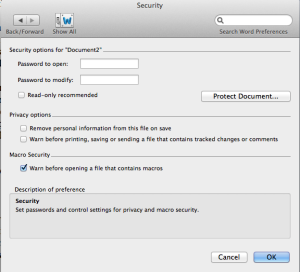
Microsoft also provides the ability to password protect files. These passwords are cross-platform so if you send the file to Windows user from a Mac or to a Mac user from windows password is left intact. Microsoft makes it slightly more difficult to set a file-based password but they do provide a nice help document that can walk you through it.

Screen Shot 2013-12-06 at 7.41.28 AMThe Process is very similar for Microsoft Word, Excel, and PowerPoint. We will use the word for this example.

Open your document in Microsoft Word. From the menu bar select preferences. Preference is divided into multiple categories. You need to select the security item under personal settings. From this dialogue you have the ability to set a password to be able to open the file and a separate password to be able to modify the file. This could be very handy if sending a file to someone else to review. You can set a password to let them look at the file without giving them the ability to change anything.

Other applications in these two application families work very similarly.

Sometimes security document is a necessary evil. The application you’re using today likely give you the ability to do this. Give it a try. But be warned, don’t forget the password!


Preparing for Major Operating System Upgrades

computer-upgradesOctober looks to be shaping up to be a big month for operating system upgrades. Microsoft has announced it on October 18 Windows 8.1 will be released. While Apple has not yet made an official announcement, there seems to be a lot of conjecture that OSX Mavericks will be made available in October also.  Many people quickly jump in and perform the upgrades without thinking about any preparation. Preparing to make one of these major upgrades is often a good thing to consider.

Regardless of which operating system you use, performing a major upgrade often puts your data at risk. While both Microsoft and Apple do extensive testing on their major operating system upgrades, often times things can go wrong very easily. Apple has the benefit of having a more closed environment so that it can test its operating system among many machines and many platforms to ensure that the upgrade go smoothly. On the other hand, Microsoft, which supports many more machine types and many more upgrade possibilities, has a more difficult time in testing these major upgrades. That’s not to say that either company doesn’t do everything humanly possible to ensure that their upgrade go smooth. It just says there are many possibilities that are hard to account for and doing testing.

So what’s the average user to do to ensure that their upgrade goes well. A little preparation upfront, and ensuring that your backup is up-to-date are the major things that you want to accomplish.

imgresWindows 8.1

More than a year in the making, Microsoft has been preparing for a major upgrade to windows. Since Windows 8 was released, many reports in the press have paned it as a poor operating system for the average user.  In post I made this blog, I’ve explained how Windows 8 is a fine operating system but only if you have a touchscreen machine. Unfortunately that recommendation doesn’t change much with Windows 8.1. Microsoft has spent a lot of opportunity to upgrade this operating system to take care of many things that people of complained about. Unfortunately the ability to use it on a non-touchscreen machine really hasn’t improved that much. That’s not to say that I wouldn’t go ahead and perform the upgrade if I have a Windows 8 machine. Windows 8.1 will add some nice new features and stability to the computer.

Before you begin the backup process you want to make sure that you have a good backup of your data. Unfortunately, in Windows 8, Microsoft backup utility is less than desirable.  This utility is fine for incrementally backing up changes to files made over days but not necessarily the best in the world for complete recovery.  The main thing to be concerned about is your user data. I recommend copying everything in your user folder over to an external hard drive. This ensures that you have it and can recover it if necessary.  Before you do this ensure that you turn on hidden files and folders so the data is stored in the application library can be moved to.

Once you have a good backup, perform the upgrade as you would any other Microsoft upgrade.  Since this is a major upgrade expected to take at least an hour, and ensure that you have your computer plugged into power if it’s a battery power unit.

imgres-1Macintosh OS X Mavericks

Since Mavericks is a major upgrade, the odds that Apple will require a small charge are very good. Like most Apple upgrades these days, they come from the app store. Login to the app store and purchase the upgrade. One important thing to note is that Apple provides license for you to upgrade up to five machines with each iCloud account that you purchase from. But the machine you use must be tied to your iCloud account for this to happen. Before you begin this backup ensure that your Time Machine backup is completely up-to-date.  If you click on the Time Machine icon in your menubar it will tell you the last time your time machine has updated.  I recommend going to the App Store and updating any applications you purchase there before you perform the upgrade to Mavericks.  Once you purchase it from the app store, it will download and begin the upgrade process.  This version is also a major upgrade to the Mac operating system so you should allocate at least an hour for the upgrade process to happen, and more time if you have a slow Internet connection for the download. Also if your machine is a laptop ensure that it’s plugged into power. Recent Apple updates have stopped in the middle of the process if you were not plugged into power and ensure that you plug it in before you start.

Keep in mind, these are pretty major upgrades. In all upgrades I would recommend waiting three days to a week before you apply.  This just ensures that the manufacture doesn’t find something immediately after the upgrade and put out another patch that you would have to later apply.

I want to reiterate the fact that both Microsoft and Apple put a lot of time into these major upgrades.  Having a backup of your data before you risk it to some upgrade only makes sense. The odds are highly in your favor that you will not need to use these backups but that doesn’t mean that you shouldn’t go ahead and have them.

Hopefully everything in your upgrade will go well. I have done some preliminary testing on both of these releases and fielder both a good upgrade for you to perform. Feel free to leave feedback as to how your upgrade goes.

How Many Email Addresses Do I Need?

Screen Shot 2013-10-02 at 8.29.08 AMPeople often ask me a question about their email.  They question whether they need an additional email address over the one that their Internet service provider normally provides.  For many people, using the Internet email address put your service provider provides is fine.  Some people, for business or professional reasons, would like to have an additional address that they can use for those purposes. Other people feel that an additional email address, to use for sites that they register on, or for companies who insist upon having your email address, is a good idea to help reduce spam.  I would like to advocate you have more than one email address that you use.  I think that it’s important for you to protect the use of your primary email address from it becoming a spam mailbox. Using an additional email address for this purpose is a good way to prevent that from happening.

But how many email addresses do I need?

There was a time when retrieving email from multiple providers was a difficult thing.  It often requires you to log onto different websites and retrieve mail one site time.  In some cases, it even require you to run a specialized piece of software provided by that email vendor that allows you to get email from them.  But these things of changed. Today is easy to configure your email client to pick up multiple email addresses and merge them together into a single inbox for you to look at.  It’s also simple to segregate those email addresses based upon the way you use them.  For instance, if you have one particular email address that you use for signing up for coupons, you can have all of those coupons put in one location that you can then look at at your leisure.

My rule of thumb is that many people need three email addresses. First off, you need your primary email address that you use with friends and family. These are people that you want to be able to contact, and you want to make sure that that email address does not get compromised with spam.  Secondly, I’m a strong advocate of using a throwaway email address, that you can get free from many providers, for signing up for things that you dont care if you lose contact with.  If this address is sold by someone who you’ve provided it to, and ends up on the spam list, you can easily delete this email address and create a new free email address for this purpose.  Finally, many people that work, have an email address provided by their employer. Others who work for themselves, have a need to segregate their work email from the personal email. So many people will need a third email address for this purpose.

Applications such as Windows live mail, or mail on the Mac, allow you to easily set up these email addresses to all be retrieved the same time, show up in a single inbox if you like, and provide rules for what to do with emails that are on specific subjects.  Even higher in applications such as Microsoft outlook allow you to do the same thing.  In this way, having multiple email addresses becomes transparent to you as a user.

Where do I get another email address?

First off, if you’re setting a new email addresses you may want to consider using a high-quality free email service is your primary personal email address.  This way, if something causes you to change Internet service providers, you do not lose contact with those personal friends and family that are most important to you.  My first recommendation would be to use Gmail for this purpose. Microsoft also provides Outlook email at Outlook.com that’s a free email and also has very good performance.  Apple will provide you an iCloud email address for free also. One caveat with the Apple iCloud email address. If you’re using iCloud on the computer to synchronize contacts and calendars, you can only have one iCloud address active at any one time.

Other providers such as AOL, or Yahoo, also provide email addresses for free. Many people consider AOL, Yahoo and Hotmail spamming email addresses due to the fact that these email addresses of been around a long time and are often thought of as email services with high spam content.  I would also caution against using one of these three email addresses as your business email address.  There’s something about doing business with someone with a Hotmail account that makes people uneasy.

[stextbox id=”info” caption=”Types of Email Arddresses”]

Personal Email Address – your most prized email that you protect aginst spam.  Only give this out to friends and family.

“Throw away address” – one you can give to everyone.  If it becomes too much of a spam pot, you can delete it and start over with another free one.

Business Email Address – an address that you use strictly for business purposes.

[/stextbox]

If you follow this idea, and have more than one email address, you’ll find that your primary email address it’s less difficult to deal with and you’re able to continue to use it for much longer period of time.

Should I Encrypt My External Drive on my Mac?

Screen Shot 2013-08-02 at 8.16.51 AMDeciding to encrypt your external hard disk on your Macintosh is a bigger decision than you might think. With Mountain Lion, Apple has made it very easy to encrypt an external drive. Encryption provides you the knowledge that someone will need the password for that drive to be able to have access to your files. In today’s world data loss and people getting their identity stolen, that seems to be a pretty good idea at least on the surface. But making the decision toI encrypt my drive needs to be done with some thought.

An encrypted disk works just like a regular disk image but requires a password to open and become available (“mount”). You can move files to or from an encrypted disk as easily as you can from a non-encrypted disk. You can certainly use keychain to store your password on your computer and keep you from having to type again each time you need to use the disk. But storing the password is just one more opening that reduces your level of security. If you truly believe you need your external this encrypted, storing the password for the encrypted disk on your computer is probably not a good idea. So this means each time you need to use the disk and you plug it into your computer, you will need to enter the password again. If security is your biggest concern, this is a small price to pay to know that your disk cannot be used by someone else if they get a hold of it.

But there’s another side of disk encryption. As we all know, hard disks fail. Disks fail for many different reasons. Sometimes the failure is related to the actual disk platter. Other times it could be the electronics on the drive itself. There are many utilities they give you the opportunity to be able to recover data off of the disc that is failed or near failing. There are also commercial services like Drive Savers that allow you to send the drive to them and have them recover for a hefty price. But one thing is very important to understand. While the odds of recovering data off of a failed or failing drive are certainly something less than 100%, the odds of not being able to recover your data from encrypted drive that begins to fail are closer to that 100%  level. It’s vitally important to back up any drive that you encrypt. You must begin with the understanding that a failing drive that has been encrypted is almost certainly a lost drive.

Encrypting the drive in Mac OS 10.8, Mountain lion, is fairly easy.

  1. Right click on the external disk on your desktop that you’d like to encrypt.
  2. Click on Encrypt ‘disk name’.
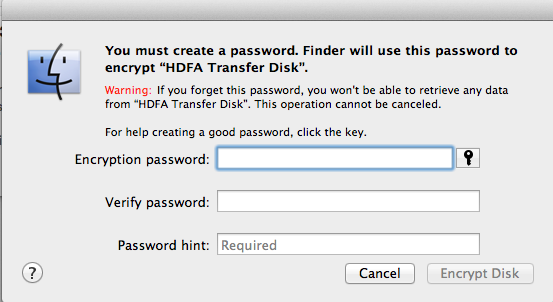
  3. You’ll now be asked to choose a password that you’ll need to gain access to encrypted content. Knowing this password is key to being able to access your drive. It is important for you to write it down and store it in a safe place or using an app like 1Password to keep it safe for you.
  4. After you’ve chosen your password and password hint, now click on Encrypt Disk.

Thats all it takes to encrypt your drive.

Screen Shot 2013-08-02 at 8.14.53 AM

Making the decision to encrypted drive is not one you want to make lightly. Give it some thought as to how important the data on your drive is and why it needs to be kept absolutely secure. Also think for a moment if you’re willing to deal with the multiple entries of that password each time you use the drive or connect it to a machine. If these issues don’t scare you off, Apples disk encryption is very secure. It certainly should keep your data safe in the long-term.