Computer Scams can really Ruin your day…

Having a bad day today?  Well it could be a lot worse.  What it you were surfing the web on Facebook and suddenly saw this?

IMG_1137 (1)

Many people have seen messages such as this, particularly by clicking a link on Facebook.  Don’t fall for this scam.  The real infection here is to get you to call the phone number, let them connect to your computer to “Fix” it, and then have them install real spyware.  Then they show you how the machine is “infected” and tell you they can fix it for $190 only to steel your credit card info and make charges to your card.

Don’t make an errant click into a terrible mistake.  Force quit your browser to get rid of the message and ignore it. NEVER call a phone number for a computer problem that pops up on your screen and NEVER let someone you do not know make a connection remotely to your PC or Mac.

This can happen anywhere on the web but lately, many people see this from clicking a link from Facebook.

iBooks Enhancements in MacOS 10.11.4

Screen Shot 2016-03-25 at 3.51.21 PMIn the last update of MacOS and iOS, Apple quietly added a huge new feature to iBooks.  iBooks has been a great way to store PDF documents on your Mac and on iOS devices to be able to reference them when you have the need.  One feature lacking has been the ability to store these PDF’s and have them sync with all your iOS and MacOS devices.  In the latest version updates there was the following update statement:

“Adds the ability for iBooks to store PDFs in iCloud, making them available across all your devices”

Finally, your PDF files transfer to iCloud and can be installed on other devices you own.  Unfortunately, Apple really did not talk about how this works.  In both the MacOS and iOS, a dialog box asked if I wanted my iBooks PDF’s stored in iCloud.  Upon agreeing, the PDF documents began to sync….slowly….

Apples help on iBooks added this section to describe these new features:

Sync and save PDFs
The first time that you open iBooks after you update to iOS 9.3 or OS X 10.11.4, you’ll be prompted to use iCloud. Learn more about syncing your books and PDFs using iCloud.

You can also add PDFs to your iTunes library on your computer by dragging and dropping the PDF into your iTunes Book library. The files will appear when you are preparing your device to sync. If you’re using OS X Mavericks or later, drag and drop your PDFs into your iBooks library using iBooks for Mac. All PDF or iBook files in your iBooks library are available to sync to your iOS device via iTunes.

To sync a PDF from your computer to iBooks on your iPhone, iPad, or iPod touch:

  1. Select your iOS device. (Learn how to sync your data with iTunes.)
  2. Under Settings, click Books.
  3. Select Sync Books.
    If iTunes is set to sync only selected books, make sure that there’s a check in the checkbox next to the PDF you want to sync.
  4. Click Sync.

    You can also use iTunes to back up your PDF files. To transfer PDFs to your computer and back them up, transfer purchases from your iOS device to your computer. These files are not in an iTunes Backup. Learn more about what’s contained in iTunes and iCloud backups.

But there are still a few questions:

  • Where in iCloud are they stored?
  • How much space is allocated to iBooks
  • Can I remove a book from any single device without deleting it?

I have searched the web extensively and no one is answering these questions so stay tuned to see if someone steps up and addresses the particulars of this new application feature.

How to Backup your Critical iCloud Information

icloud-experiencing-issuesIn the early days of iCloud, it was very common for something to go drastically wrong and iCloud and delete or scramble your data. After seeing this happen many times, I had gotten into a routine where I would back up my critical information by hand from iCloud.  For the last few years I haven’t seen this problem and have become quite complacent about it. Unfortunately, complacency generally feeds disaster, and in my case that almost happened.

The great thing about iCloud is that you can change something one time and it synchronizes around to all of your devices keeping them all up-to-date. Unfortunately that’s also the Achilles’ heel. If something goes wrong on anyone device or if you accidentally delete something from one device it synchronizes to all your devices and the information that you had before may be permanently lost. Such was my recent case with iCloud.

Somewhere along the line in updating to iOS 9.0 or 9.1, and updating my Mac to El Capitan, I came to notice that my Safari bookmarks or not the same as they used to be. Looking at them closely I saw that many of my bookmark categories had been duplicated, others had been rearranged, and if you were missing entirely. It seems that one of those upgrades did something nasty to my bookmarks. And since I had gotten out of the habit of backing up my critical information by hand, my only choice was to go back and fix them all by hand and let them sync again. So that’s exactly what I had to do. I set down at my Mac and made all my changes to get my bookmarks back as nearly as they had looked before the problem.

While investing a couple hours and cleaning up my bookmarks was probably not devastating, it did point out to me that continuing the routine of backing up your critical iCloud information makes good sense.

So what information do you consider critical? For me, that would be my contacts, calendars, Safari bookmarks, and my notes. Apple provides a method to back up by hand the first three but unfortunately the new notes application lacks that ability. So here’s how to handle a back up of the first three pieces of critical information that iCloud stores:

Contacts
Open the contacts application on a mac and go to the file menu and select export. Next select export archive from the menu. Pick a location to store your back up, and name it something that has the date included. This way you’ll be able to tell the newest one if you need to recover.

Calendars
Again on a Mac, open your calendars application go to the file menu, select export, and export a calendar archive. If you’ve been keeping track of calendars for a long time this may take a few minutes. It will again ask a location and I typically use the same naming convention I did with my contacts.

Safari bookmarks
Open Safari on your Mac, and select File and then Export Bookmarks. Pick the same location to store your back up, and name it something that has the date included.

Notes
When it comes to notes that’s another story. You can export individual notes as a PDF file but backing up hundreds of notes that way would be difficult.  If you want to dig down into the bowels of your computer, your notes file is actually stored in…

~/Users/<username>/Library/Group Containers/group.com.apple.notes

Once you selected that folder, you can simply go to the edit menu and say copy. Then paste that file into your backup location. If you can’t find it from the path you probably don’t need to be down in these folders in the first place.

Next I set a calendar alarm to remind me to do this once a month. By doing this monthly I am sure myself but for some reason iCloud has a hiccup, my information will be easily recoverable and reloadable.

iOS9: How about some tips and tricks

Screen Shot 2015-10-23 at 3.45.27 PMHere are some of the best iOS 9 tips and tricks that I have found since it’s introduction.

  • Proactive Assistant – New search feature accessed by swiping right from the home screen. You can turn it off in Settings> General> Spotlight searching
  • Keyboard – Many folks complained about the inability to tell whether the “caps” key was engaged or not. So, Apple gave us a keyboard with lower case letters by default. When you tap the “up arrow” on the left, the keys change to upper case.  You can change the keyboard back to display upper case keys all the time by going to Settings > General > Accessibility. Scroll down to “Keyboard” and tap there. Under Software Keyboards it shows a button next to “Show Lowercase Keys. Tap it off to return to all caps all the time.
  • Button Shapes – Go to Settings > General > Accessibility. Scroll down to “Button Shapes” and click on the button there. If you look at the top of the screen as you tap it, you will see a grayed area appear behind the text “General.” The grayed area will now appear behind many of the text buttons throughout your OS. For instance in Calendar app the text buttons on the bottom of the screen “ Today”, “Calendars,” “Inbox” will now show that grey background behind them making them standout from the white background.
  • Larger Text – Just tweaking up the size of the text displayed on the iPhone can really make a big difference when taking a quick glance at Contacts, Mail or Messages or overall system text. On your iPhone or iPad, go to Settings > General > Accessibility. In the Accessibility screen scroll down to Larger Text and tap there. A new screen appears with a sliding button that scales up or down for size of text. It is set in the middle by default, but you can actually see the text on the screen above the slider grow larger as you move it to the right. I set mine just one “tick” to the right of middle. If you click on the Larger Accessibility Sizes, you’ll see even larger text settings.
  • New notes – The Notes app has always been great for jotting down your thoughts. And now it’s great for so much more. Want an easy way to make a checklist of to-dos? Consider it done. Or add a photo, map, or web link to a note. You can even draw a sketch with your finger. And thanks to iCloud, changes to your notes will be updated across all your devices and on iCloud.com.
  • Public transit in maps – Now you can use public transportation with Maps as your guide. In select cities around the world, a new Transit view shows you lines and stations for subways, buses, trains, and ferries right on the map. When you plan a route, every step of your trip is laid out from point A to point B.  Not yet available in Missouri.
  • Shortcuts in maps search to nearby places – with the Nearby feature, it’s easier to see what’s around you and decide on places to shop, eat, and more.
  • Low-power mode – Across the entire operating system, apps and key technologies have been made more efficient to trim battery usage wherever possible — so you get more battery life for the things you do every day. Thanks to ambient light and proximity sensors, your iPhone knows if it’s facedown on the table and prevents the screen from turning on, even when you receive a notification. The new Low Power mode lets you extend your battery life even further.settings battery – also see what apps are using your battery
  • News app – iOS 9 adds a new app to your Home screen. News puts all the stories you’re interested in, all in one place — so you don’t have to hunt through different apps and websites to make sure you’re not missing the next big story. Articles are pulled from a wide range of sources, from top news organizations to indie publications. Stories are chosen for you based on what you like to read, and the more you use News, the better it gets at picking out just what you’ll want to see
  • Wallet app replaces passbook – Use Apple Pay to securely and easily make purchases with your credit cards, now including Discover. You can even access Wallet by double-clicking the Home button when your iPhone is locked. Soon you’ll be able to use store credit cards, like Kohl’s Charge or JCPenney Credit Card. And you’ll be able to add rewards cards, like Dunkin’ Donuts DD Perks, Walgreens Balance Rewards, and MyPanera, to your Wallet app and receive and redeem rewards
  • New Wallet Features – Double-click from off to pay with wallet or choose a different card
  • New App navigation – Link back to where you came from with “back to”
  • iCloud drive application – The new iCloud Drive app built into iOS 9 allows you to access any file you save to iCloud from just one place — right on your Home screen. Easily search within the app and find the file you’re looking for. Browse all your files by date, name, or any tags you added on your Mac. You can also preview and organize your files without leaving the app.
  • Find my phone and find friends preinstalled
  • Set a reminder about what’s on the screen – Say remind me about this to Siri
  • New Siri preferences – Turn on hey Siri, Silence Siri, and have it learn your voice
  • Slide Over – Now you can open a second app without leaving the one you’re in. So you can quickly browse the web, respond to a text message, or jot something down in a note, then slide that app away and get back to the one you were using before. (iPad only)
  • Split View – With Split View, you can go a step further and have two apps open and active at the same time. Work on a sketch with the reference photo beside it. Or write a paper while copying citations from a book in iBooks. When everything you need is right in front of you, it’s easier to focusSearch inside settings (iPad 2, iPad Mini 4, and iPad Pro only)
  • Picture in Picture – While using FaceTime or watching a video, press the Home button and your video screen scales down to a corner of your display. Tap to open a second app, and your video continues to play — even while you use the other app. So keep watching your favorite TV show while you reply to the email that just came in. (iPad only)
  • Wi-Fi assist in settings cellular – Allows you to use Celular for data when Wi-Fi fails (Uses data from your celular plan)
  • Six digit passcode -Keeping your devices and Apple ID secure is essential to protecting your personal information — like photos, documents, messages, email, and so much more. iOS 9 advances security by strengthening the passcode that protects your devices
  • Quickly trash all mail – hit edit button to trash all
  • Add attachments in mail – Press and hold to add attachments from iCloud Drive.
  • Better upgrading process – iOS 9 does even more to efficiently stream new updates to your device without having to first download and unpack them — which means you don’t need as much free space to update
  • Disable shake to undo – in accessibility
  • Check Your battery in Notifications and Widgets – Pull down from the top of the screen
  • Pinch to zoom in video – When watching some supported video, you can now pinch to zoom in
  • New smart albums in Photos for selfies and screenshots
  • Directly select photos by gliding over with your finger
  • Hide photos in your photo library – Hide tyhose photos in your library you dont want others to see when they look at your device
  • Request safari desktop site and turn off content blockers on the fly – by pressing the reload icon.
  • Quicktype – Shape up your text in no time with an all-new Shortcut Bar, convenient editing tools, and a handy new way to select text with Multi-Touch gestures. And now when you use a wireless keyboard with your iPad, you can enjoy even more keyboard shortcuts. You can even use your on screen iPad keyboard as a mouse!
  • Safari Content Blockers – Safari content blocking extensions don’t automagically identify ads and prevent them from loading. Instead, they identify elements and resources on a web page and can, optionally, hide those elements and prevent those resources from loading. The goal is to show how fast the modern web—read: Safari—really is when you remove all the extraneous code that’s been dumped on top of it.
  • Find on the page in Safari – Safari has a Find in Page feature, although it’s a bit hidden. To perform a search for words on the current page, tap the address bar and type your search. Tap the Find option under On This Page at the bottom of the list to search the current page
  • Safari Reader Enhancements – Customize safari reader mode with color and font and Background

iOS9: Viewing the Desktop Site or turning off Content Blockers

imageWhen browsing on the iPhone or iPad, many times the site you see is different from the normal website.  You may be seeing the mobile version of the site.  This is often a better view because the dite gets formatted for a small screen.  But sometimes, the mobile site does not give you everything you need to see.

Another issue you may see is that now that we have the ability to instasll content blockers, these blockers may get in the way of seeing the full view ofthe site.

In iOS9 it is easier to view the desktop site or temporally disable content blockers. All you need to do is it press and hold the reload site icon in the URL bar to get two options to releave these problems.  Once you press and hold the reload icon you get the options to reload the full desktop site or to load the site without the content blockers you have installed.

This allows you to easily get all the information you would normally get from a full web browser on a computer,

My iCloud doesn’t seem to be syncing any more…

imgresHere’s a problem that a number of people have seen since upgrading their Mac or iOS device.

Have you ever wondered if your iCloud information is truly syncing? Sometimes you add a new contact, or a new bookmark, and can’t seem to get it to move to your other devices. ICloud is supposed to sync automatically and normally it does. But once in a while, particularly after an update, I find that parts of iCloud seem to stop syncing. So what’s a person to do.

The easiest way to get iCloud to sync again is to simply toggle off the offending item, such as contacts or bookmarks in the iCloud settings on either your phone or computer. By simply turning it off, and then turning it back on, often times the sync resumes normally. Generally, when you turn the sync back on for the particular item such as bookmarks, iCloud will ask if it’s okay to merge the information from your device with the information in the cloud. Since most of the information is the same, merging will accomplish the sync that you’re looking for and put all of the information on your device. So when asked, Tell it that it’s okay to merge.

While we all realize, we shouldn’t have to go through this process, this is certainly a simple method to get all of your information in iCloud back in sync on all your devices.

Maintaining your iOS device -in a few easy steps

image

Problems with Free Wi-Fi Hotspots

imageQ: I have had increasing issues connecting to WiFi with my phone from free access locations at airports and motels. I get messages like “server not available” or “cannot connect to server”. So far, I have gotten around the problem by turning off WiFi and relying on cellular connection. However, I want to solve the problem, because once we are traveling to Canada we will rely on WiFi to send emails. Any explanation or suggested remedy?

A: I often times see the same thing coming from free wireless connections. In many cases you have to chalk it up to you get what you pay for. These free Wi-Fi connections are many times not very good and even more often don’t work. I find this to be very prevalent in airports.

But there are a couple of other things to consider when you connect to the free Wi-Fi hotspot. I’m finding more more often that these hotspots require you to open the Safari browser after you make connection to them and agree to some hold harmless agreement. I think the lawyers have gotten involved and people who offer free Wi-Fi are afraid someone will use the Wi-Fi for illegal purposes.  They allow you to connect, but unless you immediately go to Safari and agree to their license agreement, which often comes up automatically if you run Safari immediately after connection, you don’t actually have any Internet access.

The other possibility is that some of these are not truly free Wi-Fi sites. They may be connections other people are offering from their computers in the hopes of someone connects  Then, once connected, they are able to scan their computer for private information. It’s very hard to do this on the Mac, and nearly impossible on an iPhone or iPad, but on a Windows machine if you connect to one of these fake hotspots, and don’t have your firewall turned on, a thief can scan your computer for all kinds of private personal information. People create these fake access points hoping to get unsuspecting individuals to connect to them.  Nothing to really worry about with a Mac or an iPhone, but frustrating because they act exactly as your are describing when you try to connect to the Internet.

Finally, many free wireless hotspots, particularly at hotels, will not allow you to send email. They block the email ports in the Internet connection to keep you from using their systems to send out spam. I found this happen a lot in nicer hotels.  In fact, when I was traveling for business, it almost went without saying that if you paid for Wi-Fi at a hotel, it would always have mail blocked.

The best thing I can tell you, is to only connect to the  hotspots that your sure are legitimate. If a business says they offer a hotspot, it’s usually a good one to connect to. But if you see one named something similar to “Free public Wi-Fi” I find 90% of the time these are scams so only connect to one that you’re familiar with.  Also keep in mind that the only benefit of providing a free Wi-Fi connection to a business is marketing, so restaurants, and hotels, tend to put their names in the Wi-Fi connection. If you see an unlocked connection with an odd name you’re not familiar with it’s probably not one you want to connect to.

Those are just some of my thoughts.  Rest of shared, it’s not you or your devices that are having the problem, Everybody sees the same thing and has the same problems.


Google photos: the photos service that Apple should have developed

imageThe world of photos storage and manipulation, for the average user, has been turned on its head this spring with Apple releasing its new photos app to replace iPhoto, and now google introducing its own photos service that replaces Google+ photos and Picassa. Also the spring, Yahoo has greatly enhanced it’s Flickr service as a competitor to both the big dogs. With all these options for photo storage and manipulation, how does a person make a choice?

So let me start off by being perfectly clear. If you’re a Photoshop user these are not competitive products to you. If you use Lightroom to store your photos, then these are probably not services you’re going to have interest in either. If you were an Aperture user and Apple abandoned you, you’ve probably already looked into lightroom and likely selected it as your new system. But if you were in iPhoto user, someone who uses Windows Photo Gallery or still a Picassa user, the time is right to look at your other options.

I’ve written about Apple photos before and described how it was a good start at a new photo application for Apple. If you’re a Mac User this may be all you need. But if you’re a Windows user, or you’d like to get your photos into the cloud for storage without paying an arm and a leg, the other options are quite compelling.

imageNow I like Flickr. Flickr is very well developed and with its new release has many features that people will find very useful for dealing with their photos.  If your a Flickr user and have already worked out a workflow for putting your photos up at Flickr, then I see no reason to make a change. But if you have photos on your computer, that are haphazardly stored in folders, Google photos maybe just the ticket for you.

Like most Google services, Google photos is available as a web service in your web browser. First off you have to have a Google account to use the service. If you have a Gmail address you already have the account set up.  Once you connect to Google photos you have the ability to be able to put photos into the service and have them backed up. One of the benefits of Google photos is that they allow you to store up to 16 megapixel images uncompressed for free. If you’re using a camera that takes larger images, photos will down sample the image to that size or you can choose to pay for storage space to store full size images. For most users using the free unlimited storage is good enough.

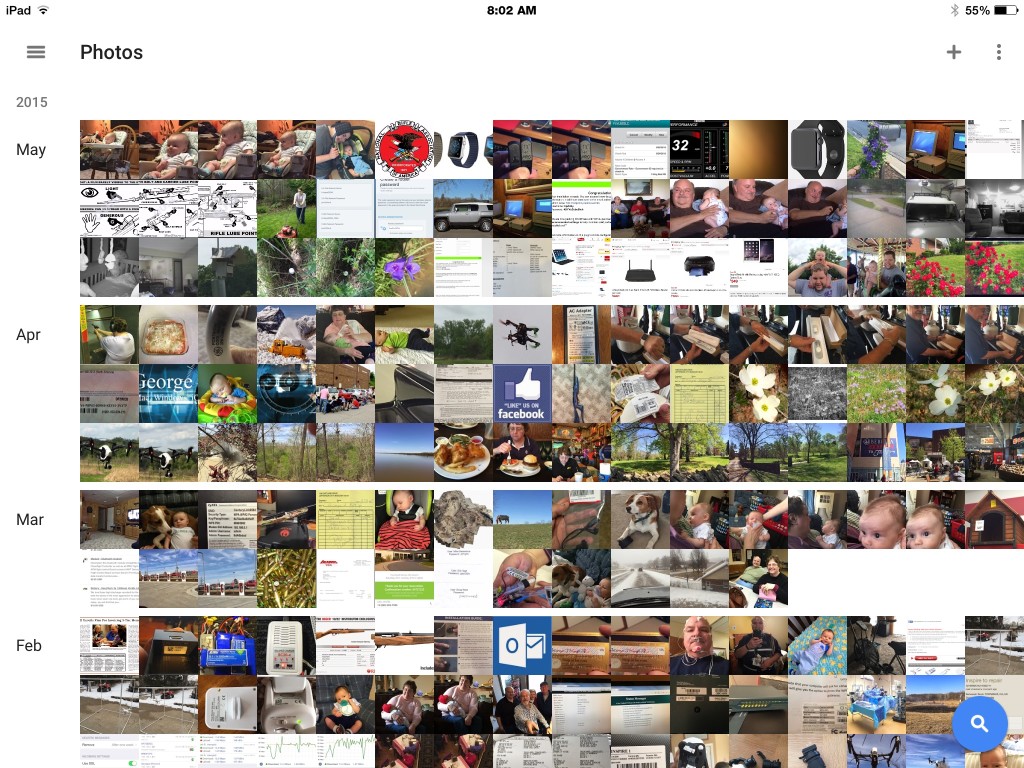
So what makes Google photo special? Google photos has a lot of intelligence built-in similar to what iPhoto users had been used to with faces and places. Google photos gives you the ability to put photos up and then Google uses their algorithms to scan those photos to help organize them in a very simple way.

imageGoogle has made available a small application for both Macintosh and Windows users that allows you to automatically upload any photos on your computer. This application runs in the background and will send any new photos up to Google photos as soon as they’re on your computer. This makes using Google Photos extremely easy. You basically continue to work with photographs the way you always have and Google Photos sends copies of those photos up to their web service and stores them for you as a backup. If you’re in computer user that has photos stored on your computer and is not religious about backing them up I see no reason to not use Google photos just for that service. Even if you do nothing with the photos you put up in Google photos, just allowing Google to back them up for you at no cost is a big win. To do this you don’t even have to go to the website, you can just download the small application, run it, and let the backups begin.

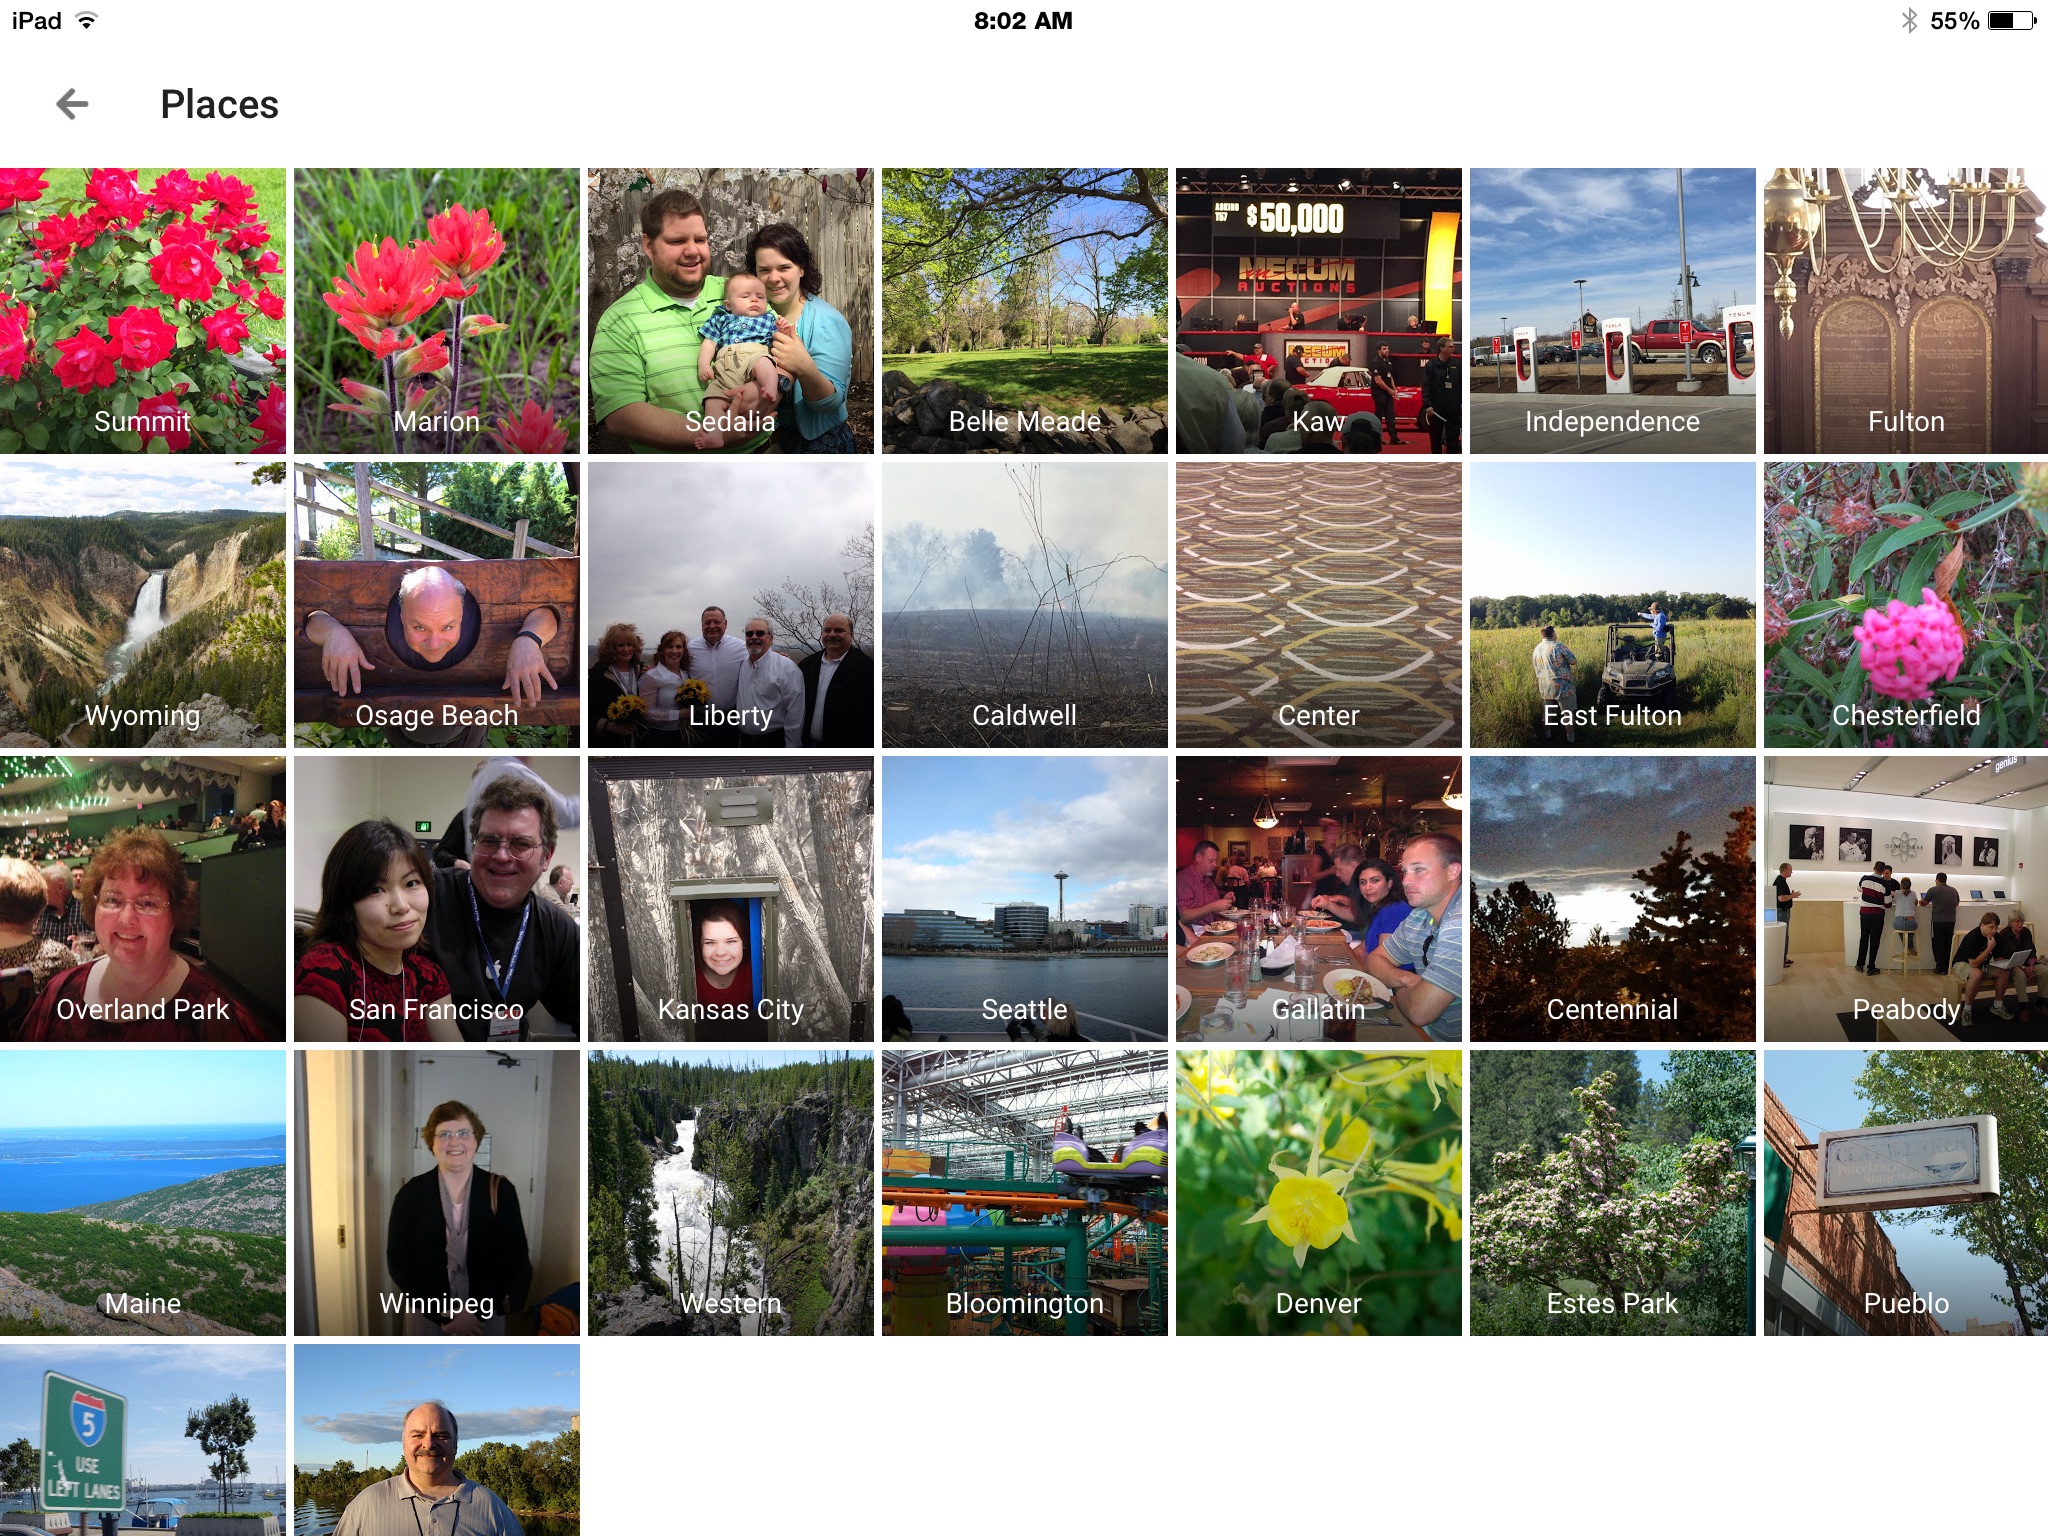
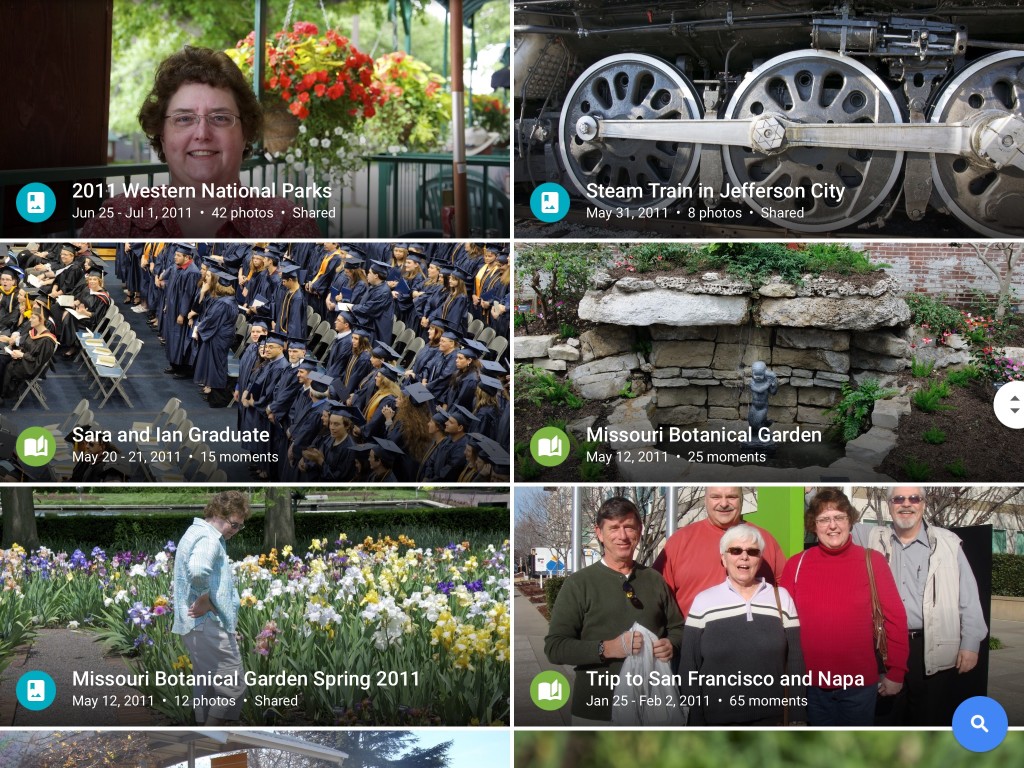
But some of the real power of Google photos begins once your photos are stored with Google. As your photos are put online in an area that is secure and only accessible to you, Google analyzes these photos both by reading the metadata and also by analyzing the image itself. From this Google automatically creates things called stories that are basically short booklets of images that are related often by time or location. You really have to see this in action to understand it. I’ll tell you upfront I was pretty amazed. In addition Google organizes photos by peoples faces, locations, and generic terms such as lakes, mountains, flowers, and helicopters. I am certainly not very good at tagging my photos but the way Google analyze them and puts them into groups was amazing.

imageHere are some of the things googles literature says that it does.

• VISUAL SEARCH: Your photos are now searchable by the people, places and things that appear in your photos. Looking for that fish taco you ate in Hawaii? Just search “Hawaii” or “food” to find it even if it doesn’t have a description. Note: Face grouping is not available in all countries.
• AUTO BACKUP: Keep all your photos and videos safe and accessible from any device. Choose free, unlimited cloud storage available at high quality, or store up to 15GB original size for free (shared across your Google account).
• SAVE SPACE ON YOUR DEVICE: Google Photos can help you clear safely backed up photos and videos from your device so you never have to worry about deleting a photo to make space.
• BRING PHOTOS TO LIFE: Automatically create montage movies, interactive stories, collages, animations, and more.
• EDITING: Transform photos with the tap of a finger. Use simple, yet powerful, photo and video editing tools to apply filters, adjust colors, and more.
• SHARING: Share hundreds of photos instantly with shareable links and use whichever apps you’d like to share.
You can read more about some of the amazing things Google photos can do on Google’s website at http://www.google.com/photos/about/

Google currently has applications for photos on the iPhone, iPad, and android devices. And for first releases, they are very good.  They also promise native apps for Macintosh and Windows coming soon.

So if you don’t have a photo storage strategy, or your strategy has been blown apart with the discontinuing of iPhoto, or even if you just want to try a good way to back up your photos automatically, I highly recommend Google photos as your new photo storage service. I’m not completely counting out Apple photos at this point, but Google photos is the app Apple should have released. So I’ll continue to use the Apple photos app in addition to Adobe lightroom to manage my imagery, but I’m going to let Google backup my photos because I can see the amazing potential of what they released this week.

New Mediacom Mail Server allow for IMAP mail

PLEASE NOTE:  Since the article was written, the Mediacom server settings have changed.  The setup instructions still work but the outgoing server settings need to be changed.  Use  Outgoing:  smtp.mediacombb.net, Using SSL, Port 587, Authentication required

If you are a subscriber to Mediacom, you may have gotten an email telling you that your mail account has been moved to their new server. Typically they send an email about a week before they’re going to do it and then again I’ll follow-up email telling you they’ve completed it. The email that you get for completion may look like this.
Screen Shot 2015-05-01 at 10.59.47 AM

One of the features provided in Mediacom’s new mail service is the ability to use IMAP mail.   These days most of us look at mail on more than one device. IMAP email allows you to leave your mailbox on the server rather than downloading all your mail to each device. This way if you delete one message from any device it gets removed from all devices.

You can set this up on your iPhone or iPad but it does require a little bit of trickery to get it to work. Setting it up on a Mac needs to be done in the same way.

The first step in the process is to go into settings: Mail contacts and calendars: and remove your existing Mediacom account from your device. Any mail you have left on the server Will come back down when you readd the IMAP account.  But if you have mail that’s fairly old it may have been deleted from the server so be sure you’re willing to do without that if you delete your account.

IMG_1715

With your account deleted you’ll need to go through the process of setting up a new mail account on your iOS device.

IMG_1716

Go to Settings: Mail Contacts and Calendars and select Add Account.

IMG_1717Select Other for the account type

IMG_1718

Select Add Mail Account

IMG_1719

Now here is where you need to trick the iOS mail setup application.  Apple’s auto mail setup goes out to look for the correct settings and unfortunately defaults to setting up the email as a POP account again.  So we will use a fictitious email address to trick it.

Enter your name and then enter an email address where the first part of the address is incorrect.  Be sure to use the correct portion of the address that comes after the @.  For instance, I entered gk@mchsi.com but you could also use something generic like xx@mchsi.com too.  Enter your password correctly and give the account a descriptive name.

IMG_1720


after a few seconds of looking out the server information, you will see the cannot get mail dialog popup.  This error is correct since you used an incorrect email address. Press OK.

IMG_1721

Next change the toggle at the top from POP to IMAP.

IMG_1722

Finally the last step is to correct the fictitious email address you used.  In each of the three locations, edit your email address to the correct one. Press Next in the upper right corner.

You should see blue checkmarks next to the user name and password fields to verify you got them correct.

IMG_1723You will see that the account is setup for mail and notes.  Notes will allow you to share notes using the mediacom server between all your devices.  You can choose to leave it on or turn it off but if left on the notes show up in the Notes application on your devices.  Press Done and you are finished.

I have also tested this process for adding the account to my Mac and it works basically the same.  I suspect Windows will work similarly also.

With an IMAP account now you only have to look at your mail in one place and delete it one time and it will be kept up to date on all your devices.