iOS 8 and iPhone 6 Impressions

Screen Shot 2014-09-21 at 6.33.38 PMApple has hit another home run with the new iPhone 6. I selected the smaller of the two devices because I felt like it better fit my lifestyle. The new iPhone 6 is dinner yet has a larger screen than my previous iPhone 5s. It also seems to be faster. But the real star of the show will be the new Apple pay when it becomes available in October. Apple pay will give us the ability to use our phone to make purchases securely. That’s the real killer feature of the new phone. So if you’re closing your contract or have a need or want to upgrade to a new phone, seriously consider the iPhone 6. It’s a very nice phone with a great screen and under contract still at a reasonable price.

Whether you purchase a new iPhone 6 or not if you have an iPhone, iOS 8 is a terrific upgrade. iOS 8 is compatible with iPhone 4s, iPhone 5, iPhone 5c, iPhone 5s, iPod touch 5th generation, iPad 2, iPad with Retina display, iPad Air, iPad mini, and iPad mini with Retina display. So it looks like the iPhone 4 is not going to make the cut. If you perform the upgrade directly from the phone it looks like it’s going to require about 5.5 GB of space for you on your phone. But if you connect your phone or iPad to iTunes, the free space on the phone requirements are dramatically reduced. I was able to update one device with as little as 2.5 GB free.
When you perform the update, there’s lots to like about the new OS. Unlike the last release, the look and feel of iOS 8 will not be dramatically different than iOS 7 was. Many people have a difficult time with the transition from iOS 6 to iOS 7 because the look and feel was a lot different. You won’t see that with iOS 8. The features in bedded in iOS 8 are a little more self. You have to take a look at the list of what’s available to find some of the new things. But it’s well worth looking at.
Some of the things to check out in the new update are:

  • Safari extensions
  • Updates to the Camera application
  • More extensive use of touch ID if you have an iPhone 5s or newer
  • Interactive notifications
  • Updates in the Messages app to allow you to send voice messages and video messages
  • Third-party keyboards
  • Easier ability to delete emails
  • Family sharing
  • Apple’s all new health kit

And those are just the highlights.Iowa State is an excellent update. And if you have a newer phone or a newer iPad it’s all free.

I always recommend making a back up of your device in iTunes before you start the update. And then allow yourself to to three hours for an average update. The larger the memory space on your phone the longer it will take.

And as always, if you feel uncomfortable with making the update yourself, or would like a little assistance, feel free to get a hold of me.

Posted in iOS

Own Android but Tempted by the New iPhones?

Screen Shot 2014-09-17 at 10.21.37 AM

Apple just continues to innovate. Sometimes it’s actually amazing. But not everybody owns an iPhone right now. Many people choose android, and that’s a good solution also. But once in a while, people want to change platforms for their phone. Go from my android phone to an iPhone. And some vice versa. Apple has a new website it gives you information on how to get data over from android to an iPhone. Some of the suggestions are purely common sense but others are really good ideas for being able to get all the stuff that you have from your android phone over to a brand-new iPhone.

So if the new iPhones have you tempted, take a look at the site to see what it’ll take to get your phone information moved over to an iPhone.

Get Ready for iOS 8!

Screen Shot 2014-09-07 at 11.32.00 AMWith Apple about ready to release iOS 8, it’s always good to go back through the list of things that you need to do to prepare before updating your phone with a major operating system update. If you follow these simple steps, the odds of your update going well are greatly increased. Over the years Apple has made installing new updates pretty simple. When the update is ready it will show you on the device by showing you a small red number on top of General icon in the Settings application.  But many times if you go into system updates and check for an update it will show you it’s available before the icon shows. If you’re in a hurry to update, you might give this a try.

1.) Check to see if your device is iOS 8 capable

The iOS 8 update is compatable with the iPhone 5S, iPhone 5, iPhone 5C, iPhone 4S, iPod touch fifth-gen, iPad 2, iPad Air, iPad mini with Retina Display, iPad mini, iPad 4, and iPad 3.  If Apple releases any new devices, iOS 8 will be standard on them.

Screen Shot 2014-09-07 at 11.33.05 AM

2.) Make sure you have enough space for the update

iOS 7 required 700MB of space and while its unknown how much its successor will require, you can be sure its going to be similarly large amount. Apple will prompt you before downloading if you do not have enough space, so either way you will either have to get rid of some unnecessary apps, photos, music/TV shows/movies or other data you might not need right on your device .  One place that I see space often used on iOS device is in the camera roll. If you sync your photos over to your computer and delete them from your phone that will free up that space. You can always put photos back on the phone using iTunes at the time of sync.

You can check how much space you have by going into settings and then general.  Select about and then it will tell you in the list how much free space you have on your device. iOS updates often have additional applications updated too. Apple generally updates many of their apps at the time of the system update so you’ll need additional space for those. Don’t cut your space to close.

3.) Is your device running iOS 7.1.2?

To update to iOS 8, you’ll likely need to be up to date with the latest iOS 7 version, meaning you won’t be able to switch unless you’re running iOS 7.1.2.

4.) Do you have the latest version of your apps?

If you don’t want to lose your app or its data, make sure they are up to date. This will also ensure you get the most out your apps in iOS 8, as they will have been tinkered with for iOS 8 integration. Just check for updates, and apply all updated applications that you find prior to the operating system install.

5.) Back up your device!

This is the most important step you need to take before updating. While everything is done to ensure the transition to iOS 8 goes smoothly, major updates can go awry. To back up, simply follow these steps:

  • Connect your iPhone or iPad into your Mac or PC and open iTunes.
  • Select your device under Source and select “Summary.”
  • Under “Backups” select “This Computer” and then “Back Up Now.”

I also recommend encrypt in your back up. If you encrypt your back up, and give it a password that you have to enter when you restore it, all of your passwords that you stored on your device will remain. This keeps you from having to go back in and reenter passwords in applications, or mail, before you can use the new OS.

[stextbox id=”info”]For most general users, it is often good to wait a few days after the new OS is available to make sure there are no issues with it.[/stextbox]

That’s about yet. You’re ready to go. Enjoy the new OS. All the new features will be great fun to play with.

Posted in iOS

“Wink” Provides and Integrated Approach to Home Control

Screen Shot 2014-09-02 at 1.18.02 PMI’ve dreamed for years about having a home that I could control electronically. Turn lights on and off from my phone, change the temperature of the thermostat, and open and unlocked doors. Over the years I’ve tried a number of products and many have worked very well. The one thing they lack was an integrated approach to being able to handle the controls.

A new product called Wink provides the ability to be able to control many other vendors devices from a single application. Just released in July, this unit allows you to connect other devices into a single integrated approach. While every device I have does not connect today, the open API provided should allow other vendors to make their connections work. This is the same approach Apple has to their HomeKit integration. While I’m absolutely sure that Apple’s products will be terrific, there was one thing I really IMG_0191liked about the Wink system. Wink has a single home unit that includes multiple radios to be able to connect to nearly any type of device. Wi-Fi, Bluetooth, zigbee, and Z-wave radios are all included in the device. These multiple radios allow many vendors devices to be able to connect and integrate together. The real beauty of this approach allows a best-of-breed solution for home control. You can purchase devices that do the best job of providing a particular home control service regardless of how they connect with each other or with other devices you already own. This approach gives you the best opportunity to find the perfect device that fits your needs.

I’m trying out the Wink system in my own home. I was able to purchase two Lutron light switches and get the Wink box for free through a special offer Wink has at the present time. These light switches were easy to connect to each other and to the app on your phone. So the Z- wave radio within the Wink device connects them to my wireless network at home. Then I can use the Wink app on my iPhone to be able to control the switches

IMG_0192Wink also provides the ability to script actions that can be put together. An example is a single button that can turn all the lights in the house that are connected to control switches off. It also has the ability to create what it calls robots. These robots are scripts that are basically if then situations. If a particular light turns on to 100%, then turn another light off. You get the idea.

Wink has committed to providing connectivity to as many devices from other vendors as possible. I’m anxious to see if I will be able to control my nest thermostat and my WeMo light switches through this same application. If Wink continues to develop the way it looks like they have, I look forward to a day where a single app on my phone may be able to control all my intelligent devices in my home.

But Apples HomeKit will be a contender also. So as I purchase new controllable devices, IMG_0190I’m keeping my eye open for support for HomeKit too. That way if HomeKit becomes the better solution, all the devices I purchased can be used with it. Since the Wink controller was provided at no cost with the purchase of the two switches I just bought, I had no investment to lose by giving this a try.

Wink devices are available through Home Depot at Amazon.com.

I’ll continue to give updates on how I’m doing with Wink and home control. Hopefully that control I’m looking for in my home is just around the corner.


Internet Slowdown Problems

Screen Shot 2014-08-15 at 11.26.09 AMQ: Lately I’ve noticed that the internet has slowed down a great deal. I also tried to purchase music at iTunes and got an error message, three times, that the network connection had ‘timed out’

A: In my experience Internet slowdowns are often a result of two things. Obviously it could be a slow down at the cable company providing the service. But the second thing actually happens more often. The devices that connect us to that Internet sometimes get confused. These are boxes at tend to run 24 hours a day so any little glitch can cause a problem. The first thing I always do when the network seems slow is to unplug the router and unplugged the cable modem. But it’s important to reconnect them in the right sequence.

While these boxes are unplugged, restart your computer. It’s always a good idea to shut down all the way to power off and then turn the power back on.

Next, plug the cable/DSL modem in and then wait about a minute. Now plug the power into the router. This allows the cable modem to reset and make a connection prior to getting the router powered back up. Once you’ve done that the next thing to do is to test the speed of your Internet and see if you’re getting what you’re paying for.

I often use one of these websites to test Internet speed.

http://www.speedtest.net/
http://www.dslreports.com/speedtest

There are also apps to do this on the iPhone or the iPad.

If you’re not getting the speed you’re paying for, it’s time to call your Internet service provider and see if they can do anything to help.

Network attached storage for the home: The good the bad

Screen Shot 2014-07-02 at 2.06.00 PMEverything you hear these days is about cloud computing. Articles about ways that people are moving to the cloud seem to be all over the internet.  Many are related to many products that can store your files in the cloud.  I have had the opportunity to try a couple of network attach storage devices recently and had one very good experience and one not so good.

So why would you want a home network attached storage device? Well that’s pretty easy to explain . If you’re using cloud storage today you’re likely limited by the amount of cloud storage that’s provided at a low-cost. You can definitely add additional storage for additional cost but that still does not solve the problem of having enough storage for what you want to put in the cloud. Vendors have realized this need and have developed network attached storage devices that you can put in your home and that will provide you a large amount of storage for a relatively low cost. You also have the added security of knowing that your cloud data is located where you put it. There is no risk of the cloud service going out of business or losing your data by doing things this way. It does not eliminate the need for a backup of your network device, but it does provide you that peace of mind in knowing that you have the data and are the only one with the data.Screen Shot 2014-07-02 at 2.06.27 PM

The first one I tried is made by Western Digital called My Cloud. Western Digital is a storage company that makes hard disk drives that are available at a local electronic stores so they were a natural to get into the network attached storage business. If you’re familiar with an external Western Digital hard drive,The My Cloud device will look very similar. On the back of this device you will find an ethernet connection port. This port connects to your local home network and allows you to configure the device for access outside the home. It also provides a USB3 port on the back of the device to allow you to either upload photos from a digital camera or connect directly to your computer.

Screen Shot 2014-07-02 at 2.10.13 PMSetting up the device only takes a few minutes. Once you install the included software on your computer it provides access to the device You then connect to the device across your home network to do the configuration. Once it’s connected you can map drive to your computer or you can access the files from the Internet. It’s very easy to work with and works very quickly. Western Digital offers mobile apps for the Android and iOS operating systems that which helps solve another problem many of us face: data fragmentation caused by having stored files on multiple devices. Install the apps onto your smartphones and tablets, and you can send all your media files over the Internet to your My Cloud.

One of the best parts of this network attached device is the cost. A 2 TB unit costs about $150. A 3 TB unit is about $200. Considering the cost of the drive itself is at least $100 to $150, these devices are are absolute bargains.

Unfortunately, I can’t be nearly as positive about the second device I’ve had experience Screen Shot 2014-07-02 at 2.28.24 PMwith. This unit was called Transporter from Connected Data. (recently purchased by Drobo). If you were giving points for looks, the transporter would certainly be a winner. It has a very odd shape and a beautiful blue light that pulses when date is being accessed. But looks are about the end of the good things I can say about transporter. The software for this product has been extremely buggy. I ‘ve also found that when I have the software running on my computer in noticeably slows my machine down. You might be able to forgive the company for some problems with the software, but the problems with the transporter only begin there.

The Achilles’ heel behind the beautiful looks of the transporter is that it uses only a 2 1/2 inch drive. As a result, the costs are much higher for drives in a transporter. Plus many small 2 1/2″ drives are truly intended for laptops and not intended for something that spins and runs 24 hours a day. The result of this drive choice is that transporters are expensive and slow compared to other devices. As an example, a 2 TB transporter costs $350. That’s a full $200 more than the Western Digital My Cloud.

Screen Shot 2014-07-02 at 2.28.35 PMOne of transporters claims to fame is that can it can automatically mirror your data to another transporter. In practice, this proved to be difficult to make happen. Configuration, firewalls, and general lack of ability for the device to see itself on the network made doing this difficult. When you add in the fact that to make this work you need a second transporter, you have to wonder what these people were thinking about in their design and selection of product features.

You have to wonder why a company like Drobo, that provides high-quality storage devices, would purchase transporter. Couple that with the fact that Drobo doesn’t even advertise transporter on it’s own website makes me believe that the purchase was more related to software or people that it was to the device itself.

From my experience with these two devices there is no choice. If you’re looking for a low-cost network attached storage device, to build your own cloud in your home, choose the Western Digital My Cloud. Steer away from transporter.   It really does not perform as well as it should, and costs way too much.

CamRanger: Remote DSLR Photos with all the bells and whistles

DeviceAndCaseWouldn’t it be nice if you could set your camera off remotely. Most DSLR cameras these days allow you to do that with a small hand-held infrared remote. The problem with doing it this way is you’re not able to see what you’re taking a shot and you’re not able to modify the settings of the camera based upon what you see. There are many ways to get around this using all sorts of computer applications but most of these require you to tether your camera to a computer. What if you could do it remotely from your iPhone.iPad, Android device, or computer?

CamRanger is a stand-alone device that connects to select Canon or Nikon DLSR cameras with a provided USB cable. It creates an ad-hoc WiFi network that your device (iPad, iPhone, iPod Touch, Android, or Mac or Windows computer) can then connect to. The free CamRanger app then enabled control of the camera. There is no need for a computer or existing Internet connection.  CamRanger creates its own Wi-Fi hotspot that your device connects to.  Once connected you run their software and it gives you complete control of the camera and also the ability to view what the camera seeing. You iPad_LiveView_Smallcan easily make changes to the controls of your camera, adjust any setting, and see the results through the camera lens.

In addition to simply letting you take pictures, the applications also provide the ability to do macro photography and focus stacking, take HDR images, and time-lapsed shots.  The real place that the CamRanger excels is its ability to be able to use literally any setting your camera has. If your camera can do it CamRanger likely supports it.

There are many products in the market today to do this similar function but in taking a look at CamRanger it seems to me that it may be the best at providing you control of your creativity. If you’re interested in photography and want to be able to set your camera off remotely and see what it’s taking a picture of, CamRanger maybe the tool for you.

Cloud Storage Options

Screen Shot 2014-05-28 at 10.08.05 AM
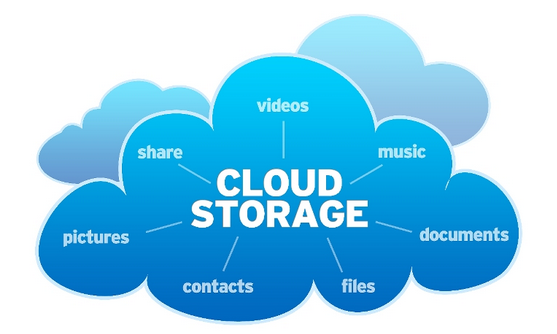
Where once there was one now there many. Cloud storage is a big fad of these days. Being able to store documents and have them accessible from any location on any device is not just nice but it serves A real business purpose. The ability to open documents created on one device on all your devices could be of great help to you. But how do you know which cloud storage system to use? With so many choices in the market today, it’s hard to make that decision. So let’s take a look at some of the major players in the market for class storage and see what their benefits and weaknesses are.

Before we look at each option individually, let’s get some of the preliminaries out-of-the-way. All of these storage options give you the ability to store documents locally on your computer and have them automatically synchronized to the cloud for use in other locations. All of the major players in the marketplace today support Macintosh, Windows, Android, iOS, and browser-based access. All of these major players also provide a free trial of their service with a small amount of cloud storage space. They also all allow you to purchase additional storage if you have the need. And finally, all of these players are major companies vying for your use of the cloud. In general they all do the same thing, but in practicality, some have benefits over others.

So let’s look at the major players:

Dropbox

Dropbox is been around for quite a while. As a result of his longevity, many more applications support the use of dropbox storage then any other cloud storage on the market. If any system can be called the standard for cloud storage, Dropbox is the one. You can store any kind of file in Dropbox, by either uploading to the Web site or adding it with the desktop apps. Those apps live in your file system so you retain copies of them on your computer for easy and fast use. Dropbox provides you 2 GB of free storage. I use dropbox every day for storing documents I want to have access on my iOS devices. It’s easy-to-use integrated into both Microsoft and Windows and Mac and works seamlessly with almost any other device type you might use. It also supports sharing files when you use tons of different kinds of devices.

Google Drive

If you already have a Google account, you can already access Google Drive Just go to drive.google.com and enable the service. You get 15GB of storage for anything you upload to Drive, including photos, videos, documents, Photoshop files and more. However, you have to share that 15GB with your Gmail account, photos you upload to Google+, and any documents you create in Google Drive. When it comes to a web-based client, Google drive truly excels. It’s web-based interface is the best of the bunch and its integration with Google services provides a high level of value. If you’re a Google user, Google drive is already part of the service your getting. Other than issues related to privacy, with Google in general, I think Google drive is probably the best service available today. I use Google drive every day to store documents and use them on multiple devices. This service is highly recommended.

OneDrive (formally SkyDrive)

If you are a user of Windows 8 and 8.1, you have OneDrive built into your operating system, where it shows up in the file explorer next to all of the files on your computer’s hard drive. But, anyone can use it on the Web or by downloading a desktop app for Mac and earlier versions of Windows, and OneDrive is also available for Android, iOS, Windows Phone, and Xbox. If you were a Windows user OneDrive makes perfect sense for you use. If you subscribe to Office 365 you get additional storage as part of that subscription plan. But if you’re not a Windows user or subscriber there’s probably not much reason for you to use OneDrive as your primary cloud storage location.

Box

Box has been around for a long time but has never really taken off with users as a class storage system. Box service’s list of sharing and privacy features were built specifically for business and IT users. Because it is not backed by one of the major players or integrated into many applications box is simply another option for you to look at for storage space on the web. Unless your an IT organization  looking for large amounts of storage in the cloud for your business, you likely need to look elsewhere for personal or small business needs.

But what about iCloud?

Apple has taken a slightly different tack to cloud storage. Like many things in the Apple universe, apples cloud storage is intended for use with their devices only. Apple seems to believe that cloud storage should be transparent and as a result provides iCloud that works in the background to store many things including documents. Unfortunately this only works really well if you’re using Apple products or products Apple supports (ie Windows).Apple provides the ability to synchronize contacts, calendars, bookmarks, and other information is used on a daily basis with iPhone, iPad, or computer. And let’s be clear, for this use, Apple does a great job. Storage and use of these pieces of information are absolutely transparent to the user one set up. But in my opinion Apple holds is proprietary system to close to itself to make iCloud be your only class storage system. I wholly recommend that for these items mentioned above iCloud is your best choice. But when it comes to storage of documents, iCloud is probably not your solution. If you’re to only use Apple products such as pages, numbers, and keynote, did Apple store system works perfectly but if you use other documents or want to be able to store other file types iCloud leaves you wanting. This seems to be because Apple integrates I call use into his applications making it just as transparent as the storage of your contacts. But unfortunately Apple does not allow other vendors to integrate iCloud so closely in their applications. So unless Apple applications are the only thing you use, one of the other cloud storage systems is better suited for document storage. My recommendation for iCloud use is that if you have iPads, iPhones, or Macs, use iCloud to stor ad sync contacts, calendars, bookmarks, and other personal information but use one of the other cloud document storage systems for storing documents in the cloud.

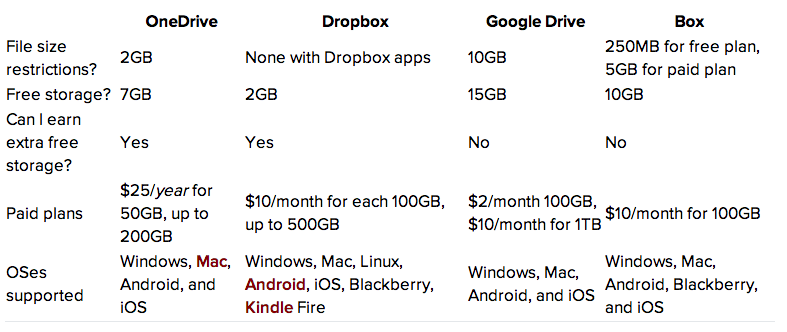
Below is a table from a Cnet article on cloud storage options.  If your are looking for more depth on the subject, take a look at this article.

Screen Shot 2014-05-28 at 10.06.38 AM

So what are my final recommendations? I think there’re many reasons to use more than one cloud storage system. Each system has integration in certain areas that the other systems lack. Story documents in more than one location can never be a bad idea. But the bottom line is that class storage systems are here to stay. If you’re not using them now you need to begin to look at them. With so many new devices using solid-state storage and providing less storage then you might have had on a machine with a spinning hard drive, there’re many reasons to start storing some of your information in the cloud.

Control tour DSLR from your Phone with TriggerTrap

Screen Shot 2014-04-22 at 11.30.36 AMMost people that have a DSL our camera Love to take creative photographs. Today’s cameras have so many built-in features it makes them difficult to learn to use and even harder to take those special creative shots. But what if you could use your iPhone or android phone to set up the photographic shot that you want to take?

TrigerTrap is an application for the iPhone or Android Phone that lets you setup specialized shots from your DSLR.  The app lets you do shots like:


  • Timelapse Mode
  • TimeWarp™ Mode
  • Sound sensor Mode
  • Shock & Vibration sensor Mode
  • LE HDR Mode
  • LE HDR Timelapse Mode
  • DistanceLapse™ Mode
  • Cable Release Mode
  • Star trail Mode
  • Bulb Ramping Timelapse
  • Wi-Fi Slave Mode
  • Wi-Fi Master Mode (trigger other devices running Triggertrap Mobile

It gives you the ability to compose to you want to take on the phone and then execute them on the camera. It can use sensors on the phone to set the camera off. For instance, you can set the phone to take a photograph every 200 feet that you have moved. If you’re driving in the car, the camera will go off using the GPS from the phone to determine in his move those 200 feet. You can also set up things like forcing the camera just go off whenever here’s a sound. You might want to set the camera to take a shot whenever he hears thunder but delay that shot A period of time to ensure it sees the lightning in the sky.  There are many different options you can do.

Screen Shot 2014-04-22 at 11.20.17 AMTo make this happen you download the free app from the app store or the Google play store.  But you need a specialized cable to connect from the headphone jack on the phone to the cameras remote-control. These cables are available from the company’s website for about $30.

If you’re looking for ways to set up interesting photographs with your DSLR, Take a look at TriggerTrap.  Since the app is free you can download it and look at the possibilities before ordering the cable for your particular camera.


Belkin Wi-Fi enabled WeMo Switch

Screen Shot 2014-03-28 at 3.39.21 PM The Belkin Wi-Fi enabled WeMo Switch lets you turn electronic devices on or off from anywhere. The WeMo Switch uses your existing home Wi-Fi network to provide wireless control of TVs, lamps, stereos, heaters, fans and more. Simply download the free WeMo App from the Google Play Store or the Apple App store, plug the switch into an outlet in your home, and plug any device into the switch. You’ll be able to turn that device on or off using your smartphone or tablet (running Android 4.0 and later or iOS 5 or higher). You can set schedules for your devices and control them remotely using a mobile internet connection. You can also add additional switches to your home to control more devices.

The Belkin WeMo Switch works with the free WeMo App to give you wireless control of your home appliances and electronics. Whether you want to turn on a light from your kitchen, front yard, or office, WeMo Switch has you covered.

Screen Shot 2014-03-28 at 3.40.17 PMTo get started, simply download the free WeMo App from the Google Play store or the Apple App store to your smartphone or tablet Next, plug the WeMo Switch into an outlet in your home and plug any device or appliance into the switch. Connect the WeMo Switch to your home Wi-Fi network and follow the onscreen instructions to complete the installation. Now you can turn your home electronics/appliances on or off from anywhere.

The Switch also operates over mobile Internet, which means you can control home devices from anywhere you have an Internet, 3G or 4G connection.

  • Turn electronics on or off — from anywhere.Screen Shot 2014-03-28 at 3.39.48 PM
  • Operates over Wi-Fi and mobile internet, at home and away.
  • You’ve already got everything you need: WeMo works with your existing Wi-Fi router and any iPod touch, iPhone, iPad – iOS 5 or higher.
  • Put your electronic devices on a schedule.
  • Modular system. You can add additional WeMo Switches easily, any time.
  • Control as much or as little of your home as you want to.
  • Plugs into any regular 120v wall outlet.
  • Intuitive, easy set up. Easy to use.
  • Free WeMo app.

These units are very easy to use.  I’ll bet you can think of a number of uses for modules like these.