
Mac users have the ability to create a password protected folder in the form of a disk image using Disk Utility. This video describes the steps.
Category Archives: Tips and Tricks
Windows 10 Settings and Controls
Many people who move from Windows 7 to Windows 10 have trouble changing system settings for their new operating system. Windows 10 has its settings located in a different place than Windows 7. But if you know how, you can continue to use Windows 7 style control panels to make settings changes.
Have you ever wanted to Dictate to your Mac?
Dictation is built into the Mac.
Go to System Preferences; Keyboard; and click the dictation tab.
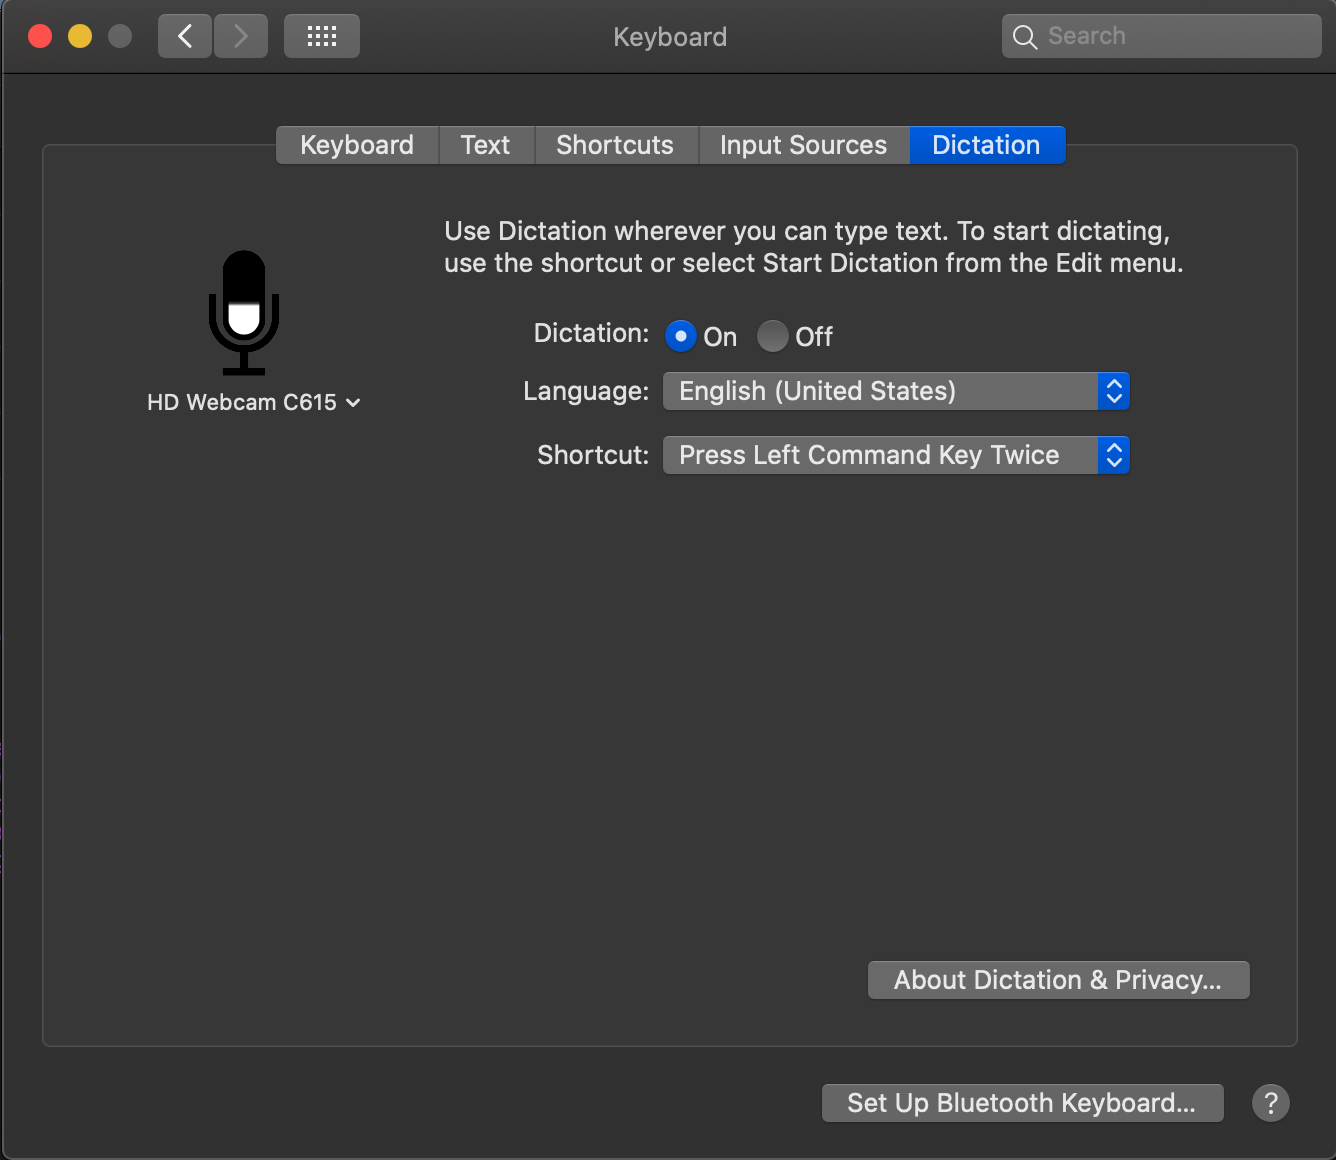
Turn on Dictation. Under the shortcut is where the trigger key is set. In the example above tapping the left side command key twice with turn on dictation.
To use this, click the cursor in any application you want to dictate into and press the left command key twice. After a second a little microphone will show up on the screen and you can start talking. Whatever you say, will get turned into text. I will warn you, I don’t believe the version of Dictation on the Mac is quite as good as that on the iPhone or iPad but it definitely works.
Here is the Apple Tutorial on making it work.
If you have a new Mac with a T2 security chip, you need to know this….
Most all new Macs have an imbedded T2 chip that performs many useful functions. The Apple T2 Chip is Apple’s second-generation, custom silicon for Mac. Apple uses this chip to improve video processing, process audio input, and most of all control the security of the machine.
At this point in time,the Apple T2 Security Chip is included in these new Mac computers:
- iMac Pro
- Mac mini introduced in 2018
- MacBook Air introduced in 2018 or later
- MacBook Pro introduced in 2018 or later
- MacPro when introduced in 2019
While we all have to applaud Apple for rating up security on the Mac from software only to a hardware/Software combination, we also need to understand the ramifications of doing just that.
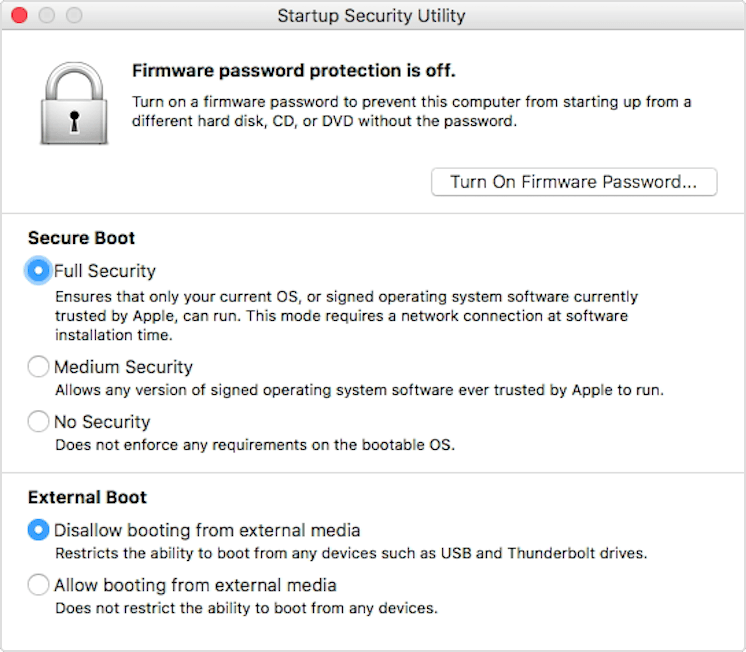
On these new Macs, Apple includes a new firmware based utility called Startup Security Utility. Startup Security Utility offers three features to help secure your Mac against unauthorized access: Firmware password protection, Secure Boot, and External Boot.
To open Startup Security Utility:
Turn on your Mac, then press and hold Command-R immediately after you see the Apple logo. Your Mac starts up from macOS Recovery. When you see the macOS Utilities window, choose Utilities > Startup Security Utility from the menu bar.
When you’re asked to authenticate, click Enter macOS Password, then choose an administrator account and enter its password.
Here is some detail on the options:
Firmware password protection
Use a firmware password to prevent anyone who doesn’t have the password from starting up from a disk other than your designated startup disk. To set a firmware password, click Turn On Firmware Password, then follow the onscreen instructions. Learn more about firmware passwords.
You can also use External Boot to prevent even those who know the firmware password from starting up from external media.
Secure Boot
Use this feature to make sure that your Mac starts up only from a legitimate, trusted operating system.
And now for the most important thing you need to know: External Boot
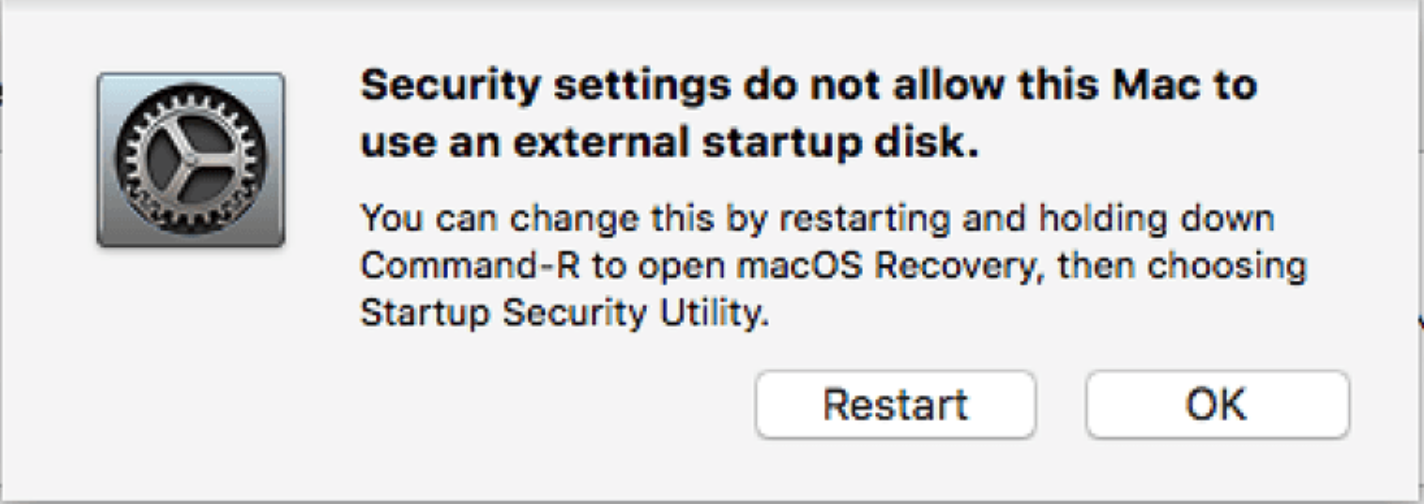
Use this feature to control whether your Mac can start up from an external hard drive, thumb drive, or other external media. The default and most secure setting is Disallow booting from external media. When this setting is selected, your Mac can’t be made to start up from any external media:
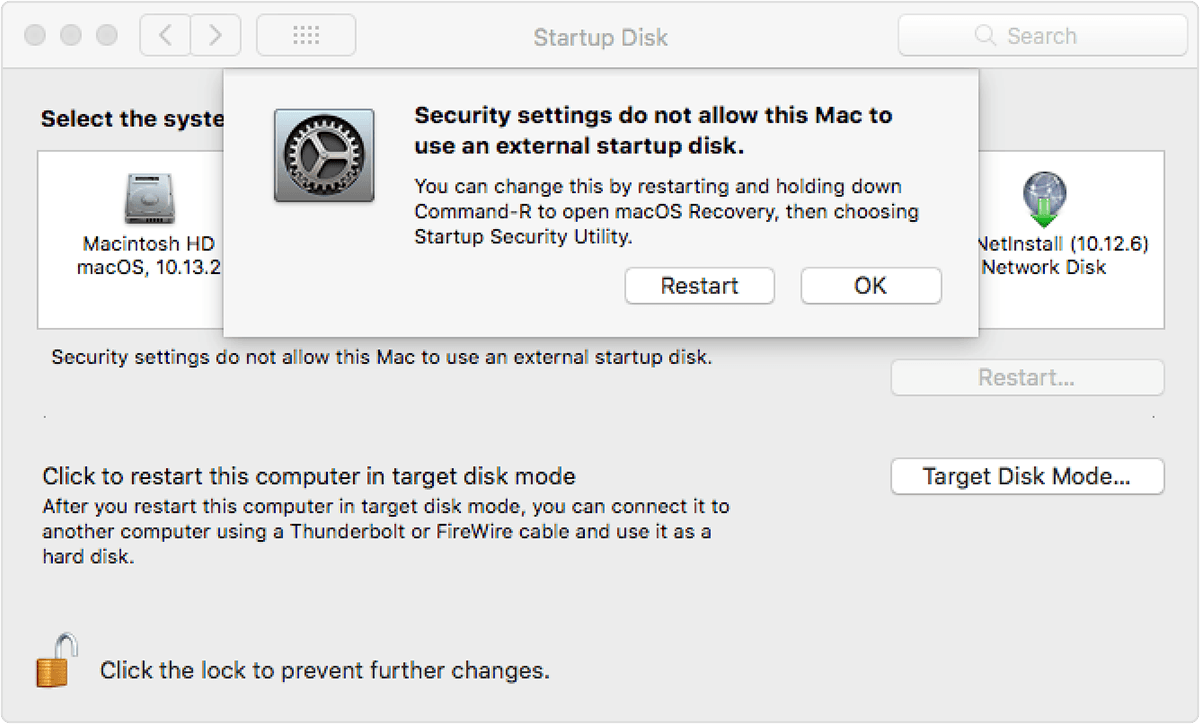
Startup Disk preferences displays a message that your security settings do not allow this Mac to use an external startup disk.
Startup Manager allows you to select an external startup disk, but doing so causes your Mac to restart to a message that your security settings do not allow this Mac to use an external startup disk. You’ll then have the option to restart from your current startup disk or select another startup disk.
If you are a good Mac user and are using two backups for your Mac, the second backup should likely be of the disk image type. Utilities like Caron Copy Cloner from Bombich Software make this easy to do and give you the ability to just boot to the backup in case of a disaster. Except if you are using a Mac with the T2 Chip. On those machines you need to set them to allow this type of boot.
To allow your Mac to use an external startup disk:
- Open Startup Security Utility.Select Allow booting from external media.
- Your Mac doesn’t support booting from network volumes, whether or not you allow booting from external media.
- If you want to select an external startup disk before restarting your Mac, quit Startup Security Utility, then choose Apple menu > Startup Disk.
- One important note is that to make changes to these settings you need the machine password.
If for some reason, you have forgotten the machine password, you seem to be out of luck to make these changes. Don’t confuse the machine password with the setting to turn on a firmware password. That is an additional layer of security above and beyond the machine password and FileVault disk encryption that you may be using.
Information included from an Apple Tech Note on the Startup Security Utility,
Tips on Working with Images in WordPress
 I have been blogging off and on for quite a few years. I was first encouraged to blog by a buddy of mine named Steve Mays. He worked for Learfield communication and was responsible for assisting clients to create blogs of their own mostly related to sports teams. Steve got me involved in a product called TypePad and over the years I moved on and off of other blogging platforms that are mirror footnotes in blog history. Finally, Steve recommended that I move to WordPress and that seems to have been one of the best recommendations I’ve had in my blogging history.
I was having coffee with Steve this week and talking about an individual I was working with to begin a new blog. After our talk, Steve wrote up some tips for me on about utilizing the WordPress Media Library. As I read through the tips I knew I wanted to post them on my blog for others to be able to get the benefit of. Steve graciously allowed me to do so.
WordPress Media Library Tips
The WordPress Media Library is powerful but it takes some thought and discipline to get the most out of it. And the time to start is when you launch the blog. Or before. The following are some things I’ve done right — and wrong — with images (and video) on my blog.
Use a good file naming convention. IMG_0850.jpg is not a good file name. Before uploading, take the time to rename the file and there’s no compelling reason to keep the file name short. In the example below I named the file “exhaust pipe 2apr2019-A” but could have just as easily named it “Land Rover original exhaust pipe brazing April 2, 2019 – A”. The more descriptive the better. And be consistent. Use the same format on all images.
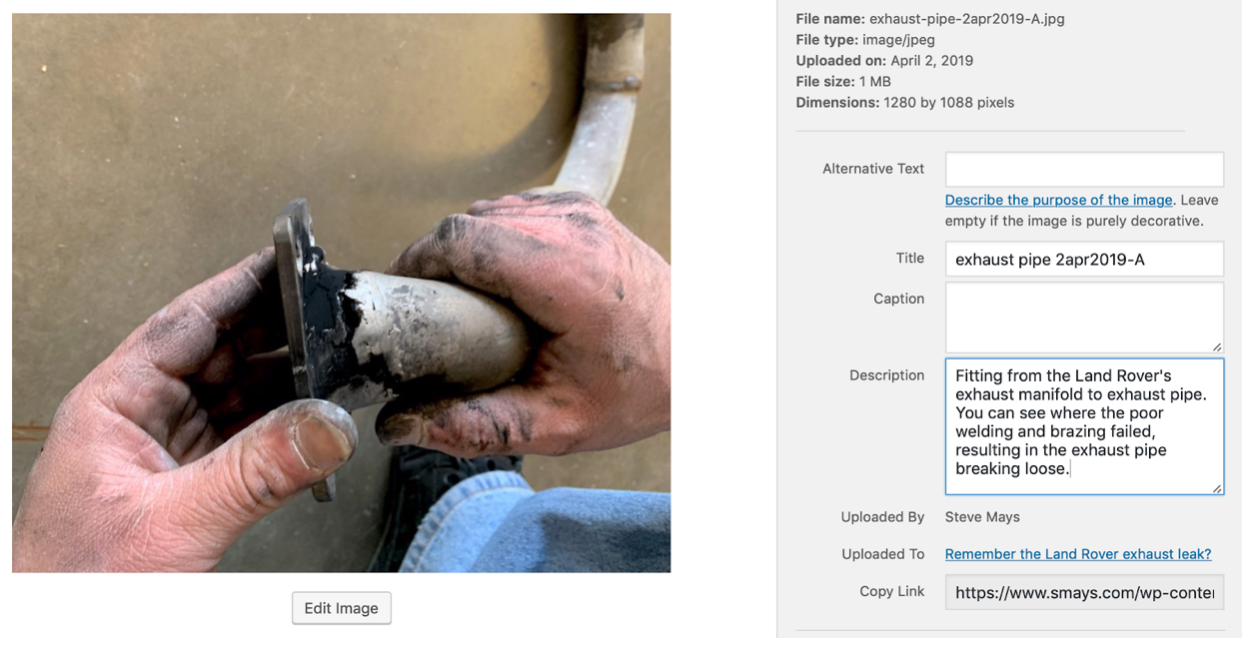
WordPress Media Library
The first field in the WordPress form below is “Alternative Text.” This is what one would see when they hovered their cursor over the image. Especially useful for those with vision problems. The link in the form has more on “alt text.”
Title. By default WordPress uses the file name but you can edit this to title the image as you choose. As far as I know this doesn’t appear anywhere on your blog post.
Caption. I tend not to use captions but this will depend a lot on how you display images in your post. I prefer to describe the image within the body of the post. I just don’t like the way way WP handles captions.
Description. I discovered this useful field relatively recently. I wish I had made better use of it from the first day I moved to WP. Again, as far I have been able to determine, the contents of this field does not appear with the image in the post. I started using this field when I discovered the text is searchable. So if you have 1,000 images in your library and would like to search for all with the phrase “Lake of the Ozarks” in the Description field, make sure you include that phrase. There’s no real tagging feature for images but you can use this field for that. For example, you might include the word *gear* for any photo of equipment; *John and Jane Doe* for each photo of John and Jane; *fall foliage* for… you get the idea.
The trick is to spend some time thinking about this at the very beginning because it’s a pain to go back and do this after you have hundreds of photos and videos. And you’ll be surprised how fast your media library grows. And how often you want to reuse an image you you posted months or years earlier.
What do the LEDs on my Orbi router and satellite mean?
A number of people I work with use the Netgear Orbing Router system. Overall, I am very pleased with the setup and performance of these units. Once in a while, you see colored lights coming from the router and like many things these days you just can’t find the documentation that comes with the devices to be able to determine what the lights mean. Netgear has a great FAQ on this that gets right down to telling you what the lights mean:
Router and satellite power button LEDs
Solid green. Your Orbi router and satellite are powered on.
Solid amber. Your Orbi router and satellite are rebooting.
Pulsing amber. You must reset your Orbi router and satellite to factory default settings.
Pulsing red. Your Orbi system might need attention. Contact support.
Satellite and router ring LEDs
Pulsing white. Your Orbi router and satellite are applying a configuration or updating their firmware.
OFF. Your Orbi router and satellite are working normally.
Router ring LEDs
Solid white. Your Orbi router is powering up.
Pulsing white. Your Orbi router is in factory default mode.
Pulsing magenta. Your Orbi router ring LED might pulse magenta for the following reasons: the WAN port link is down, the router is unable to get the IP address from the modem or ISP, or the router is unable to connect to the Internet.
Pulsing blue and magenta. The Internet connection is blocked because the traffic meter is configured to block Internet traffic when it reaches the limit you configured.
Satellite ring LEDs
Solid white. Your Orbi satellite is powering up.
Pulsing magenta. When your Orbi satellite’s ring LED pulses magenta for the first time, it means that your satellite is attempting to connect to your Orbi router. If the ring LED pulses magenta for more than one minute, it could be for the following reasons: the satellite lost the connection to the router or the satellite is unable to get an IP address from the router.
Solid magenta. Your Orbi satellite ring is solid magenta for 10 seconds if it is unable to obtain the IP address from the router.
Solid blue. If your Orbi satellite ring is solid blue for 10 seconds, the connection between your Orbi router and satellite is good.
Solid amber. If your Orbi satellite ring is solid amber for 10 seconds, the connection between the router and satellite is fair.
Whats New in MacOS 10.14 – Mojave
Like each update to MacOS, there are hundreds of new features. Here is a list of the ones I find particularly useful.
 Dark Mode
One of the major changes in Mac OS Mojave is the addition of the dark mode. Personally, I find a dark mode to be beautifully stunning. It lets the colors within applications pop and provides a completely new experience in using your Mac. You can turn this on in the system preferences general panel.
Photos from iPhone
Blink and you might miss it, but Mail hasn’t only gained a button that lets you place emojis in your message, but it gets another that lets you place an image. Click this, and you can choose to use an existing image or directly scan/capture a new one from your iPhone. This feature is also available from the desktop by Control-clicking on the desktop and selecting Import from iPhone. For this to work, you iPhone needs to be unlocked and on the same wifi network as your Mac.
Favicons
A favicon is small icon associated with a particular website, usually displayed before the URL in a web browser. Until this release, Safari did not provide support for these cute icons but with this release you can turn favicons. Within safari, go to preferences, tabs, and turned on Show website icons in tabs.
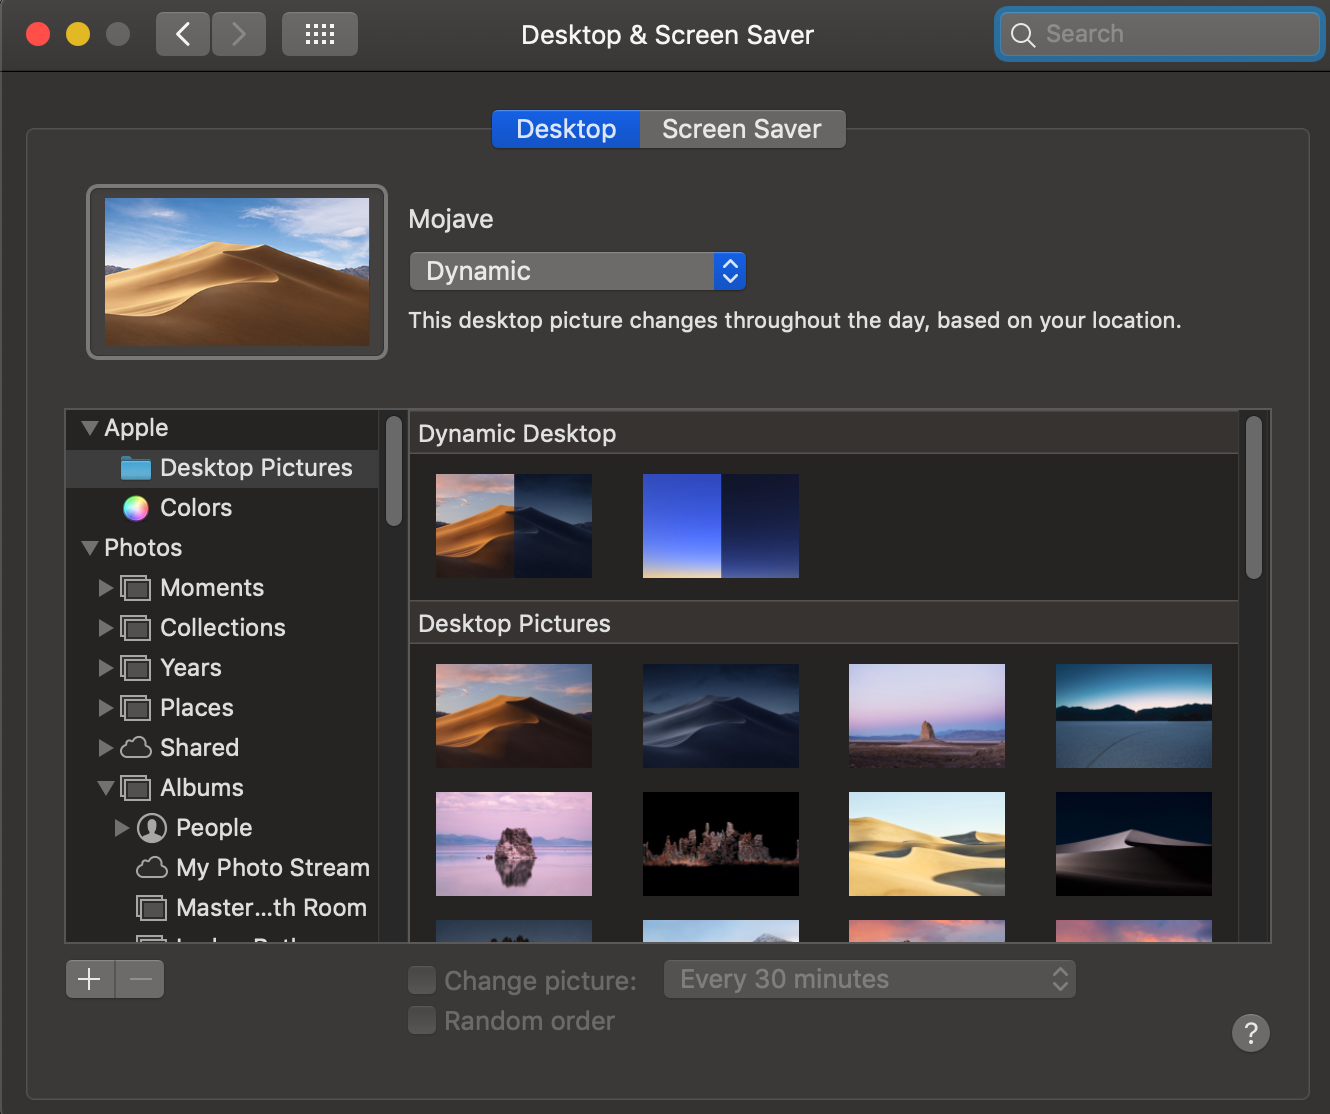 Dynamic Desktop
In system and preferences, desktop and screensavers, a new screen view exists for the desktop. It’s called dynamic desktops and Apple provides one related to the safari motif. The desktop picture on your screen changes over today as the sun would change in the Mojave Desert. A very nice look.
Stacks are a great addition to MacOS. This lets you store files of the same kind such as PDF, JPG, etc in a single icon on the desktop rather than cluttering your desktop with many files. To turn it on, Control-click on the desktop and select Use Stacks. In the same location you can set what type of stacks it creates. I find the Kind method to be the best for me.
Recent apps in the Dock
You’ll like this iPad feature. Icons for the three most recently used apps that you don’t already keep in your Dock will be made visible between the Settings and Downloads icons. This is enabled in System Preferences>Dock using the Show recent applications checkbox.
Automatically keep your Mac updated
Apple has moved Software Updates to its own dedicated pane in System Preferences. Open it, and you can ask your Mac to automatically check for and install software updates. You can also require it to automatically install app updates and security updates for you.
Tighter permissions
Apple has taken a step toward convincing Mac users not to cover their iSight cameras with tape when not in use by introducing new Security System Preferences that will tell you when apps request access to your Camera or microphone. Another security enhancement (available in Notifications) lets you decide if you want to always show notification previews for an app or if you want these to be made visible only when your Mac is unlocked. That’s useful if you work in a public place.
New Screenshot Tool
You have always been able to use Command-Shift-3 to capture the full screen or Command-Shift-4 to capture a section of the screen. In MacOS Mojave you can now use Command-Shift-5 to bring up a new screen shot tool. With it you can capture the entire screen, a portion of the screen, or a selected window. But this tool gives you the ability to capture a video of the screen or a portion of the screen. There are options to select where to save the file and to set a timer delay for the capture to happen.
New Mac App Store
Apple first debuted the Mac App Store in 2011 but has given it very little love since then. With macOS Mojave, it is giving the App Store a complete redesign similar to the one it debuted with iOS 11 last year. Apart from the new design, there’s a new Discover tab which would be updated on a weekly basis by editors over at Apple to help you discover new apps.
Gallery View in Finder
The Finder gets a new Gallery View in macOS Mojave which makes it easier to skim through your photos and videos. It also has metadata support which is displayed in the Preview pane so you can quickly see important details of a photo.
With this release, apple has begun the process of making iOS applications work on the Mac. Apple debutes 4 iOS apps in MacOS Mojave.
 Apple News App
macOS finally gets a dedicated Apple News app with a new design. There’s also a sidebar in the app for easy and quick navigation.
Home App
There’s a new Home app in macOS as well that will allow macOS Mojave users to control their HomeKit-enabled accessories easily.
Voice Memo
Another iOS app that is going to be available in macOS Mojave is Voice Memo. Using the app, one can quickly and easily record personal notes, meetings, and more. Voice Memos are also synced across all your devices using iCloud.
 Stocks
Finally, the Stocks app is also going coming to macOS Mojave with a brand new interface, personalized watchlist, and interactive charts. This app is basically the same as the iPad version of the Stocks application.
Here is a feature you can put in the Not quite there yet file….
Group FaceTime
Apple is debuting Group FaceTime with iOS 12 and the feature is also a part of macOS Mojave. With Group FaceTime, you can make a group video call comprising of up to 32 people. Even better, you can use Animoji, Memoji, stickers, and more while on a FaceTime call now.
This will be added soon in a MacOS update, likely at the same time it gets added too iOS.
I am sure there are quite a few more interesting things in Mojave but those are a few I find most useful.
iPhone X: Return to the first home screen
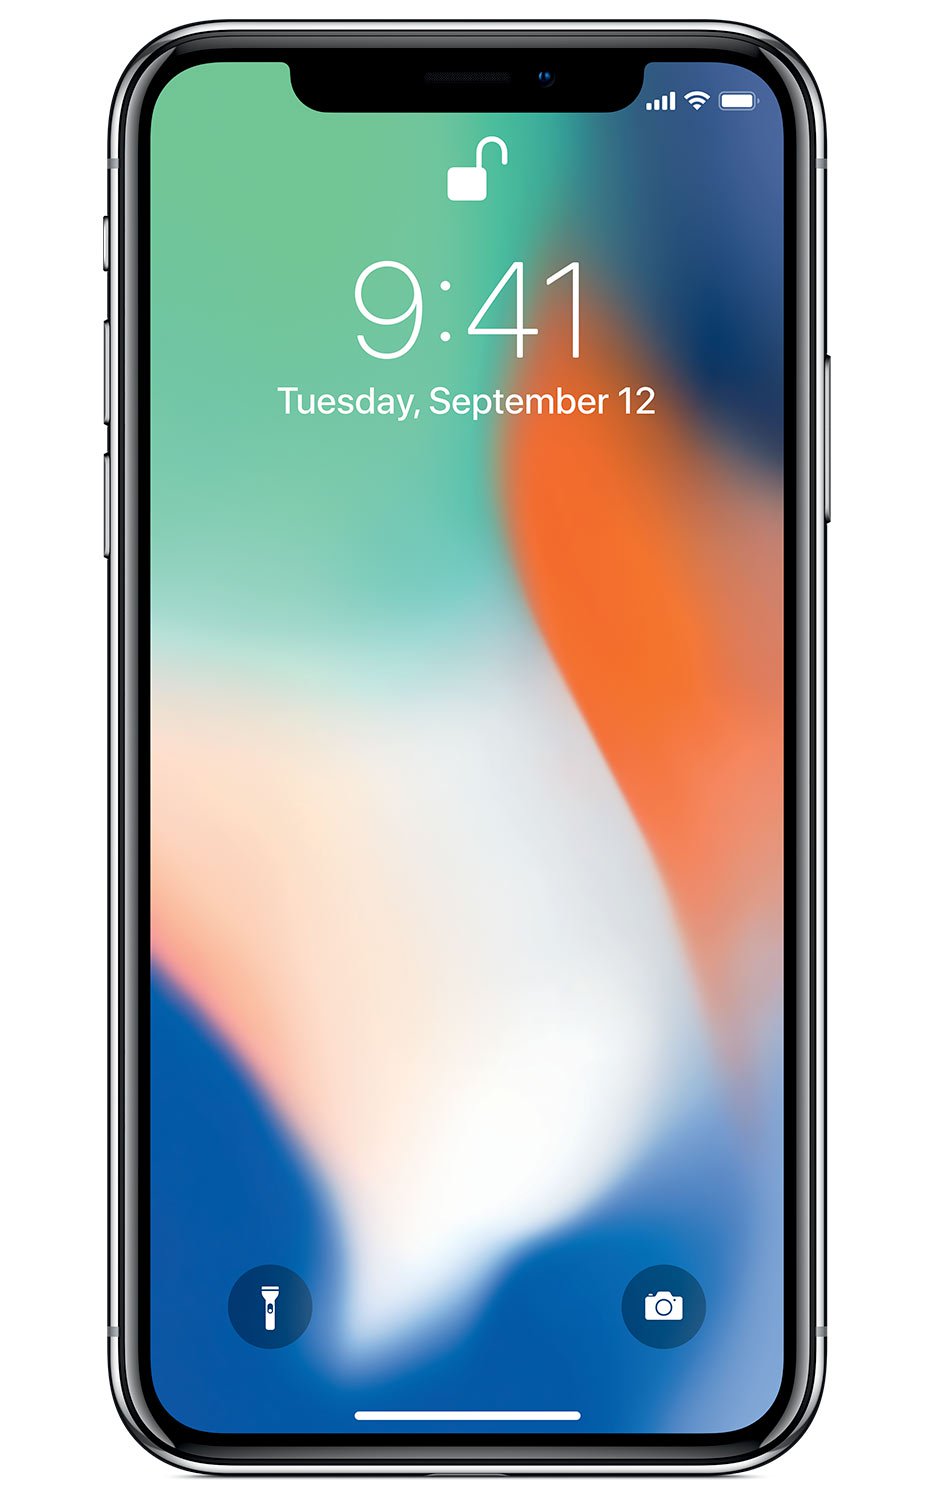 Many of us have been using iPhones for a long time. We all know if you’re on a home screen that is not the first page you can simply double tap the home button to return to the first page of your home screens. Unfortunately, without a home button, the iPhone X doesn’t work that way.
I I have always wondered if Apple provided a shortcut on the iPhone X to do that and so I looked it up. It’s amazing I haven’t run across this simple trick before.
On the iPhone X To move from any application back to the home screen all you have to do is quickly swipe up from the bottom of the screen. But if you’re already on one of your home screens, and you again swipe up from the bottom of the screen quickly, it takes you right back to that first page of your home screen just like double tapping the button did in the past.
I probably should’ve looked at trick up sooner.
Finding Topics for your Website
Over the years, I have setup a number of websites. Once I setup a site for someone the first question I usually get is “I don’t know what to write about”. There is a site that looks like it would be useful. Check out Answer the Public.
This site aggregates bing and google search history to tell someone what people are asking about a particular topic. For instance, look at a search for ‘Apple Pages’.

These are the “long tail” questions people are asking in Bing and Google about Apple Pages. This gives a site creator an idea of what people are looking for so they can taylor their site to give them what they want. The more of these questions you cover in your site, the better chance you will get the hits.
This can be very helpful in giving someone ideas for what to write about and post on your website.
Cleaning your iPhone cases and Covers
 For a long time I have been looking for something that would lead those rubberized covers and cases we use on our iPads and iPhones. Over the years I’ve tried many things from different types soaps to even running them through the dishwasher. Believe me, the dishwasher idea was not a good one. Unfortunately, most of the soaps I tries, while able to remove dirt, did a very poor job in also removing the oils from fingerprints.
Recently, I’ve run upon something that does a terrific job. The item called a Mr. Clean Magic eraser. It is a foam sponge that is infused with some light bleach. These items are great for removing scuffs off walls and stuck on dirt on a auto interior, but I had never considered them for cleaning the rubber coated iPad covers. I gave it a try and found it to do a terrific job. I simply moistened the sponge and vigorously rubbed the cover. Then I dried it thoroughly. I dont recommend this for the glass but it definitely Dows a great job on the covers.
The next time you need to clean one of those covers, give it a try.