I Just can’t keep track of my Mac’s Cursor….

Screen Shot 2013-05-17 at 12.06.56 PMDo you ever lose your curser on your big screen Mac? Perhaps it is hard to follow it on your new retna display laptop. There is an easy fix for this that allows you to make your Mac curser get larger.

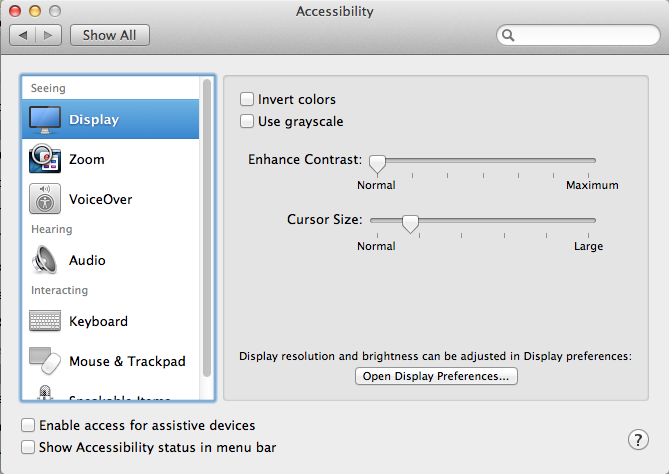
It’s easy to make your cursor bigger and it’s built into your Macs’s operating system. Open your System Preferences and select Accessibility. This system preference lets you choose from many accessibility options, including enabling access for assistive devices. The Display selection lets you change the size of the mouse pointer and adjust the contrast of your display.  The VoiceOver selection lets you toggle VoiceOver off and on and open the VoiceOver Utility. There are other options to let you turn on and configure display zooming and other display enhancement settings such as grayscale, enhanced contrast, and Black on White/White on Black. The Audio selection lets you control whether the screen will flash when an alert sound occurs. The Keyboard selection lets you turn Sticky Keys off and on and configure them, and also can set a delay to ignore accidental keystrokes. The Mouse & Trackpad selection lets you use the numeric keypad in place of the mouse, add a delay or maximum speed to the mouse pointer.

Once Accessibility is opened, you want to select the Display selection from the menu on the left. Under this option you see a slider to adjust the Cursor Size from Normal to Large. One nice thing about this slider is that the cursor grows as you slide so it is easy to see just how much larger you are making it.

While you are in this System Preference, you may want to try some of the many other options that are included there.

So if your big screen causes you to misplace the cursor, or your high resoloution Rgetna display cursor is just too small, you can easily fix it without having to install anythin on your Mac.

How to Migrate to a New Mac Quickly

imagesMoving large amounts of data requires a dedicated connection.  Firewire or Thunderbolt target disk mode is the answer for this.

Important: Unplug all other Thunderbolt or FireWire devices from both computers prior to using FireWire target disk mode. Do not plug in any FireWire devices until after you have disconnected the two computers from each other, or have stopped using target disk mode. If using Thunderbolt, it is ok to leave your Thunderbolt display plugged in.

To use FireWire target disk mode

  1. Make sure that the target computer is turned off. If you are using a MacBook or MacBook Pro as the target computer, you should also plug in its AC power adapter.
  2. Use a FireWire cable (6-pin to 6-pin) to connect the target computer to a host computer. The host computer does not need to be turned off.  If you do not have a firewire port on your new computer, Apple makes a Thunderbolt to firewire adaptor.
  3. Start up the target computer and immediately press and hold down the T key until the FireWire icon appears. The hard disk of the target computer should become available to the host computer and will likely appear on desktop. (If the target computer is running Mac OS X 10.4 Tiger or newer , you can also open System Preferences, choose Startup Disk, and click Target Disk Mode. Then restart the computer and it will start up in Target Disk Mode.)
  4. When you are finished copying files, drag the target computer’s hard disk icon to the Trash or Eject from the File menu (Mac OS X).
  5. Press the target computer’s power button to turn it off.
  6. Unplug the Thunderbolt FireWire cable.

The process of making this connection is exactly the same if you are using the migration wizard that runs on a new mac or using the Migration Assistant application in the Utilities folder.

Make iTunes 11 look like iTunes 10

Apple made many changes to iTunes 11 and some of them make it harder to find things. You can make iTunes 11 look more like iTunes 10.

How to Fix Safari when it is acting odd

Sometimes the Safari web browser just will not perform the web viewing you are trying to do. Many times, resetting Safari will fix this problem

Repairing your Permissions on a Mac

Sometimes you see that spinning beach ball on your mac and things get very slow. Here is the first thing to try to fix it.

Change screenshot format on your Mac

Ever thought you would like the built in Mac screenshots to be in pdf format? Here is an easy way to do it.

First off, open the Utilities folder inside Applications and double click on Terminal. Now, don’t get to concerned about the command line. You are only going to type one command. At the prompt, type:

defaults write com.apple.screencapture type pdf

Don’t want pdf?  I tested tiff, jpg and png is the default. You’ll then have to logout/login to make the change take effect.